Showing posts with label Tips and Tricks. Show all posts

Sunday, May 13, 2012

What are the Different ways to Shutdown PC & Shutdown XP Faster??

Different ways to shutdown your pc

There are so many different ways to turn off your Windows XP computer, let's look at some of them:


1. The standard approach - click the Start Button with your mouse, then select the Turn Off menu and finally click the Turn Off icon on the Turn Off computer dialog. blink.gif

2. Press Ctrl+Esc key or the Win key and press u two times - the fastest approach.

3. Get the Shutdown utility from Download.com - it add the shut down shortcuts for you. Else create them yourself using approach 4.

4. Create a shutdown shortcut on your desktop. Right click on the desktop, choose New Shortcut and type shutdown -s -t 00 in the area where you are asked to specify the location of the program file. Now you can just double click this icon to turn off the computer. The best location would be your quick launch bar.

5. Press the Win key + R key to open the run window. Type shutdown -s -t 00. [s means shutdown while t means the duration after which you want to initiate the shutdown process].

If some open processes or application won't let you turn off, append a -f switch to force a shut down by closing all active processes.


6. Win+M to minimize all windows and then Alt+F4 to bring the Turn Off computer dialog.

7. Open Windows Task manager (by right clicking the Windows Task bar or Alt+Ctrl+Del) and choose Shut down from the menu. Useful when the Windows are not responding.

8. open task manager--->click on shutdown--->hold the ctrl key and click on Turn off::::::: pc will be turned off in 3 secs.. fastest method other than hard shutdown


Shutdown XP Faster..!!
Like previous versions of windows, it takes long time to restart or shutdown windows XP when the "Exit Windows" sound is enabled. To solve this problem you must disable this useless sound.

1. Click Start button.
2. Go to settings > Control Panel > Sound, Speech and Audio devices > Sounds and Audio Devices > Sounds.
3. Then under program events and windows menu click on "Exit Windows" sub-menu and highlight it. Now from sounds you can select, choose "none" and then click Apply and OK.
4. Now you should see some improvements when shutting down your system.

Solution if Email is overload? Try Priority Inbox - Official Gmail Blog


New update by Gmail Email overload? Try Priority Inbox - Official Gmail Blog.

It is normally seen that your mailbox is full of unwanted mails and you are not able to check all the mails then how to identify which mail is important & which are not? So Here is the solution now...

Gmail introduced new feature called Priority inbox.

Through this feature you can easily identify important mails which you should read.
It is basically based on the mails which you normally read & reply.

And If you want to use those mails then you can mark with star and choose option of less important or more important..

Just watch the video , you will understand everything.
Gmail rocks...

How to watch movies in MS Paint?


> Open your favorite movie palyer and play the move

> Hit "PrintScreen", keep playing the movie in the player, dont stop it.

> Open MsPaint.

> Select "Edit>Paste" Or Hit "CTRL+V"

> Now You can watch movies in Paint!

> But there are no Pause, Next, Previous, Stop etc. buttons

> Experiment with other formats too, it doesn't play DivX , Flash movies, etc.

How to search with your voice in Android?


How to search with your voice in Android?

Android is a amazing platform with unlimited features. But to exploit its opportunities the user need to understand its possibilities.

Google’s search app allows you to search the web or your phone just by talking. Tap the microphone next to the search bar and record your search. It’s awesome and incredibly accurate.

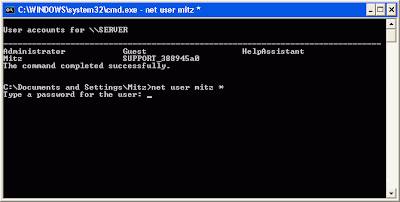
How to change anyone password in xp without knowing it?- Tips and Tricks


If you log in to admin account and want to change password of admin or user then do the following steps

1. click start then run type cmd in it and hit enter command prompt opens

2. type net user it will show you user present in xp

3. type net user desired username new password and press enter all done 

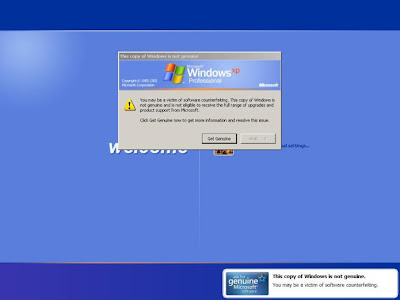
Make Xp genuine


MaKe Xp GeNuIne in 1 SeCond!


JUST COPY THE FOLLOWING CODE IN A NOTEPAD AND SAVE IT AS"GENUINE.REG"AND RUN THAT REG FILE!


Windows Registry Editor Version 5.00


[HKEY_LOCAL_MACHINE\SOFTWARE\Microsoft\Windows NT\CurrentVersion\WPAEvents]
"OOBETimer"=hex:ff,d5,71,d6,8b,6a,8d,6f,d5,33,93,fd
"LastWPAEventLogged"=hex:d5,07,05,00,06,00,07,00,0f,00,38,00,24,00,fd,02


[HKEY_LOCAL_MACHINE\SOFTWARE\Microsoft\Windows NT\CurrentVersion]
"CurrentBuild"="1.511.1 () (Obsolete data - do not use)"
"InstallDate"=dword:427cdd95
"ProductId"="69831-640-1780577-45389"
"DigitalProductId"=hex:a4,00,00,00,03,00,00,00,36,39,38,33,31,2d,36,34,30,2d,\
31,37,38,30,35,37,37,2d,34,35,33,38,39,00,5a,00,00,00,41,32,32,2d,30,30,30,\
30,31,00,00,00,00,00,00,00,00,0d,04,89,b2,15,1b,c4,ee,62,4f,e6,64,6f,01,00,\
00,00,00,00,27,ed,85,43,a2,20,01,00,00,00,00,00,00,00,00,00,00,00,00,00,00,\
00,00,00,00,00,00,00,00,00,00,00,31,34,35,30,34,00,00,00,00,00,00,00,ce,0e,\
00,00,12,42,15,a0,00,08,00,00,87,01,00,00,00,00,00,00,00,00,00,00,00,00,00,\
00,00,00,00,00,00,00,00,00,00,00,00,00,00,00,00,00,94,a2,b3,ac
"LicenseInfo"=hex:9e,bf,09,d0,3a,76,a5,27,bb,f2,da,88,58,ce,58,e9,05,6b,0b,82,\
c3,74,ab,42,0d,fb,ee,c3,ea,57,d0,9d,67,a5,3d,6e,42,0d,60,c0,1a,70,24,46,16,\
0a,0a,ce,0d,b8,27,4a,46,53,f3,17


Its All.

IT IS 100% TEATED AND WILL WORK SURE!
By making your XP genuine,u can now install softwares on ur pc
such as Windows Media Player 11 , Internet Explorer 7 , etc.


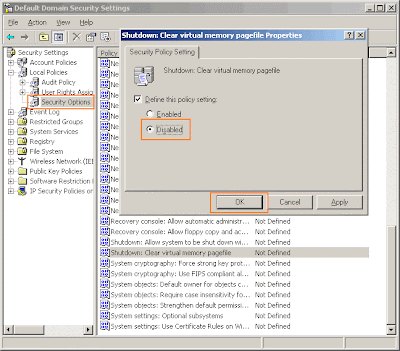
WinXP Clear Page file on shutdown

Go to Control panel Administrative tools, local security policy.
then goto local policies ---> security options.

Then change the option for "Shutdown: Clear Virtual Memory Pagefile"

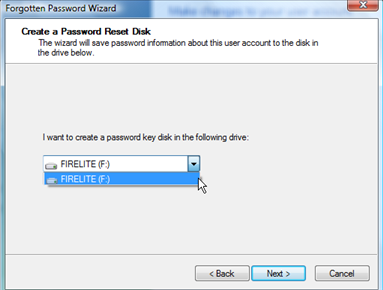
Create a Password Reset Disk


If you’re running Windows XP Professional as a local user in a workgroup environment, you can create a password reset disk to log onto your computer when you forget your password. To create the disk:

1.Click Start, click Control Panel, and then click User Accounts.

2.Click your account name.

3.Under Related Tasks, click Prevent a forgotten password.

4.Follow the directions in the Forgotten Password Wizard to create a password reset disk.(u can use pen drive also)

5.Store the disk in a secure location, because anyone using it can access your local user account.

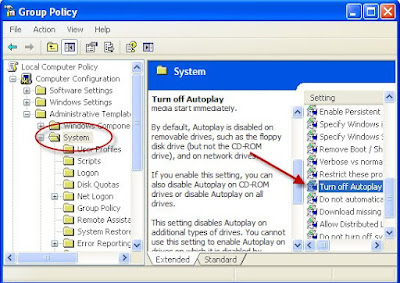
Disable CD Autorun

( WinXP PRO Only)

1) Click Start, Run and enter GPEDIT.MSC

2) Go to Computer Configuration, Administrative Templates, System.

3) Locate the entry for Turn autoplay off and modify it as you desire.

Right position to work on the Computer? - with images

For everyone who works daily on a computer. The mistakes daily mouse and keyboard usage will result in Carpal Tunnel Syndrome! Use the mouse and keyboard correctly. 
View below for the RIGHT TECHNIQUES.. ....

Correct way to work on the Computer


Correct way to work on Keyboard


Correct way to work on Mouse

Hand Exercises for Carpal Tunnel Syndrome


What are the things need to do before selling your iPad? - 4 simple things


So, eager to trade up for the new iPad? Well, the good news is that you can still get a decent chunk of change for your old one, provided you’ve kept it in relatively good shape. Here’s a couple ways to get a few extra pennies for last year’s iPad, plus some tips for keeping your iPad data safe and secure.

1. Back it up, using either iTunes or iCloud backup

Don’t even think of giving away your iPad without first making a backup copy of its settings and data.

Backing up your iPad is as simple as syncing it with iTunes—and indeed, each time you sync your iPad, iTunes makes a backup complete with all your settings, application data, your iMessages, and any snapshots or video clips in your Camera Roll.

You can also back up your iPad using Apple’s iCloud service, which automatically (and wirelessly) backs up your iPad settings and data to Apple’s remote iCloud servers. 

Make sure you have a recent iPad backup—either in iTunes or iCloud—before wiping your iPad's memory.

Once you get a new iPad (assuming that’s the plan, of course), you’ll be able to restore the backup of your old iPad from either iTunes or iCloud; just follow the prompts as you’re setting up your new tablet. 

One thing to keep in mind is that an iPad backup file on iTunes or iCloud doesn’t include music, movies, TV shows, music videos, or your actual iPad applications. Instead, you’ll have tore-download them from the iTunes store (your iPad should do this automatically during the backup restoration process).

And what about music and videos that you didn’t purchase from iTunes? Well, you’ll need to transfer them manually from wherever you’d originally synced them, or (for music only) via Apple’s new iTunes Match service.

2. Wipe it completely

Now that you’ve backed up your iPad, you’ll need to wipe its memory completely clean—that is, unless you like the idea of letting your iPad’s new owner poke through all your email, contacts, photos, and other personal information.

Here’s what you do:
  • First, make absolutely sure you’ve backed up your iPad. If you’re using iTunes for your backups, click Preferences from the iTunes menu, click the Devices tab in the window that appears, then make sure you see a recent backup of your iPad in the “Device backups” list. If you’re using iCloud, go to your iPad, tap Settings, iCloud, Storage & Backup, and check the date of your latest backup at the bottom of the screen. 
  • All set? Go back to the Settings menu on your iPad and tap General, Reset, then “Erase All Content and Settings.”
  • Within a few minutes (or more, depending on how much data is on your iPad), you should be looking at a gray screen that reads “iPad,” just as if you were switching it on for the first time. And with that, you’re done.
3. Find the original box, sync cable, and charger

No, you don’t need your original iPad box to sell your old iPad, but it’ll help sweeten the deal once you find a willing customer. More important, though, is the white syncing cable—the one with a USB plug on one end and Apple’s 10-pin connector on the other—and its accompanying charger, a pair of key accessories that sells for $30 through the Apple store.

4. Clean the screen, but not with Windex


Sure, go ahead and clean the iPad's screen—but no water, please!

The nice thing about the iPad’s aluminum shell and durable glass screen (well, relatively durable, anyway) is that they both shine up like a new penny. A gentle wipe with (as Apple recommends) a soft, dry cloth should do the trick.

Whatever you do, though, don’t use a damp cloth, nor should you ever spray your iPad’s screen with glass cleaner. The iPad is deathly allergic to all things liquid, and water damage isn’t covered by Apple’s standard one-year warranty. Just don’t do it.

What are the essential Facebook tips and tricks?


Don’t like getting tagged in someone else’s Facebook photo? Had it up to here with the ticker? Want to change the privacy settings for all your old posts in one fell swoop? Read on for 10 tips that’ll make life on Facebook easier—and more private.

How to make your Facebook news feed default to “most recent” stories first?
Tired of seeing “highlighted” stories at the top of your Facebook news feed? Here’s a browser bookmark that’ll keep your Facebook feed in chronological order.


You can limit who sees the posts from "Open Graph" Facebook apps right before you install the app onto your account.

How to keep Facebook’s new “Open Graph” apps from (over-)sharing your activity?
Want to keep your reading, listening, and streaming habits to yourself? Here’s how to stop Facebook’s new, oversharing Open Graph apps from spilling the beans.

How to restrict access to all your old Facebook profile posts?
You can lock down access to all your wall posts in just a few clicks—but once you do it, there’s no easy way to undo it.

You can always bring the ticker come back, if you really miss it.

How to completely hide the Facebook ticker?
Some people love it, most seem to hate it, but there was no real way to completely hide the Facebook ticker—well, until now, anyway.

How to send a photo from your iPhone directly to Facebook?
Wish you could post a fresh snapshot from your iPhone onto your Facebook wall without having to open the Facebook app? Here’s how to do it.


If you haven't turned "Timeline Review" on yet, you should—pronto.


How to turn on Facebook’s “Timeline Review” feature?
Facebook’s improved privacy controls let you check any photo you’ve been tagged in before it pops up on your Timeline—but you’ll have to tweak your settings first.


How to “unfriend” a Facebook friend without really unfriending them?
Want to keep a marginal Facebook pal at arm’s length without actually hitting the unfriend button? Read on for a couple of ways to do it.


Just unsubscribe from a friend's comments and "likes" to keep random photos out of your news feed.

3 ways to declutter your Facebook news feed
Seeing too many links and photos in your Facebook news feed from perfect strangers? Read on for three ways to whip your bloated news feed into shape.

4 ways to keep Facebook comments private
Don’t like the idea that everyone (or seemingly everyone, anyway) on Facebook can see the comments you’ve left on your friends’ posts? You’re not alone.

How to control who can post stories to your Facebook Timeline—and who can’t?
Don’t want any and all of your Facebook friends marking up your Timeline—or sifting through Timeline stories posted by others, for that matter? No problem.

How to zoom in on your iPhone’s entire display?


You probably know how to zoom in on a web page in the iPhone’s Safari browser by “pinching” the page with your fingertips, but what if you want to magnify the entire iPhone screen, including even the digital clock and battery icon at the top of the display?

The trick, as it turns out, is a three-finger tap—but you’ll have to tweak a key iPhone setting first.

Just change this one setting on your iPhone to magnify its screen with a three-finger double-tap.

Ready to give it a try? Here we go…
  1. From your iPhone home screen, tap Settings, General, Accessibility, Zoom, then switch Zoom to “On.”
  2. Now double-tap the screen with three fingers at once, and well … zoom!
  3. Want to pan around your zoomed-in iPhone display? Just swipe around as your normally would, expect using three fingertips at once rather than just one.
  4. You can also adjust the magnification level by double-tapping and holding with three fingers (it’s a “tap” and a “hold,” not a double-tap and then a hold), then dragging your fingertips up (to increase the zoom level) or down (to decrease the magnification).
  5. Had enough? Double-tap the screen with three fingers again to make it jump back to the normal view.

Note: This tip also works on the iPad and the iPod Touch.

Wednesday, May 2, 2012

How to download all your Facebook posts, photos and videos to your PC?


Want a copy of each and every status update you’ve ever posted to Facebook, along with all your photo albums, videos, chats, and even comments? All you have to do is ask.


Facebook has a “Download Your Information” feature that will pack all your shared content into a digital trunk of data, which you can then download to your desktop.


The file includes pretty much everything you’ve ever shared on Facebook—we’re talking wall posts, comments on your wall posts, photos, video clips, Facebook messages, chat transcripts, and the names of your friends.

Facebook has also announced that starting soon, the information packed into your digital Facebook archive will include any previous names you’ve used on Facebook, all your prior friend requests, and even the IP addresses of every computer, smartphone or tablet you’ve ever used to log into your Facebook account.

So, what isn’t in your Facebook archive? The personal information of your Facebook friends (except for those who allow their email addresses to be shared), as well as their own posts and photos. Also not included in the archive: comments you’ve made on other people’s posts.

Requesting an archive of all your Facebook information is easy. Here’s how it works:

  • From any Facebook page, click the little down-arrow in the top-right corner and select “Account Settings” from the drop-down menu.
  • Next, find and click the “Download a copy of your Facebook data” link at the bottom of the “General Account Settings” page.
  • You should land on a page that describes all the information your download will include, along with a warning to think twice before sharing your Facebook archive with just anyone. Ready to proceed? Then click the green “Download” button.
  • Got any laundry to do, checkbooks to balance, or lawns to mow? Now’s the time, because it could take anywhere from a few minutes to several hours for Facebook to collect and pack up all your shared data. (For me, five years of posts and photos took about an hour and a half.)
  • Once your archive is finally ready, Facebook will send you an email. Click the link in the message, and you’ll arrive at a Facebook page where you’ll be asked to re-enter your password.
  • All set? Then go ahead and click the green “Download Archive” button to download the file (which should be labeled with your Facebook user name) to your system. Remember to note the location of the file on your hard drive; to make locating the archive easier, you might want to download it straight to your desktop.
  • Open the archive folder, then double-click the file named “index.html.” Your web browser will open, and you’ll see a bare-bones page with your Facebook profile, complete with links to your wall posts, photos, videos, friends, and Facebook messages. Keep in mind that these pages aren’t living on the Internet; instead, they’re sitting “locally” on your computer’s hard drive, and only you can see them (well, unless you share them with someone else, that is).
  • To find your actual photo and videos files, just open the “photos” and “videos” folders in your downloaded Facebook archive, and voilà—there they are, ready to be clicked and dragged anywhere on your hard drive.

Now that you’ve downloaded an archive of your Facebook info, what if you want to wipe all your data, photos, and videos off Facebook? To do so, you’ll need to delete (and not just deactivate) your Facebook account.

Monday, April 30, 2012

What are the things to know before unlocking your AT&T iPhone?


Want to use your AT&T iPhone with another carrier, such as T-Mobile or an overseas network? If so, good news: AT&T will now “unlock” your iPhone for use on another compatible wireless carrier, although there are a few “ifs,” “ands,” and “buts” to keep in mind.

Read on for 5 things you need to know about getting your AT&T iPhone unlocked, starting with…

1. What’s the difference between a “locked” and “unlocked” phone, anyway?


When you buy an iPhone (or just about any phone, for that matter) from a wireless carrier like AT&T, the carrier will typically “lock” the phone to its network—meaning you won’t be able to simply pop in a SIM card from a competing network (like, say, T-Mobile) and start chatting away.

That said, your carrier may also unlock your phone once your contract is partially or completely expired, so long as your account is in good standing (i.e., you’ve been paying your bills on time). Once unlocked, you can use your iPhone on any compatible GSM network, provided you’ve got a working SIM card for the network in question (more on that in a moment).

You can also buy an unlocked iPhone directly from Apple, but they’re outrageously expensive—as in $549 and up, versus $99 for an 8GB iPhone 4 with a two-year contract.


2. AT&T won’t unlock your iPhone unless you’re completely out of contract


In the case of AT&T and the iPhone, AT&T will only unlock your handset if a) you’re either completely out of your two-year contract or b) you’ve agreed to pay an early termination fee (about $350 or so, depending on how much time is left on your service agreement).

I just checked myself and found out I need to wait a few more months before my AT&T contract expires, so no unlocking for me (or at least, not yet).

To check if your iPhone is eligible for unlocking, just dial 611, press “0″ for a customer service representative, and ask.


3. Getting your iPhone unlocked isn’t an instantaneous process


It could take a day or more between the time you call and ask AT&T to unlock your phone and when you actually get a confirmation email (a copy of which you can see here, courtesy of AppleInsider)—think 24 to 48 hours, according to the AT&T representative I spoke to.

Once AT&T approves your iPhone for unlocking and Apple pulls the switch on its end, you’ll need to connect your iPhone to your PC or Mac and then sync it with iTunes.

If all goes well, a message should pop up on your iPhone that says your handset has been successfully unlocked. Problems? Check out Apple’s troubleshooting tips.


4. You’ll need a new SIM card to use your unlocked iPhone on another carrier

So, want to use your unlocked AT&T iPhone on T-Mobile, or another GSM-based carrier? No problem; all you need is a working SIM card from your chosen carrier. Just pop out the iPhone’s SIM tray with a paper clip, replace the little plastic SIM card, and you’re in business.

Standard SIM card and the iPhone 4S's smaller micro-SIM, compared

OK, so how do you get a new SIM card, then? Easy; just call the carrier you want to use your iPhone with and ask, order one online, or buy one over the counter.

Remember that you’ll need a voice and/or data plan associated with your new SIM—and yes, you can opt for a pre-paid, no-contract plan if you wish.

Keep in mind that the iPhone 4 and 4S both use a smaller “micro-SIM” rather than the standard, full-size SIM found in earlier iPhone models. T-Mobile, for example, offers a micro-SIM card specifically for newer iPhones; just make sure to request one when placing your order.


5. Even once you’ve unlocked your AT&T iPhone, it still won’t work on Sprint or Verizon Wireless


That’s because Sprint and Verizon both run CDMA cellular networks—a technology that’s incompatible with the GSM networks operated by AT&T and T-Mobile.

Now, technically speaking, the new iPhone 4S is a so-called “world phone” that will connect to both CDMA and GSM networks; however, Apple has made it very clear that even an unlocked iPhone 4S won’t work on a CDMA carrier.

Sunday, April 29, 2012

How to restore an iCloud backup of your old iPad to your new iPad? - Easy Way


So, you’ve got the latest and greatest iPad, and you want to transfer everything on your old iPad—including your apps, contacts, calendars, music, and videos—to your new one. What’s the best way to do it?

My suggestion: try Apple’s iCloud Backup utility, which makes nightly copies of your iPad’s settings, messages, camera roll, and even its wallpaper, and wirelessly saves them to a giant iCloud server bank.

iCloud Backup is an essential tool for preserving your iPad, iPhone, or iPod Touch data in case something disastrous befalls your precious iDevice, but it also makes for a handy, relatively painless way to move from (for example) an old iPad to a new one.

I’ve already demonstrated how to restore an iCloud backup to an iPhone, but the arrival of my iPad 3—er, the “new” iPad—presents a nice opportunity to document how to use iCloud Backup to transfer settings and data from an old iPad to a brand-spanking new one.

So, ready to get started?

Tap "Back Up Now" to create a fresh iCloud backup of your old iPad.

1. The first step, of course, is making sure you have a recent iCloud backup of your old iPad. (Don’t have an iCloud backup at all yet? Visit iCloud.com, set up a free account, sign in on your iPad, then tap Settings, iCloud, Storage & Backup to get started.)

From your iPad home screen, tap Settings, iCloud, then Storage & Backup. At the bottom of the page, you’ll see a date for your last iCloud Backup, and just above it, a button labeled “Back Up Now.” Unless your latest iCloud backup for your iPad is less than an hour old or so, you should probably go ahead and tap “Back Up Now” to get a fresh backup before moving ahead.

2. Do you have any videos or music on your iPad that you didn’t get from the iTunes Store? Or how about photo albums from iPhoto? If so, they’re probably sitting in iTunes (or iPhoto, in the case of photos) on your PC or Mac—and if that’s the case, I recommend you sync your iPad with iTunes one last time, either via USB or Wi-Fi. (iTunes Match users will be able to download all their music from iCloud.)

3. All set? Now, pull your new iPad out of its box, slide the “slide to set up” slider, pick a language (English, Spanish, French, etc.), a country, and decide whether to enable the iPad’s “location services” (which let your various apps pinpoint your location).

4. Connect to a Wi-Fi network (probably your own), which you’ll need to do if you want to transfer the iCloud Backup of your old iPad to your new one.

5. Next, you’ll get three choices: Set Up as New iPad, Restore from iCloud Backup, and Restore from iTunes Backup. Since we’ve got our iPad backup in iCloud, we’re going to go ahead and select Restore from iCloud Backup, then click Next.

Just tap the most recent iCloud backup of your old iPad, tap Restore, and you're on your way.

6. On the following screen, you’ll enter your Apple ID and password, followed by a lengthy terms-of-service agreement. Once you’ve read it (or skimmed it, anyway), tap Agree.

7. Now comes the moment of truth: a screen that lists your latest iPad backups in iCloud. Pick the most recent one, then tap the blue Restore button.

8. Up next: a progress bar that shows you how long it’ll take for iCloud to restore your old iPad settings. If you’re lucky, it’ll only take a few minutes, and after another quick loading screen, you’ll jump to the iPad home page—or rather, your old iPad home page, just like you left it (folders and all).

But wait—you’re not done yet.

It could take hours for all your old iPad app to download, but at least you can use your new iPad while you wait.

9. Now comes the boring part:waiting for all your apps and iTunes media (music, videos, e-books, and the like) to download and install themselves on your new iPad. Depending on how many apps and other downloadable goodies you had on your old iPad, you could be in for a long wait. The good news, though, is that you’ll be able to use your shiny new iPad (including Safari, Mail, Music, and other core iPad apps) while you wait for your purchased apps and media to arrive.

10. Before your apps, videos, and other iTunes wares begin to download, you’ll be prompted for your Apple ID; remember to enter the Apple ID you use for the iTunes, which isn’t necessarily the same as your iCloud username and password.

11. So, you’ve waited patiently, and now all your apps and music are downloaded onto your iPad. But what about the non-iTunes videos and music sitting on iTunes? To transfer them (plus any photo albums) to your new iPad, just sync it with iTunes on your desktop. Still no music at all yet? Launch the iTunes app, click the Downloads tab at the bottom of the screen, and you should see all your media queued up for download.

12. At last, your new iPad is set up. What about your old iPad? Eventually, you’ll probably want to wipe it clean; until you’re sure your new iPad is set up properly, though, you may want to keep your old iPad as-is.

And, with any luck, that should just about do it.

Having trouble restoring the iCloud backup of your old iPad to your new one? If that’s the case, don’t panic; just describe what’s happening in the comments below, with screenshots if you can. I won’t be able to answer all your questions, but hopefully a fellow reader will.

What is the Easiest and Quickest Way To Send Videos Online? - Record and Send


Saturday, April 28, 2012

How to Place Facebook Chat on Firefox Sidebar?

The coolest feature of the Facebook which permits you to send live messages, or in internet word, ping your friends is the Facebook chat. As it is the most frequently used feature of this great social networking site, therefore it deserves to be at the top. The chat can be placed at the Mozilla Firefox sidebar by following these simple steps:


1). At the top-most navigation of your page, you will find an option by the name of “Bookmarks”. Select “Organize Bookmarks” from this menu.


2). There you will find the tab by the name of “New Bookmark”.


3). On clicking “New Bookmark” it will ask for some information. Fill it according to the following:


Fill “Facebook Chat” in the space provided in front of the “Name” section.
Type the URL “http://www.facebook.com/presence/popout.php” in the space provided in front of “Location” section.
Also check the check box as shown


How to Set Auto Reply Status on Google talk or Gtalk? - Tips and Tricks

Many Times it happens that you are busy with some work or is not sitting in front of your computer but your google talk or gtalk is open. Gtalk autoreply is a small tool which is quite useful in such scenario. It can be used to set auto reply on your gtalk or google talk. When you set auto reply using Gtalk Autoreply and anyone pings you the tool will send him the auto reply message. It does not voluntarily send this message to every friend but just replies to those who ping you.


You just need to download the software and install it. Then run the utility from the desktop icon and then enter your gtalk account username and password and fill the message you want to be send to your friends when they ping you. Now click save and enable autoreply and it will get enabled.


Now after activating it, if any of your friend ping you he will receive the auto reply message. In order to close the auto reply feature you simple need to close the application. You can download the Gtalk Autoreply tool from Link1. You can also download its source code from here.

How to Open and Manage Multiple Gmail and Facebook Google Account in Chrome?


Google add new user browser allow you to handle multiple profile in same time, using this feature you can log in multiple facebook google twitter or any web services. You don’t need to add any extension to use this feature because all this feature are now available inside google chrome , You only need to create profile to use this feature.Her’s how you can do this

  • Click the wrench icon on the browser toolbar.
  • Select Settings.
  • Click Personal Stuff.In the “Users” section, click Add new user.
  • A new window for the user appears, with a special icon for the user in the top corner

Here, you can sign in to Chrome with a Google Account to associate the account with the user. Once signed in, all the bookmarks, apps, extensions, theme, and browser settings for the user will be synced to the account.

How to Download Protected PDF Docs Files from Scribd for Free? - Easy way

Looking to download Protected PDF Docs Files from Scribd for Free Here are few Cool ways that will help you to download protected files from Scribd


Firefox Greasemonkey Scribd Downloader Script

Now view the documents in Scribd and click the download button available at the bottom right. You will be prompted to open or save the file, rename and save it as you wish.

Using Task ForceQuit Pro to Quickly End Tasks - Easy way


After some digging around in the registry, I have traced the problem to the fact it writes a registry entry when you tick the box, but the next time it checks if the box has been ticked before, a different non existent registry key is checked. Below are the registry entries that will stop the activation window appearing and also stop the success window from popping up again. Copy the text below into a notepad text file, and save as ‘yourname.reg’. Then double click the file to import into the registry. Works on current version 1.0.2.0.
Windows Registry Editor Version 5.00

If Task ForceQuit Pro didn’t have these nagging screen issues and the restart / shutdown buttons could be made a bit safer, it has the potential to be a very good little utility. With the registry entries above applied, it still makes a handy tool even though you have to take care with the bottom row of buttons.Compatible with Windows 7, Vista and XP
Download Task ForceQuit Pro