Wednesday, November 30, 2011

How To Enable Add/Remove Programs When Disabled By A Virus?

Are you facing trouble opening Add/Remove Programs from your Control Panel? Does it give you the error saying that it has been disabled by administrator? Some days back we covered a post on How to enable show hidden files and folders when disabled by a virus, the problem of Disabled Add/Remove program is also a registry tweak caused by some virus and is quite frustrating for those who wants to uninstall a software but this dialogue box won’t just open up. This problem has a pretty easy solution.

Before following the below mentioned steps, it is always necessary to backup registry, if you don’t know how to create backup, follow this link of our other post.


If your system is attached to a domain, your network administrator may have disabled the Add or Remove Programs applet.

For standalone system, follow these steps:

Go to Start > Run and type regedit


Expand HKEY_CURRENT_USER from the list


Now expand the Software branch from the list.


Scroll down to find Microsoft from the list, expand this option and then Windows from the next list.

 
You will now encounter Current Version, expand it and then expand Policies too.


Here you will see an Uninstall option, select this key and on the right side you will find a key named NoAddRemovePrograms.


Delete this key to enable the Add/Remove Programs dialogue in the control Panel. And you are done !


Warning: Make sure that you have made a backup of your registry before making any changes to it.

Got any questions, suggestions, or feedback? Feel free to leave a comment.

Friday, November 25, 2011

Android radio buttons example

In Android, you can use “android.widget.RadioButton” class to render radio button, and those radio buttons are usually grouped by android.widget.RadioGroup. If RadioButtons are in group, when one RadioButton within a group is selected, all others are automatically deselected.

In this tutorial, we show you how to use XML to create two radio buttons, and grouped in a radio group. When button is clicked, display which radio button is selected.

1. Custom String

Open “res/values/strings.xml” file, add some custom string for radio button.
File : res/values/strings.xml
<?xml version="1.0" encoding="utf-8"?>
<resources>
    <string name="hello">Hello World, MyAndroidAppActivity!</string>
    <string name="app_name">MyAndroidApp</string>
    <string name="radio_male">Male</string>
    <string name="radio_female">Female</string>
    <string name="btn_display">Display</string>
</resources>

2. RadioButton

Open “res/layout/main.xml” file, add “RadioGroup“, “RadioButton” and a button, inside the LinearLayout.
File : res/layout/main.xml
<?xml version="1.0" encoding="utf-8"?>
<LinearLayout xmlns:android="http://schemas.android.com/apk/res/android"
    android:layout_width="fill_parent"
    android:layout_height="fill_parent"
    android:orientation="vertical" >
 
    <RadioGroup
        android:id="@+id/radioSex"
        android:layout_width="wrap_content"
        android:layout_height="wrap_content" >
 
        <RadioButton
            android:id="@+id/radioMale"
            android:layout_width="wrap_content"
            android:layout_height="wrap_content"
            android:text="@string/radio_male" 
            android:checked="true" />
 
        <RadioButton
            android:id="@+id/radioFemale"
            android:layout_width="wrap_content"
            android:layout_height="wrap_content"
            android:text="@string/radio_female" />
 
    </RadioGroup>
 
    <Button
        android:id="@+id/btnDisplay"
        android:layout_width="wrap_content"
        android:layout_height="wrap_content"
        android:text="@string/btn_display" />
 
</LinearLayout>
Radio button selected by default.
To make a radio button is selected by default, put android:checked="true" within the RadioButtonelement. In this case, radio option “Male” is selected by default.

3. Code Code

Inside activity “onCreate()” method, attach a click listener on button.
File : MyAndroidAppActivity.java
package com.mkyong.android;
 
import android.app.Activity;
import android.os.Bundle;
import android.view.View;
import android.view.View.OnClickListener;
import android.widget.Button;
import android.widget.RadioButton;
import android.widget.RadioGroup;
import android.widget.Toast;
 
public class MyAndroidAppActivity extends Activity {
 
  private RadioGroup radioSexGroup;
  private RadioButton radioSexButton;
  private Button btnDisplay;
 
  @Override
  public void onCreate(Bundle savedInstanceState) {
 super.onCreate(savedInstanceState);
 setContentView(R.layout.main);
 
 addListenerOnButton();
 
  }
 
  public void addListenerOnButton() {
 
 radioSexGroup = (RadioGroup) findViewById(R.id.radioSex);
 btnDisplay = (Button) findViewById(R.id.btnDisplay);
 
 btnDisplay.setOnClickListener(new OnClickListener() {
 
  @Override
  public void onClick(View v) {
 
          // get selected radio button from radioGroup
   int selectedId = radioSexGroup.getCheckedRadioButtonId();
 
   // find the radiobutton by returned id
          radioSexButton = (RadioButton) findViewById(selectedId);
 
   Toast.makeText(MyAndroidAppActivity.this,
    radioSexButton.getText(), Toast.LENGTH_SHORT).show();
 
  }
 
 });
 
  }
}

4. Demo

Run the application.
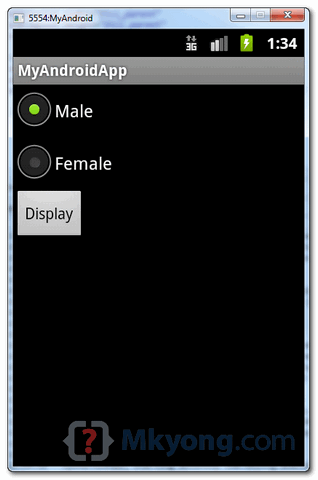
1. Result, radio option “Male” is selected.
android radio button demo1
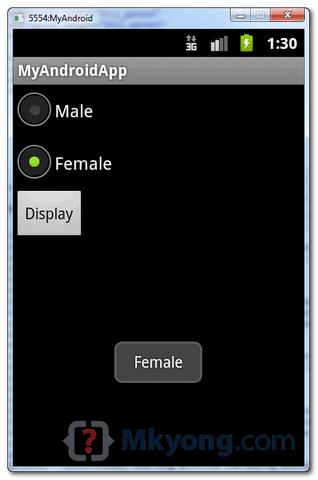
2. Select “Female” and click on the “display” button, the selected radio button value is displayed.
android radio button demo2

Sunday, November 20, 2011

Easy and Fully Configurable Laptop Battery Manager For Windows 7/Vista

We have previously covered power tools that allows you to keep a check on your laptop battery, among them so far our favorite has been Battery Bar. But now a new contender has arisen that aims to be totally flexible and fully configurable, and yes it also supports Aero Glass.

BattCursor is a free battery management tool that aims to replace the default Power functionality that comes in Windows 7 and Vista. Everything is customizable, from Cursor, Tray Symbol, and Colorization to Battery Tweaks, Power Profiles, and Notifications.


Unlike Windows, where the Advanced Power Settings is too complicated to use, BattCursor makes it easy to tweak everything from a single window. You can perform battery tweaks and create a custom power profile to suit your needs or you can simply customize the look and feel. The profile management section is quite impressive since it allows you to automatically change the power plan according to the battery. For example in my case, if the battery is above 70%, the profile would be High Performance, if battery is above 50% then Balanced, and so on.


When the battery reaches the warning level, your cursor will become yellow and so will your battery along with the superbar/taskbar and Windows Explorer. The same will happen when the battery reaches the critical level, in this case, everything will become red.


Note: This color change will only take place when Windows Aero Glass is enabled.


The screenshots taken above are from developer’s product webpage

These colors are just the default, but can be changed to anything of your liking. Not only this, but you can also set when to warn you and which percentage would mean the battery is critical, etc. Just like you can change the Power profile in Windows from the system tray, you can do the same with this tool. Simply right-click the system tray icon and go to Profiles.


There are tons of other features that you can explore. Even if you are comfortable with your current laptop battery power management, you should still give it a try since it drastically helps you in further reducing the power consumption. Since BattCursor has a less system memory footprint, it can also come handy if you are running Windows 7 on a Netbook.


It works with Windows 7 and Windows Vista, both 32 and 64-bit OS are supported. Enjoy!