Monday, April 30, 2012

What are the things to know before unlocking your AT&T iPhone?


Want to use your AT&T iPhone with another carrier, such as T-Mobile or an overseas network? If so, good news: AT&T will now “unlock” your iPhone for use on another compatible wireless carrier, although there are a few “ifs,” “ands,” and “buts” to keep in mind.

Read on for 5 things you need to know about getting your AT&T iPhone unlocked, starting with…

1. What’s the difference between a “locked” and “unlocked” phone, anyway?


When you buy an iPhone (or just about any phone, for that matter) from a wireless carrier like AT&T, the carrier will typically “lock” the phone to its network—meaning you won’t be able to simply pop in a SIM card from a competing network (like, say, T-Mobile) and start chatting away.

That said, your carrier may also unlock your phone once your contract is partially or completely expired, so long as your account is in good standing (i.e., you’ve been paying your bills on time). Once unlocked, you can use your iPhone on any compatible GSM network, provided you’ve got a working SIM card for the network in question (more on that in a moment).

You can also buy an unlocked iPhone directly from Apple, but they’re outrageously expensive—as in $549 and up, versus $99 for an 8GB iPhone 4 with a two-year contract.


2. AT&T won’t unlock your iPhone unless you’re completely out of contract


In the case of AT&T and the iPhone, AT&T will only unlock your handset if a) you’re either completely out of your two-year contract or b) you’ve agreed to pay an early termination fee (about $350 or so, depending on how much time is left on your service agreement).

I just checked myself and found out I need to wait a few more months before my AT&T contract expires, so no unlocking for me (or at least, not yet).

To check if your iPhone is eligible for unlocking, just dial 611, press “0″ for a customer service representative, and ask.


3. Getting your iPhone unlocked isn’t an instantaneous process


It could take a day or more between the time you call and ask AT&T to unlock your phone and when you actually get a confirmation email (a copy of which you can see here, courtesy of AppleInsider)—think 24 to 48 hours, according to the AT&T representative I spoke to.

Once AT&T approves your iPhone for unlocking and Apple pulls the switch on its end, you’ll need to connect your iPhone to your PC or Mac and then sync it with iTunes.

If all goes well, a message should pop up on your iPhone that says your handset has been successfully unlocked. Problems? Check out Apple’s troubleshooting tips.


4. You’ll need a new SIM card to use your unlocked iPhone on another carrier

So, want to use your unlocked AT&T iPhone on T-Mobile, or another GSM-based carrier? No problem; all you need is a working SIM card from your chosen carrier. Just pop out the iPhone’s SIM tray with a paper clip, replace the little plastic SIM card, and you’re in business.

Standard SIM card and the iPhone 4S's smaller micro-SIM, compared

OK, so how do you get a new SIM card, then? Easy; just call the carrier you want to use your iPhone with and ask, order one online, or buy one over the counter.

Remember that you’ll need a voice and/or data plan associated with your new SIM—and yes, you can opt for a pre-paid, no-contract plan if you wish.

Keep in mind that the iPhone 4 and 4S both use a smaller “micro-SIM” rather than the standard, full-size SIM found in earlier iPhone models. T-Mobile, for example, offers a micro-SIM card specifically for newer iPhones; just make sure to request one when placing your order.


5. Even once you’ve unlocked your AT&T iPhone, it still won’t work on Sprint or Verizon Wireless


That’s because Sprint and Verizon both run CDMA cellular networks—a technology that’s incompatible with the GSM networks operated by AT&T and T-Mobile.

Now, technically speaking, the new iPhone 4S is a so-called “world phone” that will connect to both CDMA and GSM networks; however, Apple has made it very clear that even an unlocked iPhone 4S won’t work on a CDMA carrier.

Sunday, April 29, 2012

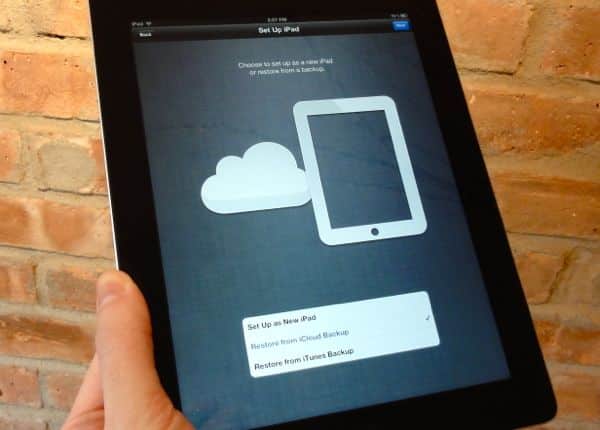
How to restore an iCloud backup of your old iPad to your new iPad? - Easy Way


So, you’ve got the latest and greatest iPad, and you want to transfer everything on your old iPad—including your apps, contacts, calendars, music, and videos—to your new one. What’s the best way to do it?

My suggestion: try Apple’s iCloud Backup utility, which makes nightly copies of your iPad’s settings, messages, camera roll, and even its wallpaper, and wirelessly saves them to a giant iCloud server bank.

iCloud Backup is an essential tool for preserving your iPad, iPhone, or iPod Touch data in case something disastrous befalls your precious iDevice, but it also makes for a handy, relatively painless way to move from (for example) an old iPad to a new one.

I’ve already demonstrated how to restore an iCloud backup to an iPhone, but the arrival of my iPad 3—er, the “new” iPad—presents a nice opportunity to document how to use iCloud Backup to transfer settings and data from an old iPad to a brand-spanking new one.

So, ready to get started?

Tap "Back Up Now" to create a fresh iCloud backup of your old iPad.

1. The first step, of course, is making sure you have a recent iCloud backup of your old iPad. (Don’t have an iCloud backup at all yet? Visit iCloud.com, set up a free account, sign in on your iPad, then tap Settings, iCloud, Storage & Backup to get started.)

From your iPad home screen, tap Settings, iCloud, then Storage & Backup. At the bottom of the page, you’ll see a date for your last iCloud Backup, and just above it, a button labeled “Back Up Now.” Unless your latest iCloud backup for your iPad is less than an hour old or so, you should probably go ahead and tap “Back Up Now” to get a fresh backup before moving ahead.

2. Do you have any videos or music on your iPad that you didn’t get from the iTunes Store? Or how about photo albums from iPhoto? If so, they’re probably sitting in iTunes (or iPhoto, in the case of photos) on your PC or Mac—and if that’s the case, I recommend you sync your iPad with iTunes one last time, either via USB or Wi-Fi. (iTunes Match users will be able to download all their music from iCloud.)

3. All set? Now, pull your new iPad out of its box, slide the “slide to set up” slider, pick a language (English, Spanish, French, etc.), a country, and decide whether to enable the iPad’s “location services” (which let your various apps pinpoint your location).

4. Connect to a Wi-Fi network (probably your own), which you’ll need to do if you want to transfer the iCloud Backup of your old iPad to your new one.

5. Next, you’ll get three choices: Set Up as New iPad, Restore from iCloud Backup, and Restore from iTunes Backup. Since we’ve got our iPad backup in iCloud, we’re going to go ahead and select Restore from iCloud Backup, then click Next.

Just tap the most recent iCloud backup of your old iPad, tap Restore, and you're on your way.

6. On the following screen, you’ll enter your Apple ID and password, followed by a lengthy terms-of-service agreement. Once you’ve read it (or skimmed it, anyway), tap Agree.

7. Now comes the moment of truth: a screen that lists your latest iPad backups in iCloud. Pick the most recent one, then tap the blue Restore button.

8. Up next: a progress bar that shows you how long it’ll take for iCloud to restore your old iPad settings. If you’re lucky, it’ll only take a few minutes, and after another quick loading screen, you’ll jump to the iPad home page—or rather, your old iPad home page, just like you left it (folders and all).

But wait—you’re not done yet.

It could take hours for all your old iPad app to download, but at least you can use your new iPad while you wait.

9. Now comes the boring part:waiting for all your apps and iTunes media (music, videos, e-books, and the like) to download and install themselves on your new iPad. Depending on how many apps and other downloadable goodies you had on your old iPad, you could be in for a long wait. The good news, though, is that you’ll be able to use your shiny new iPad (including Safari, Mail, Music, and other core iPad apps) while you wait for your purchased apps and media to arrive.

10. Before your apps, videos, and other iTunes wares begin to download, you’ll be prompted for your Apple ID; remember to enter the Apple ID you use for the iTunes, which isn’t necessarily the same as your iCloud username and password.

11. So, you’ve waited patiently, and now all your apps and music are downloaded onto your iPad. But what about the non-iTunes videos and music sitting on iTunes? To transfer them (plus any photo albums) to your new iPad, just sync it with iTunes on your desktop. Still no music at all yet? Launch the iTunes app, click the Downloads tab at the bottom of the screen, and you should see all your media queued up for download.

12. At last, your new iPad is set up. What about your old iPad? Eventually, you’ll probably want to wipe it clean; until you’re sure your new iPad is set up properly, though, you may want to keep your old iPad as-is.

And, with any luck, that should just about do it.

Having trouble restoring the iCloud backup of your old iPad to your new one? If that’s the case, don’t panic; just describe what’s happening in the comments below, with screenshots if you can. I won’t be able to answer all your questions, but hopefully a fellow reader will.

How to Downgrade Android OS? - Simple Guide

Have you ever had an experience of it before when your android OS is not functioning well as it used to be before due to upgrade and other factors? If you’ve had one before – it is likely that you may be looking for a permanent solution to it now. And one of those permanent solutions is to downgrade your OS to the formal one before the issue arose so that you can be able to re-upgrade when it is right for you to do so.

I have in this post simple guides that will show you How to Downgrade Android OS to lower version e.g – downgrade your device from android 2.2 to 2.1, or downgrade an HTC device from 2.0 to 1.6 respectively.


Guides on How to Downgrade Android OS to lower versions without hassle


1. Download the earlier versions of your device’ android firmware. For example, say you want to download android 2.1 OS, then you should conduct a research on Google for keyword like “Download Android 2.1 Firmware”


2. Use the regular steps according to your device manufacturer guidelines (you might consider checking your manufacturer’s manual before doing that). You’ll find the software extracted and in there, you’ll see a file that ends with/extension “nbo” – that is the Android ROM image file. And it is advisable that you get the exact Android ROM Image Filedue to the reason that, they differ from one manufacturer to the other.

3. Download RUT (ROM Update Tool)

Use the link prescribe beside here to download the ROM update tool for this tutorial. Download RUT here.

4. On your device, install ROM Update Tool Application and after it has being installed on your phone – reboot your Android Phone.

5. Once it is rebooted, browse the Android Image File and select next

6. Then Switch OFF your phone and then remove battery to ensure that the Downgrade starts

7. Switch on again

8. Click the Call+Delete button on your device as it is starting up

9. Connect a USB cable to your desktop PC and the select next on the RUT application

10. And from this moment, the Android ROM image will be installed on your phone

11. Now start to enjoy your newly downgraded android phone.

I believe you find How to Downgrade Android OS from 2.2 to 2.1 useful? Please share your tips and problems in the section below.

What is the Easiest and Quickest Way To Send Videos Online? - Record and Send


Saturday, April 28, 2012

How to Place Facebook Chat on Firefox Sidebar?

The coolest feature of the Facebook which permits you to send live messages, or in internet word, ping your friends is the Facebook chat. As it is the most frequently used feature of this great social networking site, therefore it deserves to be at the top. The chat can be placed at the Mozilla Firefox sidebar by following these simple steps:


1). At the top-most navigation of your page, you will find an option by the name of “Bookmarks”. Select “Organize Bookmarks” from this menu.


2). There you will find the tab by the name of “New Bookmark”.


3). On clicking “New Bookmark” it will ask for some information. Fill it according to the following:


Fill “Facebook Chat” in the space provided in front of the “Name” section.
Type the URL “http://www.facebook.com/presence/popout.php” in the space provided in front of “Location” section.
Also check the check box as shown


How to Set Auto Reply Status on Google talk or Gtalk? - Tips and Tricks

Many Times it happens that you are busy with some work or is not sitting in front of your computer but your google talk or gtalk is open. Gtalk autoreply is a small tool which is quite useful in such scenario. It can be used to set auto reply on your gtalk or google talk. When you set auto reply using Gtalk Autoreply and anyone pings you the tool will send him the auto reply message. It does not voluntarily send this message to every friend but just replies to those who ping you.


You just need to download the software and install it. Then run the utility from the desktop icon and then enter your gtalk account username and password and fill the message you want to be send to your friends when they ping you. Now click save and enable autoreply and it will get enabled.


Now after activating it, if any of your friend ping you he will receive the auto reply message. In order to close the auto reply feature you simple need to close the application. You can download the Gtalk Autoreply tool from Link1. You can also download its source code from here.

How to Open and Manage Multiple Gmail and Facebook Google Account in Chrome?


Google add new user browser allow you to handle multiple profile in same time, using this feature you can log in multiple facebook google twitter or any web services. You don’t need to add any extension to use this feature because all this feature are now available inside google chrome , You only need to create profile to use this feature.Her’s how you can do this

  • Click the wrench icon on the browser toolbar.
  • Select Settings.
  • Click Personal Stuff.In the “Users” section, click Add new user.
  • A new window for the user appears, with a special icon for the user in the top corner

Here, you can sign in to Chrome with a Google Account to associate the account with the user. Once signed in, all the bookmarks, apps, extensions, theme, and browser settings for the user will be synced to the account.

How to Download Protected PDF Docs Files from Scribd for Free? - Easy way

Looking to download Protected PDF Docs Files from Scribd for Free Here are few Cool ways that will help you to download protected files from Scribd


Firefox Greasemonkey Scribd Downloader Script

Now view the documents in Scribd and click the download button available at the bottom right. You will be prompted to open or save the file, rename and save it as you wish.

Using Task ForceQuit Pro to Quickly End Tasks - Easy way


After some digging around in the registry, I have traced the problem to the fact it writes a registry entry when you tick the box, but the next time it checks if the box has been ticked before, a different non existent registry key is checked. Below are the registry entries that will stop the activation window appearing and also stop the success window from popping up again. Copy the text below into a notepad text file, and save as ‘yourname.reg’. Then double click the file to import into the registry. Works on current version 1.0.2.0.
Windows Registry Editor Version 5.00

If Task ForceQuit Pro didn’t have these nagging screen issues and the restart / shutdown buttons could be made a bit safer, it has the potential to be a very good little utility. With the registry entries above applied, it still makes a handy tool even though you have to take care with the bottom row of buttons.Compatible with Windows 7, Vista and XP
Download Task ForceQuit Pro

Activate In Built Windows 8 Flip 3D Feature - Simple Guide


1. Press Windows Key + R to open run prompt and then type gpedit.msc and press enter.

2. Now navigate to Computer Configuration >> Administrative Templates >> Windows Components >> Desktop Window Manager – Locate the settings in the right page which says Do not allow Flip3D Invocation – double click this entry to change the settings and then select disabled so that Flip 3D gets enabled.


You should know the following info about this windows 8 setting. This policy setting allows you to configure the accessibility of the Flip 3D feature. Flip 3D allows the user to view items on the Windows desktop as they are being flipped through in three dimensions. 


If you enable this policy setting, Flip 3D is inaccessible.

If you disable or do not configure this policy setting, Flip 3D is accessible, if desktop composition is turned on. When Windows Flip 3D is activated with the Windows+Tab keys, a visual version of the desktop is presented and items can be flipped through to select. 
Please Note: Changing this policy setting requires a logoff for it to be applied only then you will be able to see Flip 3D in effect.

Facebook Video Calling: How To Set Up & Start a Video Call - Simple Guide

Facebook has finally started filling up the missing blanks on their social network as an answer to Google Plus Project. Together with Skype, Facebook has launched its first ever Video Calling option on there website. Facebook Users can now not only chat but they can now do video chat with each other


How do I set up video calling?

Three Simple Steps
  1. To call a friend, click the video icon at the top of your chat window.
  2. Simply click the “Set Up” button and follow the easy instructions for how to set up video calling on your favorite browser.
  3. Once installed successfully the video call will start automatically or you can ring back your friend by clicking the video call button at the top right corner of your friends profile
How do I start a video call with a friend?

Again three Simple steps we provide Easy method For Our Users

  • Visit your friend’s profile and click the “Call” button in the top right corner. You can also click the video icon at the top of the chat window.
  • When your friend answers, be patient and wait for sometime till both your web cams are inter connected.
  • If your friend is unavailable or offline, you can leave a video message. That's indeed more like Yahoo's Voice service...

Super MP3 Recorder - to record whatever your pc play


Super Mp3 Recorder Professional, the powerful recorder, editor and player, makes a complete recording studio of your computer. With the recorder you can record voice from microphone, internet streaming audio, or music played by Winamp, Windows Media Player, Quick Time, Real Player, Flash, games, etc. Super Mp3 Recorder Pro is able to automatically detect the recording formats your sound card supports and then set the application's parameters for the best possible performance. The recordings can be saved as .mp3, .wav, .wma, .vqf and .ogg files. What makes Super Mp3 Recorder Pro more powerful is its editing feature. It can edit audio files as you desire by cutting, copying, pasting, trimming and various DSP effects. Another useful feature is recording schedule which enables automatic recording, that is, Super Mp3 Recorder Pro starts and stops recording at any time you want.

Super Mp3 Recorder Pro has a Voice Activation System with which you can choose to skip silent passages, or stop the recording after a certain amount of silence. This option is especially useful when you're recording streaming audio and net congestion temporarily stops the stream. Instead of having a big blank spot in your recording, Super Mp3 Recorder Pro will just pause and wait for the signal to reappear.

Features:

  • Powerful Recorder:
Super Mp3 Recorder Pro can record any signal played through your sound card into Mp3, Wma, Vqf, Ogg or Wav files.

  • CD Quality Recordings:
With its powerful sound engine Super Mp3 Recorder Pro produces CD quality recordings.

  • Audio File Editing:
Super Mp3 Recorder Pro can edit audio files as you desired by cutting, copying, pasting, trimming and various DSP effects.

  • Recording Schedule:
Super Mp3 Recorder Pro can start and stop recording at any time you set.

  • Easy-to-use User-friendly Interface:
Most functions can be called up with a simple mouse click or menu selection.

  •  Flexible Setting:
Super Mp3 Recorder Pro is able to automatically detect the recording formats your sound card supports and then set the application's parameters for the best possible performance. The default parameters work in most cases, but you can change them easily to best suit your needs.

  •  Record Volume Control Support:
Super Mp3 Recorder Pro integrates the complete set of record volume control for your convenience.

  • Direct-To-Disk Long Time Recording Support:
Super Mp3 Recorder can record on the fly for as long as your like without interrupt. It can record and save to an mp3 file in one operation instead of having to save it to a wav and then spend time converting.

  • Recording History Management:
Super Mp3 Recorder Pro enables you to manage recording files conveniently.

  •  Voice Activation System:
Super Mp3 Recorder Pro has a Voice Activation System with which you can choose to skip silent passages, or stop the recording after a certain amount of silence.

  • Hotkey Support:
Super Mp3 Recorder Pro supports hotkey setting (F8 to start recording and F9 to stop recording by default).

  • Much, much more ...

Download Code:
http://rapidshare.com/files/146095712/Upload.From.iLachva.SMP3R.rar

Download and Install Allok 3gp PsP Mp4 iPod Video Converter Free Full Version - Latest

Allok 3gp PsP Mp4 iPod Video Converter by Allok Soft Inc. is a software that can convert a video file to 3gp, Psp, Mp4, iPod etc. file type. I do really like this software specially when I am grabbing some music videos from Yotube I can easily convert my grabbed video to mp3, VCD Mpeg 1 so I can burn it in CD, DVD Mpeg for my DVD Collections, and sometimes in 3GP so I can send it to my mobile. Allok 3gp PsP Mp4 iPod Video Converter is one that I recommend specially in your business like Internet shop in order to expand your market and also for personal computer users who has a hobby of collecting music, videos and different music gadgets. Another thing I like in this software is his converting speed one mp3 file in 10 seconds.


Download Allok 3gp PsP Mp4 iPod Video Converter here: http://www.mediafire.com/?gxe23qzungn


Instructions on how to Install Allok 3gp PsP Mp4 iPod Video Converter:


First you have to download the software by copying the url and pasting it in a new tab then click download.

Second you have to extract your downloaded file by using right click then extract here. Note: recommended software to extract is "winrar".

Open extracted folder and double click setup icon.

The Allok 3gp PsP Mp4 iPod Video Converter setup wizard table will show, just click "Next".

Then the Licence Agreement table will appear click 'I accept the agreement' and click "Next".

Next table is select destination location there is already a default destination folder given if you want to change it click browse and select a location then click "Next".

Then you have to select a start menu folder then click "Next".

Next is select additional task like creating a desktop icon and quick lunch icon (optional) then Click "Next".

Setup is ready to install just click "Install".

Click Finish and the software will lunch. View the 'Read Me' text document then copy and paste the name and code to register your copy.

Allok 3gp PsP Mp4 iPod Video Converter is ready to use so enjoy.

Friday, April 27, 2012

What are the Best 10 File Explorer Apps For Android?

Top Android File Explorers


One of the sweetest advantages I find in Android over iOS and WP7, is the ability to use an Android device as a USB mass storage medium without any strings attached, and with that, the ability to go through all these contents right on your mobile phone or tablet. Delete, copy, move, rename are all very powerful options that otherwise, are way more restricted on an iPhone and a WP7 device. Not surprisingly, the Android market is flooded with File Explorer apps, and a new user is left bewildered with the choices at their disposal. Which one would you pick if you were new to Android and why? It is to answer this question we have grouped together, what we believe, are the 10 most brilliant file explorers for Android out there today.


Root Explorer

Easily the most popular and most needed app out there today. This app, despite being a paid one, appeals through it’s core functions, that are to access system files on an Android device and gives you read/write access within those folders as well. To say the least, any Android device that has root access, deserves to be running Root Explorer, for you will find yourself in need of it almost every time.


Root Explorer Root Explorer
Download Root Explorer

File Expert

The UI on this app is extremely user-friendly, and the app will see all your file exploring needs satisfied. Accessing your files is a given, but the app lets you connect to cloud storage services such as Dropbox, Baidu Cloud, Box.net and a few others, access FTP servers, share content over Bluetooth, Web and more as well. To add some eye-candy, the UI can be overhauled with some themes as well. You can get this app for free of the Play Store; however, if you want root access for system files, you will have to purchase the Pro version.
File Expert File Expert-2

ES File Explorer

Boasting what is easily one of the finest user interfaces an Android file explorer can offer, ES File Explorer has a plethora of features to offer, including root access, for free. Access files over LAN, FTP, Bluetooth, Internet (box.net, Dropbox & Sugarsync), manage your apps or use it as a task manager, you name it, ES has got it! Oh, on a side note, you can theme up a few things in the UI as well.
ES File Explorer ES File Explorer-2

MIUI File Explorer

When I first used the MIUI ROM on my Desire HD, the one thing that really caught my attention – apart from iPhone like UI – was the inclusion of a native File Explorer. With a very well and neatly laid out interface, the app can filter content based on music, videos, zip files, pictures etc. Moreover, you can also access content over FTP, which is set up in a single tap and you’re good to go. Earlier only available for MIUI ROMs (bundled with them), the app has now been released for the public owing to the popularity it received. MIUI File Explorer is a to the point, simple, no-nonsense file explorer app for Android. 
MIUI File Explorer MIUI File Explorer-2
File Manager ES
Dual-pane, you say? File Manager ES takes that concept a step further, letting you open as many different file browser panels on a single screen as required. You can move files from one directory to another by simply dragging and dropping them on the desired directory. Much like a history function, the app lets you bookmark important directories that you navigate through often. It supports swipe gestures to help you navigate through the various file explorer panels easily. To add icing to the cake, the app gives you root access to complete system files as well, for free! 
File Explorer ES File Explorer ES-2

FileSlick

FileSlick is yet another file explorer app that uses swipe gestures as part of its navigation functions in and out of folders, as well as boasting some pretty slick aesthetics. The app goes on to offer some complex functions as well, such as toggling read/write permissions for various mount points, modifying user permissions for root mode and Server Message Block (SMB). 
File Slick File Slick-2
Total Commander
Not released to the Play Store even after all this while, the app certainly deserves some attention. Sporting Dual Panes, “file selection in Total Commander is even easier. Tap on the icon/thumbnail of a file to select it. You can select multiple files at once in this manner. To open a file, just click on its filename.”  The app supports a built in text editor, along with the ability to handle encrypted ZIP and RAR archives. 
Total-Commander01 Total-Commander02
Ghost Commander
They say, Total Commander got it’s que from Ghost Commander, and well, all we know is that Ghost Commander was the first on the scene with a dual pane for exploring files. In addition to the features offered by Total Commander, you have thumbnail views, favorite folders and a built in text editor. That said, the UI isn’t exactly the most pleasing we’ve seen so far.
Ghost Commander Ghost Commander-2

Super Manager

One of the most comprehensive file managers out there, and well, to be honest, it’s more than just a file manager. It is a Task Manager, APK Manager, App protector, File Manager, Backup & Restore tool, Auto Scheduler, all built into one package. Super Manager allows you access to root level files as well, and lets you extract APKs from installed apps and much much more. You have to actually try this app out to understand the plethora of functions it offers.
Super Manager Super Manager-2

Android Commander

Aptly titled as a Swiss knife for Android devices ,Android Commander is a lot more than your average file explorer. With a desktop client for interfacing with your Android device (of course, you’ll want root access), Android Commander is your one stop shop for exploring all the the content in your device, installing apps straight from the PC, installing and copying stuff into root level folders and a lot more. With well laid out graphics and information, the application is actually much easier to use than what it may appear from reading this. Our comprehensive review of Android Commander is linked above.
Android-Commander-Main-2
This concludes our list of what we believe to be some of the most important and effective file explorer apps out there for the Android devices.

Honorary Mention: ASTRO File Manager

Oh wait, we missed out ASTRO File Manager! One of the oldest file manager apps out there, the app is still kicking and has some awesome features out there to offer. App backup, built in image viewer, text editor, download manager etc. This is an honorary mention for a true veteran! The app has pretty much those functions to offer that most other File Explorers offer as well, and this by no means suggests that Astro File Manager fails in comparison to those apps. Alongside an SMB and Bluetooth plugin to add OBEX FTP support for browsing devices and sending/receiving files using Bluetooth networking, the app goes on to offer a totally free ASTRO Backup, a cloud service of its own.
Astro File manager Astro File manager-2
Do you have a favorite? Did we miss out on an app you’re crazy about, and feel we should have featured here? Do share your thoughts and suggestions with us in the comments section below.