No matter the commercial in recent years, it seems every product claims to be bluetooth enabled. The other day I think I heard about a loaf of bread even having bluetooth access. The question begs to be asked; exactly what is bluetooth? To many people, its sounds like something you’d get from kissing a smurf.
Sunday, October 30, 2011
What is Bluetooth? - A Simple definition
How to Recover and Restore accidentally deleted pictures, photos, and files?
Sooner or later you will be desperate to find out how to recover deleted files, because accidentally deleting your precious pictures, photos, and files is bound to happen to anyone. I hope that you do not encounter this dilemma, however if you do, you may possibly have a chance to recover deleted files. One way is to get a professional IT guy that specializes in file or data recovery, which in itself can be very expensive. Maybe you are recovering files from a crashed hard drive and haven’t actually deleted anything or maybe you want to recover deleted pictures from your digital camera. This article is about how to recover deleted files free using software but if you have a crashed hard drive then this is a different story altogether.
Firstly we need to know what has happened to our deleted files so that we can learn which action is best to recover deleted files.
What does Windows do with deleted pictures, photos, and files?
When you delete a file from your computer, providing it is not a huge file, it is sent to the computer recycle bin. There is usually an icon on your desktop that will allow you to open your recycle bin and see the file in there. If you have gone to that extra step of deleting the file from the recycle bin, then this is when we are faced with this situation of trying to figure out how to recover deleted files. Here is a basic tutorial on how to recover a deleted file from your recycle bin.
Even when you have deleted a file from the recycle bin it is not really gone. Windows simply marks the file as deleted, and waits for the space to be overwritten by another file needing the space, for it really to be deleted. If you didn’t format or defrag the drive the file may possibly be there for years to come. This is what happened with my D drive.
People often have to buy a program that will recover deleted files and photos, because that’s how desperate they are to retrieve their precious data..
Well this is your lucky day because you have actually hit the jackpot by finding this fantastic free program called Recuva. I know I was ecstatic when I found it and actually recovered my irreplaceable family photos that I had accidentally deleted from the recycle bin. I seriously thought that it would not work, because after all, it is a free program after all. More details are available on our freeware page.
“Recuva (pronounced “recover”) is a freeware Windows utility to restore files that have been accidentally deleted from your computer. This includes files emptied from the Recycle bin as well as images and other files that have been deleted by user error from digital camera memory cards or MP3 players. It will even bring back files that have been deleted by bugs, crashes and viruses!” Quoted from the Recuva website, it just sounded too good to be true.
When can you use Recuva to recover deleted files free?

- When you have recently accidentally deleted a file, photo, or picture from your computer you can use Recuva to recover deleted files.
- You can recover deleted pictures free when you haven’t used your computer too much and overwritten the deleted file.
- When this program says “No overwritten clusters detected” and that the file is in Excellent state after scanning your drive.
When can’t you use Recuva to recover deleted files free?
- When you have been formatting a hard drive you will not be able to recover deleted pictures free because the files would have been overwritten.
- Sometimes if you have defragged your computer. In my tests, after defragging my hard drive I could not recover deleted pictures free as they were then damaged. At this point you would need a professional data recovery service.
- If the program says the file has overwritten clusters. If you are trying to recover deleted pictures free using Recuva and you see the files have a red dot next to it, that’s not good.
Recover deleted files – What are the results from my tests with Recuva?
- I have two hard drives and scanned both. One is C drive and one is D drive. C drive is the main hard drive and D is storage. Nearly all the files that showed up were available for recovery.
- D drive had very old files show up. Half the stuff I could hardly remember because I had been storing files on there for a few years.
- C drive had less as I had recently formatted it, but all the recent deleted filed were available. Therefore I could recover deleted files easily, well the ones available.
- Then I decided to defrag C: and then scan it again. This definitely reduced the number of files that were in Excellent condition to recover. It probably overwrote 75% of files by defragging.
- I was amazed at what it actually recovered. It had every little thing that had been stored in my internet history, cookies, and other stuff that you thought would have been gone. It was almost scary how much detail this program went in to. All this from a free program.
Notes on how to recover deleted files:
- Files that has Excellent state and with the comment No overwritten clusters detected can be recovered.
- You should always recover deleted files to another hard drive as you might overwrite the file your are trying to recover.
- You can also recover deleted files and photos from your camera storage card! How great is that?
- This program is totally free and is made be the same guys that made Ccleaner. Their programs do no nag you to upgrade and they have no spyware contained in them. All they have is a donation button on their site. So if you find this free program handy then go and give these guys a donation.
Also watch the video below to see how to recover deleted files, photos, and pictures.
Get Navigation on Foot With Google Maps For Android Update
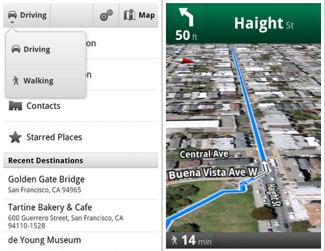
Google is making big moves lately, first with priority inbox and Instant search, then some new updates to its Android Voice app and the Google Earth website, and now Google Maps on Android is getting updated with a brand-new feature: walking navigation!
Find out what's coming with the latest update (and why you should care) after the jump.
Not just walking directions, the walking navigation feature gives you turn-by-turn directions as you find your way from point A to B on foot. Just choose "walking" from your Navigation icon, and your Android device will use the internal GPS to show you how to get there every step of the way. But don't worry about missing a turn if you're in a loud and bustling city — walking navigation will allow your Android device to vibrate every time you need to make a turn, so you never miss a voice command. Plus, the map will rotate with you as you change directions, along with using satellite by default, so you'll get (and keep) your bearings in a new place.
The Google Maps 4.5 update is available now for free in the Android Market!
Saturday, October 29, 2011
How to connect two computers to a broadband modem?
If you have a broadband modem or one that is supplied from your internet service provider (ISP) you can most probably connect two computers to it without needing a router. If you look at the picture of my modem below, it has a USB (blue) and a ETHERNET (yellow) port. Of course there are many other ways to connect two computers together to share files or an internet connection, however this article is about connecting two computers to one modem.
My service provider, Telstra Australia, supplied this modem to me. It came with an installation disc, which you should use to connect to the modem through the USB.
 |
Now if you do not have a router, but have a similar modem to the one shown, you can connect two computers off the one broadband modem and thus both accessing the internet.
One computer can connect through the USB port and the other through the Ethernet.
A USB cable and and Ethernet cable come with the modem, however to connect the second computer you may need to buy a longer Ethernet cable. Get a blue cable.. NOT yellow or red. The blue one is a CROSSOVER cable, the others will be PATCH cables. They have the same connections on them but do entirely different jobs. (this colour coding applies in Australia, I don’t know about other countries.)
How to connect two computers to one broadband modem?
In this tutorial I will show you how to connect two computers to the same broadband modem.
What do you need to connect two computers?
- You will need two computers to connect to one modem.
- You will need an ethernet cable and a USB cable.
- You will need a modem similar to the one pictured above.
- You will need an internet connection.
- You will need an installation CD to install through USB connection.
To connect a computer to a broadband modem through USB, it is recommended that you use the installation cd. It will ask you to choose how you want to connect and you select USB. Make sure you know your user name and password for your internet service provider.
To connect the second computer to the same modem but through the Ethernet, just plug it in…It usually works straight away. If it does not, use the installation cd, but choose to connect with Ethernet.
Friday, October 28, 2011
Microsoft Word 2010 Templates free download
Microsoft Word 2010 provides some built-in templates which can be used to create attractive looking documents, you can also download and install additional templates.
There are many standardized templates which can be used in creating commonly used documents as well as the templates which can be used for some specific purposes like creating a resume, calendar, agenda, job descriptions, invitations, etc.
While creating new documents, hit File > New and choose your desired template from the available templates which are installed by default with Office 2010.

How To Install Additional Templates
In Word 2010, installing additional templates is quite easy, you can find lots of free and attractive looking templates from Office.com. Hit the Template name from the list displayed under the Office.com Templatessection, and click the Download button located in the left side, under the preview image of the template.

It will download the template immediately.

Once the download is completed, you will find the template listed in the available templates list.
Download Link:
How To Add Templates In Ubuntu Context Menu?
Each Ubuntu user has a Templates folder located in their Home directory. This folder is empty by default, and anything you put inside this folder is displayed in your right-click context menu (via Create New Document menu). This feature, hence, enables users to create custom templates for quickly creating new documents. For example, you can create and place a Libre Office template that may come in handy every now and then. This may be a company letterhead, a frequently used expense calculation sheet, and others of the like.

There is, of course, another alternative for individually adding items to the right-click menu without much hassle, i.e., by using third-party templates. For your convenience, we have provided a download link to a third-party templates pack (the Ultimate Templates Pack). This pack contains a number of templates for creating new RAR, GZ, TXT, Python, PHP, GIMP Image, Open office and many other kinds of files. To use Ultimate Templates Pack, download the package from the link given at the end of this post, copy the folder to the Templates directory within the Home folder, and extract it. This will display the templates in Ubuntu right-click context menu.

In case you find many of the items within this package to be unwanted, simply delete the files for those applications from the Templates directory, such as, perhaps, development specific items for creating XML, Java or C++ documents.
Thursday, October 27, 2011
How to Store And Retrieve Files From Your Gmail Account With GMail Drive?
Google, or Gmail, specifically, offers its users over 7.5GB of storage space. For most of us, having this much storage capacity in our mailbox is useless, since emails are mostly in kilobytes. GMail Drive is a Shell Extension for Windows that creates a virtual file system around your Google Mail account. In addition to just being an email client, it allows you to use your Gmail account as a storage medium. Once installed, it creates a virtual drive inside Windows Explorer and enables you to create, copy and delete files and folders. When you upload a file to your Gmail account, the application will automatically generate an email with the file as an attachment. You can use GMail Drive to access and modify all the files uploaded from the application.
To begin with, install GMail Drive, and it will automatically create a virtual drive in your Windows Explorer. By default, the virtual drive is named “GMail Drive” and can be found under Computer in Windows Explorer.

When accessing the drive for the first time, you are required to log in with your Gmail account. CheckAuto Login to prevent the application from nagging you for credentials in future sessions.

Once logged in, copying files and folders is just a matter of drag and drop. Drag the files you want to copy and drop them into the drive window. A pop up message will display the upload progress, and once it is complete, you will receive an email with the file as an attachment.

To avoid cluttering up your email, you can create a filter in your Gmail account to automatically move files with “GMAILFS” in their subject, to your archived mail folder. GMail Drive works on Windows XP, Windows Vista and Windows 7.
Free download Facebook Video Player(for Chrome): Watch Videos & Continue Reading Posts
Watching videos on Facebook can become really frustrating at times. You play a video, and have to remain stuck at the same part of the page until it finishes, since if you scroll away to continue your social activities on Facebook, you lose sight of the video. Facebook Video Player is an extension for Google Chrome that enhances your video-watching experience on the social-networking giant by allowing you to play Facebook videos in a fixed location, to the right side of the page. Using this extension, you no longer have to pause your commenting or wall-posting, since you’ll always have the video in front of you. More after the break.
Once you’ve installed the extension, it automatically starts working when you play a video on Facebook. The video will be displayed in a fixed block to the right of the page, along with support for multiple videos. While you can continue to browse Facebook and watch the videos at the same time, if you decide to close a video, just hit the cross displayed on top of the video.

Facebook Video Player for Chrome may find particular popularity among the video buffs on the said website. This is the initial version of the extension, so we can expect quite a lot of new features in future releases. The link below will find this free extension for you in Chrome Web Store.
Wednesday, October 26, 2011
Windows 8 Developer Preview Free downloads
Note: You can't uninstall the Windows 8 Developer Preview. To go back to your previous operating system, you must reinstall it from restore or installation media.
Windows 8 Developer Preview with developer tools English, 64-bit (x64)
DOWNLOAD (4.8 GB)
Sha 1 hash - 6FE9352FB59F6D0789AF35D1001BD4E4E81E42AF
All of the following come on a disk image file (.iso). See below for installation instructions.
- 64-bit Windows 8 Developer Preview
- Windows SDK for Metro style apps
- Microsoft Visual Studio 11 Express for Windows 8 Developer Preview
- Microsoft Expression Blend 5 Developer Preview
- 28 Metro style apps including the BUILD Conference app
Windows 8 Developer Preview English, 64-bit (x64)
DOWNLOAD (3.6 GB)
Sha 1 hash – 79DBF235FD49F5C1C8F8C04E24BDE6E1D04DA1E9
Includes a disk image file (.iso) to install the Windows 8 Developer Preview and Metro style apps on a 64-bit PC.
Note: This download does not include developer tools. You must download the Windows 8 Developer Preview with developer tools 64-bit (x64) to build Metro style apps.
Windows 8 Developer Preview English, 32-bit (x86)
DOWNLOAD (2.8 GB)
Sha 1 hash - 4E0698BBABE01ED27582C9FC16AD21C4422913CC
Includes a disk image file (.iso) to install the Windows 8 Developer Preview and Metro style apps on a 32-bit PC.
Note: This download does not include developer tools. You must download the Windows 8 Developer Preview with developer tools 64-bit (x64) to build Metro style apps.
Live SDK
The Live SDK provides a set of controls and APIs that enable applications to integrate Single Sign On (SSO) with Windows Live ID and access information from SkyDrive, Hotmail and Windows Live Messenger. To learn more, sign up for our technical preview.
System Requirements
The Windows 8 Developer Preview works great on the same hardware that powers Windows Vista and Windows 7:
- 1 gigahertz (GHz) or faster 32-bit (x86) or 64-bit (x64) processor
- 1 gigabyte (GB) RAM (32-bit) or 2 GB RAM (64-bit)
- 16 GB available hard disk space (32-bit) or 20 GB (64-bit)
- DirectX 9 graphics device with WDDM 1.0 or higher driver
- Taking advantage of touch input requires a screen that supports multi-touch
- To run Metro style Apps, you need a screen resolution of 1024 X 768 or greater
Notes about installing the Windows 8 Developer Preview
A clean install is supported on all builds, but you can upgrade if you are installing a download without the developer tools. You will receive the full set of migration options when setup is launched in Windows. To dual-boot, you must first boot from media and choose an alternative partition.
How to install the Windows 8 Developer Preview from an ISO image
The Windows 8 Developer Preview is delivered as an .iso image that must be converted into installation media stored on a DVD or a USB flash drive. On Windows 7, the easiest way to convert this file is to use Windows Disc Image Burner. On Windows XP and Windows Vista, a third-party program is required to convert an .iso file into installable media—and DVD burning software often includes this capability.
Note: The .iso file that contains the developer tools requires a large capacity DVD called a DVD-9, as well as a DVD burner that can handle dual-layer (DL) DVDs. Most modern burners should be able to handle this format.
Are you an MSDN Subscriber?
Go to the MSDN subscriber page to see additional developer preview downloads available.
Top Features of iPhone 4S and recent Images

Today's Apple "Let's Talk iPhone" event at the company's Cupertino headquarters brought the introduction of the latest iPhone — the iPhone 4S. Though it's not the completely overhauled iPhone 5 many people were hoping for, the technology inside the iPhone 4S has received a dramatic revamp that includes the same dual-core A5 processor chip of the iPad 2; iOS 5 software; a faster 8MP camera; a 1080p HD resolution video camera; an updated antenna that works on both the GSM and CDMA networks for worldwide use; a 64GB capacity option; improved battery life for eight hours of 3G talk time; and, most noteworthy, Siri, an intelligent assistant operated by voice controls. We can expect deep Twitter integration in the iPhone 4S, as well as a Notifications center, new iMessage app, and Reminders app within the device.
The iPhone 4S comes in both black and white at a suggested retail price of $199 for the 16GB model, $299 for the 32GB model, and $399 for the 64GB model. Available for pre-order on Oct. 7, the iPhone 4S will hit US stores on Oct. 14 on three carriers: Verizon, AT&T, and Sprint.


Top 6 Cool Features Coming With Android 4.0 Ice Cream Sandwich
Android 4.0, codename Ice Cream Sandwich, is set to be rolled out to Android lovers everywhere this November with the launch of the Galaxy Nexus phone, and all signs indicate that this is the best OS yet. The entire system has been revamped and refined, bringing some powerful apps, features, and functionality to the mix. Though there are plenty of new tidbits to learn about inside Android 4.0 (which we'll be uncovering over the next few weeks prior to its release), here are six cool features we can't wait to try out.

- Face Unlock — Say buh-bye to passcodes! Thanks to some upgraded face detection software, Ice Cream Sandwich can take a quick scan of your face to unlock your device. The only downside might be low-light situations, but hopefully there's a way to bypass face detection for a code in those instances.
- Android Beam — NFC technology takes another turn with Android Beam, which will allow you to share information and content — like contacts, websites, apps, maps, and more — with other Android users within close proximity.
- Flexible widgets — Organize your homescreen the way you want it with flexible widgets. You can scale Android's stock widgets up or down in size and store them in a separate space of their own in the app drawer.
- Voice typing — This feature allows you to speak your emails, texts, messages, and search queries (or anywhere you want to enter text) just by tapping on the microphone icon on your keyboard.
- Panoramic camera modes — Your on-board camera can take full panoramic pics with Ice Cream Sandwich and full panorama mode. Partner this with the new zero-lag shutter on the Galaxy Nexus and you have a sweet way to document landscapes.
- New typeface — Hey, lookie here: Android has a new typeface! Gone are the days of Droid Sans — Roboto is on the scene now.
Want to see more? Check out the Ice Cream Sandwich and Galaxy Nexus demo video after the break.
Tuesday, October 25, 2011
How to Install Android 2.3 Gingerbread On Samsung Spica i5700?


Most of the Android 2.3 Gingerbread ROMs that we have been featuring here recently have been for HTC, Motorola and Samsung Galaxy S Series devices as these models get most of the independent development community’s attention, but now we are bringing you a latest Android 2.3 Gingerbread based custom ROM for the Samsung Spica i5700.
Disclaimer: Please follow this guide at your own risk. AddictiveTips will not be liable if your device gets damaged or bricked during the process.WARNING: This ROM is a test build and is not stable enough for daily use.
Brought to you by Samdroid forum member LeshaK, this ROM is just a test build and is quite unstable at the moment. However, the Gingerbread interface is fully functional. Audio, voice, data and SD card are working but may still have stability issues. GPS, camera, Wi-Fi and sensors are not working.
To install this ROM, download it from the link given below, copy it to the root of your SD card and flash it to your device from recovery after wiping data and cache. For detailed installation instructions, refer to our guide on how to install a ROM to your Android device from recovery.
The developer needs user response to make this ROM better. Therefore to report bugs, request features or get updates on the development progress, head over to this Samdroid Forum thread.
Subscribe to:
Posts (Atom)