Wednesday, November 30, 2011

How To Enable Add/Remove Programs When Disabled By A Virus?

Are you facing trouble opening Add/Remove Programs from your Control Panel? Does it give you the error saying that it has been disabled by administrator? Some days back we covered a post on How to enable show hidden files and folders when disabled by a virus, the problem of Disabled Add/Remove program is also a registry tweak caused by some virus and is quite frustrating for those who wants to uninstall a software but this dialogue box won’t just open up. This problem has a pretty easy solution.

Before following the below mentioned steps, it is always necessary to backup registry, if you don’t know how to create backup, follow this link of our other post.


If your system is attached to a domain, your network administrator may have disabled the Add or Remove Programs applet.

For standalone system, follow these steps:

Go to Start > Run and type regedit


Expand HKEY_CURRENT_USER from the list


Now expand the Software branch from the list.


Scroll down to find Microsoft from the list, expand this option and then Windows from the next list.

 
You will now encounter Current Version, expand it and then expand Policies too.


Here you will see an Uninstall option, select this key and on the right side you will find a key named NoAddRemovePrograms.


Delete this key to enable the Add/Remove Programs dialogue in the control Panel. And you are done !


Warning: Make sure that you have made a backup of your registry before making any changes to it.

Got any questions, suggestions, or feedback? Feel free to leave a comment.

Friday, November 25, 2011

Android radio buttons example

In Android, you can use “android.widget.RadioButton” class to render radio button, and those radio buttons are usually grouped by android.widget.RadioGroup. If RadioButtons are in group, when one RadioButton within a group is selected, all others are automatically deselected.

In this tutorial, we show you how to use XML to create two radio buttons, and grouped in a radio group. When button is clicked, display which radio button is selected.

1. Custom String

Open “res/values/strings.xml” file, add some custom string for radio button.
File : res/values/strings.xml
<?xml version="1.0" encoding="utf-8"?>
<resources>
    <string name="hello">Hello World, MyAndroidAppActivity!</string>
    <string name="app_name">MyAndroidApp</string>
    <string name="radio_male">Male</string>
    <string name="radio_female">Female</string>
    <string name="btn_display">Display</string>
</resources>

2. RadioButton

Open “res/layout/main.xml” file, add “RadioGroup“, “RadioButton” and a button, inside the LinearLayout.
File : res/layout/main.xml
<?xml version="1.0" encoding="utf-8"?>
<LinearLayout xmlns:android="http://schemas.android.com/apk/res/android"
    android:layout_width="fill_parent"
    android:layout_height="fill_parent"
    android:orientation="vertical" >
 
    <RadioGroup
        android:id="@+id/radioSex"
        android:layout_width="wrap_content"
        android:layout_height="wrap_content" >
 
        <RadioButton
            android:id="@+id/radioMale"
            android:layout_width="wrap_content"
            android:layout_height="wrap_content"
            android:text="@string/radio_male" 
            android:checked="true" />
 
        <RadioButton
            android:id="@+id/radioFemale"
            android:layout_width="wrap_content"
            android:layout_height="wrap_content"
            android:text="@string/radio_female" />
 
    </RadioGroup>
 
    <Button
        android:id="@+id/btnDisplay"
        android:layout_width="wrap_content"
        android:layout_height="wrap_content"
        android:text="@string/btn_display" />
 
</LinearLayout>
Radio button selected by default.
To make a radio button is selected by default, put android:checked="true" within the RadioButtonelement. In this case, radio option “Male” is selected by default.

3. Code Code

Inside activity “onCreate()” method, attach a click listener on button.
File : MyAndroidAppActivity.java
package com.mkyong.android;
 
import android.app.Activity;
import android.os.Bundle;
import android.view.View;
import android.view.View.OnClickListener;
import android.widget.Button;
import android.widget.RadioButton;
import android.widget.RadioGroup;
import android.widget.Toast;
 
public class MyAndroidAppActivity extends Activity {
 
  private RadioGroup radioSexGroup;
  private RadioButton radioSexButton;
  private Button btnDisplay;
 
  @Override
  public void onCreate(Bundle savedInstanceState) {
 super.onCreate(savedInstanceState);
 setContentView(R.layout.main);
 
 addListenerOnButton();
 
  }
 
  public void addListenerOnButton() {
 
 radioSexGroup = (RadioGroup) findViewById(R.id.radioSex);
 btnDisplay = (Button) findViewById(R.id.btnDisplay);
 
 btnDisplay.setOnClickListener(new OnClickListener() {
 
  @Override
  public void onClick(View v) {
 
          // get selected radio button from radioGroup
   int selectedId = radioSexGroup.getCheckedRadioButtonId();
 
   // find the radiobutton by returned id
          radioSexButton = (RadioButton) findViewById(selectedId);
 
   Toast.makeText(MyAndroidAppActivity.this,
    radioSexButton.getText(), Toast.LENGTH_SHORT).show();
 
  }
 
 });
 
  }
}

4. Demo

Run the application.
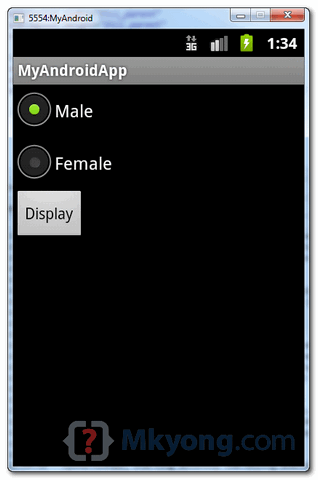
1. Result, radio option “Male” is selected.
android radio button demo1
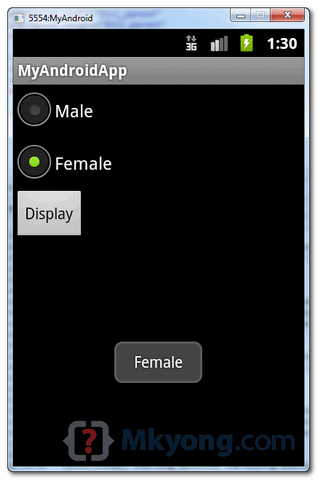
2. Select “Female” and click on the “display” button, the selected radio button value is displayed.
android radio button demo2

Sunday, November 20, 2011

Easy and Fully Configurable Laptop Battery Manager For Windows 7/Vista

We have previously covered power tools that allows you to keep a check on your laptop battery, among them so far our favorite has been Battery Bar. But now a new contender has arisen that aims to be totally flexible and fully configurable, and yes it also supports Aero Glass.

BattCursor is a free battery management tool that aims to replace the default Power functionality that comes in Windows 7 and Vista. Everything is customizable, from Cursor, Tray Symbol, and Colorization to Battery Tweaks, Power Profiles, and Notifications.


Unlike Windows, where the Advanced Power Settings is too complicated to use, BattCursor makes it easy to tweak everything from a single window. You can perform battery tweaks and create a custom power profile to suit your needs or you can simply customize the look and feel. The profile management section is quite impressive since it allows you to automatically change the power plan according to the battery. For example in my case, if the battery is above 70%, the profile would be High Performance, if battery is above 50% then Balanced, and so on.


When the battery reaches the warning level, your cursor will become yellow and so will your battery along with the superbar/taskbar and Windows Explorer. The same will happen when the battery reaches the critical level, in this case, everything will become red.


Note: This color change will only take place when Windows Aero Glass is enabled.


The screenshots taken above are from developer’s product webpage

These colors are just the default, but can be changed to anything of your liking. Not only this, but you can also set when to warn you and which percentage would mean the battery is critical, etc. Just like you can change the Power profile in Windows from the system tray, you can do the same with this tool. Simply right-click the system tray icon and go to Profiles.


There are tons of other features that you can explore. Even if you are comfortable with your current laptop battery power management, you should still give it a try since it drastically helps you in further reducing the power consumption. Since BattCursor has a less system memory footprint, it can also come handy if you are running Windows 7 on a Netbook.


It works with Windows 7 and Windows Vista, both 32 and 64-bit OS are supported. Enjoy!

Wednesday, November 16, 2011

How To Solve Laptop From Overheating [Windows 7]?

A few months back, I bought a new Core i3 laptop, hoping to run more resource intensive applications and games with better performance. While most of the applications seem to run without any issues, I have been dealing with a few thermal heating issues while playing games or running encoding tasks. For some odd reason, even reducing the affinity of the application or the game, does not eliminate the heating problem. I even bought a cooling pad, and tried switching to lower graphic options, but that, too, has resulted in minimum heat reduction. After going through many methods of reducing system heat up, it appears that there is only one true method that may be more effective than others (courtesy of our former editor, Ghaus Iftikhar), i.e., to reduce the maximum processor state from the laptop’s power settings. In this post, we will tell you how to prevent your system from heating up by adjusting the power options for your processor state.

This tip might come in handy not just for gamers and people who wish to run resource intensive application in the wake of overheating laptops, but also if, for some reason, you are unable to return a laptop with a heating issues (perhaps due to warranty constraints), or are dealing with an old laptop, which won’t take the brunt any more.

Before explaining the method of reducing the maximum processor state, let us take a look at the logic behind reducing the maximum processor state to prevent overheating of your laptop. Reducing the maximum processor state for your laptop (both when it is on battery or when the power cable is plugged in), reduces the processor’s performance a notch (depending on your settings) and prevents it from being used at optimum potential by an application or game, which will reduce thermal heating. For example, if you are playing a game that is consuming 100% of your processor’s capacity, then it may also result in heating up your system, whereas reducing the battery power state to, say 80%, can resolve this problem, and also result in battery power conservation.

To change these settings, go to Power Options from the Control Panel or the system tray menu.


Now go to Change Plan Settings –> Change Advanced Power Settings.


In the new window that pops-up, expand Processor Power management –> Maximum processor state, and reduce the on battery and plugged in power settings. The settings you keep will depend on your preferences and the capability of your system.

Based on our experience, we have noticed that that the laptop overheats when the processor is running at 100% processor state. Reducing the processor state by a few notches results in the reduction of temperate by 10-20 C, which results in a minor performance dip. We used Speccy to check for temperate during testing, based on which the processor running on 95% processor state gave the same performance (barely noticeable dip), with a drop of 10-20 C. You can keep an even lower processor state (such as 80-85%) to make sure that your laptop heats up even less.


The above mentioned tip should easily prevent your laptop from heating up; however, make sure that the processor state is not reduced very low in order to prevent reducing your processor’s performance to an undesirably low level.

How to Recover Permanently Deleted Files Easily?

We have all come across situations where we felt the need to restore a file that was deleted even from the Recycle Bin. Data recovery is possible when the files have been deleted from the hard disk, as only the reference to their location in directory structure is removed, and the space they occupy becomes available to write more data. The original file can be restored before any data is overwritten on that space. Kickass Undelete is a portable recovery tool for Windows which can recover all the deleted files on your hard drive or removable flash drive.

To start, select the drive which contains the deleted files from the left pane, and click Scan button on the right side to start scanning for deleted files. Kickass Undelete will scan and list all the deleted files on the selected drive.

Once the scanning process is complete, you can select the required files from the list. The file list can be sorted by Name, Type, Size and Last Modified. Select all the desired files and click Restore Files button available on the bottom right corner of the interface.


During testing, we felt that there should be an option to define type, size and modification date before scanning for the deleted files. We hope that the developer will include these options in the next release. Kickass Undelete is an open source application and works on Windows XP, Windows Vista and Windows 7.

How to translate Text between more than 50 languages ? - G Translator Free download

We often come across web pages with text in foreign languages, and even though Chrome has a built-in Translator, some of us prefer other browsers. G Translator is a text translation application that uses Google’s Translation service, and translates the text from one language to another. It also produces reverse translation to translate text back from the target language to source one. It has support for more than 50 languages, including Arabic, Hindi, Korean, Russian and various others.

The interface has Source Language and Target Language drop down menus at the top, Enter Your Source Text Here text field in the middle and Translated Text and Reverse Translation boxes to view the translated text below that. The Translate button is at the bottom of the main interface.

To start, select the Source Language and Target Language from the drop down menus. Then, copy and paste the text in Enter Your Source Text Here text field, and click Translate. The translated text will appear under Translated Text. Reverse Translation is a unique feature of G Translator that enables you to reverse translate the text from the target to source language without any extra commands.

During testing, we found out that there is no option to auto detect the source language, and we hope that the developer includes it in the next release, since Google’s Translation service definitely supports this. G Translator is a lightweight application with a memory footprint of only 10 mb. It works on Windows XP, Windows Vista and Windows 7, provided that Microsoft .Net Framework 2.0 or higher is installed on your system.


Wednesday, November 9, 2011

How to Disable Windows Startup Programs in Windows 7,Vista and XP?


When you start your computer, Windows isn't the only program that loads. For instance, you may have noticed icons in the notification area (also known as the system tray) in the far-right portion of the taskbar. These icons often represent programs that start when the system starts. You also may have seen certain programs, such as software for syncing your phone or MP3 player, launching themselves along with Windows. Additionally, some applications begin running silently in the background every time you boot the PC.
All of these automatically opening programs consume system memory, and can drag down performance. Fortunately, managing startup programs isn't difficult; by taking a few steps, you can find out what is running on your computer and disable the items you don't need.

Method 1: Configure a Program Directly

If you've noticed a program starting automatically, and you want the behavior to stop, sometimes the easiest solution is to explore the program's settings directly.
1. Open the program.
2. Find the settings panel. Typically it will be available under a menu labeled Settings, Preferences, Options, or Tools.
3. Find the option to disable the program from running at startup. The language for this type of option varies, but it should be easy to find if it exists.
When you restart the computer, the program will no longer launch. You'll still be able to start it manually, so don't be deterred if the application asks you if you are sure you want to disable its automatic startup.

Method 2: Use the System Configuration Utility (MSConfig)

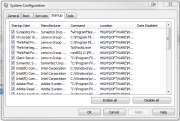
You can use msconfig.exe to change Windows' startup items.You can use msconfig.exe to change Windows' startup items.
The System Configuration Utility--also called MSConfig--is a useful tool for understanding and controlling startup programs. Microsoft intends MSConfig to act primarily as a troubleshooting tool, but its simple and powerful interface makes it a good option for startup management as well.


1. Open the Start menu and type msconfig into the Search box.
2. Click the msconfig search result. The utility will open in a new window.
3. Click the Startup tab. You'll see a list of programs that start when your computer starts.
4. To stop a program from automatically launching when you boot the PC, uncheck the box next to its entry.
5. When you are finished deselecting startup items, click OK. If you made any changes, you'll be prompted to restart the computer. You don't have to restart it immediately, but the changes won't take effect until you do.
When you restart the computer, MSConfig will alert you to the changes. In the window that pops up, check the box next to Don't show this message or launch the System Configuration Utility when Windows starts, and click OK to prevent future alerts. You can always return to MSConfig to reverse the changes or make additional tweaks.

Warning

Use caution when disabling items in MSConfig. Many entries have names that aren't self-explanatory. Research each entry before unchecking its box; use the Web to search for the name of the entry, and to get an idea of its function. Without doing your homework, you could end up disabling an important application such as your antivirus program.

Other Methods

In Windows or in third-party applications, you can find more ways to manage startup programs. For instance, Microsoft currently recommends a utility called Autoruns, which is more advanced than MSConfig. The two methods above should suit your needs, but feel free to explore other options if you are curious.

Saturday, November 5, 2011

Top 10 Antivirus Software Reviews of 2011

#1

Screenshots:


Bitdefender Antivirus Pro 2011Bitdefender Antivirus Pro 2011 is an Antivirus software which offers comprehensive security solutions. It performs outstandingly when removing online threats including viruses, malware, spyware and phishing scams among others. One of the advantages that this software offers is that it does not compromise speed with security. This means it does not cause the computer to slow down. 


Some Of The Features:
  • Stop majority of viruses and malware with Proactive Protection
  • Warnings about unsafe pages displayed in search results
  • Eliminate data leaking over email, Facebook, IM...
  • Minimize interruptions with automatic mode activations
  • Basic, Intermediate and Experts interface settings
  • Price: $29.95

#2
Screenshots:


Kaspersky Antivirus 2011Kaspersky Antivirus is an inclusive piece of software which offers security to users against several threats, such as viruses, Trojans, worms, spyware, malware, bots and rootkits.
The software is created to protect users from a number of angles and is set with advanced technology to protect them not only from common viruses, but also from new and unfamiliar threats. Kaspersky has various tools and web-specific features that are only available in more inclusive Internet Security Suites.

Some Of The Features:
  • Get Real-time protection against spy-ware and viruses
  • Website and email scanning for malicious code
  • Non Stop Digital identity protection
  • Scan for vulnerabilities and get treatment advices
  • New Easy-access Desktop gadget
  • Price: $39.95

#3
Screenshots:


Norton Antivirus 2011Norton AntiVirus 2011 provides a number of great features and a new approach to online security so as to satisfy your security needs. One of the pros of using Norton AntiVirus is its comprehensive scope of protection. Each of its components are comprehensive and they work together to offer protection from all angles. Norton AntiVirus 2011 now supports Chrome, Opera, and Safari, aside from the most popular web browsers. 


Some Of The Features:
  • Traditionally powerful protection from online threats
  • Fast and instant check of files with Norton Reputation Service
  • Multiple overlapping layers of protection with Norton Protection System
  • Up-to-the-minute updates with Norton Pulse
  • Monitors your PC for suspicious behavior with SONAR 3 Behavioral Protection
  • Price: $39.99


#4
McAffee AntiVirus Plus 2011McAffee AntiVirus Plus 2011 is an antivirus software which provides proactive online protection while boosting your system’s performance and efficiency through its Site Advisor toolbar and the new Idle Timer. McAffee AntiVirus Plus 2011 is the only antivirus software application which features a comprehensive two-way firewall. It can protect your computer against online scams, risky downloads, malicious websites and shared files on email or instant messages, among others.


Screenshots:


Price: $49.99


#5
ESET NOD32 Antivirus 4ESET NOD32 Antivirus 4 is a proactive antivirus program which protects your system while you are surfing online. ESET has a ThreatSense technology which offers protection even against unfamiliar threats. The best thing about Antivirus 4 is that they keep your system running smoothly and efficiently while it protects you from threats. The only way you will know that it is running is the occasional information system pop up.

Screenshots:


Price: $39.99

#6
Trend Micro Titanium AntivirusTrend Micro Titanium Antivirus, even with its new cloud based technologies, performed only moderately compared to other superior antivirus programs.

Its cloud based technologies allows it to protect your computer, better when compared to its earlier versions. Trend Micro Titanium Antivirus detects threats even before they enter your computer.

Screenshots:


Price: $39.95


#7
Panda Antivirus Pro 2011Panda Antivirus Pro 2011 is an effective antivirus solution. It is equipped with a number of security tools that make it one of the most efficient antivirus software available. It is capable of fighting off even new unidentified threats. Installation is simple but in one test that was conducted, the presence of malware in the system slowed down the process. It was easily solved though by using a PSCAN, a tool provided by the technical support. The software installation ran smoothly and was completed in just a few minutes.

Screenshots:


Price: $55.32


#8
Avast! Pro AntivirusAvast Pro Antivirus has been the recipient of various awards because of its efficiency in protecting systems against viruses and malwares. It combines a number of features which have made it one of the best in the industry. It has a built in protection against spyware, rootkits, Trojans, and other common threats. It has an integrated IM Shield and a specific defensive tool for P2P file sharing applications.

Screenshots:


Price: $74.95


#9
Spyware Doctor with Antivirus 2011Spyware Doctor with Antivirus 2011 is one of the most effective tools for protecting your computer against viruses and malware. This antivirus software has several powerful features, such as IntelliGuard which monitors each process and restrains behavior patterns similar to malware. It provides real-time protection for your browser, files, system, email, cookie guard, site guard, immunizer guard, startup guards, network, and processes.

Screenshots:


Price: $39.99 


#10
CA Anti-Virus r8.1CA Antivirus r8.1 is a comprehensive piece of software which you can avail of independently or as a component of the CA Threat Manager solution. When installed in stand-alone mode, it offers inclusive protection for business PCs, servers, and PDAs. The software brings together security and strong management features that block and remove malicious code before it goes through your network. It allows you to manage different client environments from one web-based console. 

Screenshots:


Price: $46.00