Wednesday, December 21, 2011

What is the feature in iphone 5 to avoid the difficulties of the hardware buttons?


Apple has released the newest beta of their upcoming iOS 5 mobile operating system, and one of the quickly discovered new features is a gesture interface that provides the same functionality as the iPhone and iPad’s hardware buttons.


Listed under the Accessibility settings in the device’s setup area, the new “Assistive Touch” option places a floating button on the screen which allows users to use touch gestures to complete a variety of commands, including returning to the home screen, multitasking, changing the device’s volume and more. While it appears that Assistive Touch is targeted at those who have difficulty with hardware buttons, the feature appearing in this way has signaled to many that Apple is considering dropping hardware buttons in future devices.

There are some gaps in the Assistive Touch software, as would be expected from a beta release. It’s possible to create and save custom gestures for the interface, but as of yet there appears to be no way to actually assign it to do anything. The rest of the interface appears to be working perfectly, however, as users can make use of the Assistive Touch menu system to access four options: Home, Device, Gestures and Favorites.

The “Home” option does exactly what it sounds like, returning the user to the iPhone or iPad’s home screen – similar in function to the hardware button. “Device” offers a multitude of different controls, including those to lock the screen, to change the volume, a button that performs a “shake” of the device, and another to rotate the screen’s orientation. The “Gestures” menu shows options for three, four and five-fingered gestures, which have been popping up in the iPad 2 betas for iOS 5 and are expected to be coming to the device when iOS 5 is officially released. Finally, “Favorites” allows access to custom, saved gestures as well as a handful of other ones such as “pinch” and “swipe”.

Customers of Apple’s devices who may struggle with some or all of the hardware gestures – think elderly users and the “shake” function on an iPad – are likely to be very happy with the company’s implementation of these resources in iOS 5. While the rumor mill is likely to use Assistive Touch as Apple’s means to finally rid their devices of hardware buttons, there’s been no indication from the company that they ever plan to do so, and a great deal of users would be frustrated with the inability to adjust things like an iPhone’s volume without taking the device out of their pocket and accessing the screen. Assistive Touch does show that Apple is paying attention to its customer space, and that they have the skills to produce software interfaces that could eliminate hardware buttons in the future if that’s what the market dictates.

It’s tough to imagine a button-less iPod or iPhone, but this could be relatively feasible for the iPad which is screen-centric and virtually everything is done via the display. Only time will tell if Apple decides to eliminate hardware buttons entirely.


1. Multi Touch Gestures
iOS 4.3 GM came with a feature named multi touch gestures. The feature enabled users in using only 4-5 fingers to perform several tasks (i.e. a 5 finger pinch would take you to the home screen). So it is the first most expected feature from iPhone 5.

2. Lack of Home Button
Users think that there is no need of a hardware home button when one can switch between the apps with just a 4 finger pinch! But it is a major hardware change; so I don’t think that Apple will do it.

3. 1GHz Dual Core CPU
We know that iPad 2 already features an A5 chip, so we can expect it from our iPhone 5 also. An A5 chip is a chip with 1GHz ARM Cortex A8 ( may be A9 also). According to Jobs, the A5 chip is 2 times faster CPU and 9 times faster GPU.

4. 512 MB Ram
iPad 2 has got the 512 MB Ram. So users are also expecting the same in their iPhone. But the chances of this change are very rare.

5. Availability of iPhone 5 from the First day of its launch
Either it is a case of iPad or of iPhone, users always want the availability of the white device from the first day of its launch. So it is also a most demanded feature of iPhone 5.

Tuesday, December 13, 2011

The Shut Down Comparison among Windows XP,Windows Vista and Ubuntu 9.04

Studying the ways of shutting down the computer has been kind of a research area among operating system GUI designers. Although we as users do not see it, designing a simple interface like shutting down the computer takes lots of user studies and research. Today with number of operating systems that we use, we can see different approaches they have taken on how to present the user with the least annoying Shut Down interface.

I'll compare the shut down mechanisms of the 3 major operating systems we use; Windows XP, Windows Vista and Ubuntu 9.04. Specifically, I'll consider the number of mouse clicks and mouse movement they require from the user. Although there are shortcut keys associated with them, I won't consider them since ordinary users won't know about them anyway.


Windows XP

In XP, users have to go through 2 dialog boxes to accomplish the task. First, the start menu and the second, the final shut down box.

  1. Click Start button. (click 1) 
  2. Click "Turn Off Computer". (click 2) 
  3. Move the mouse to the center of the screen. 
  4. Click "Turn Off" button. (click 3)


    It is clear that this involves 3 mouse clicks and a mouse movement across the screen. Although, as IT people the mouse is in our "genes", this is a fair amount of work load for a typical user. (You should've seen the time it takes for our grandma to do this)


    Windows Vista
    This is totally confusing for new users. There are number of ways you can shut down. With the default settings, you see a yellow "shut-down-like" button. People mistake this as the shut down button where it actually means "Sleep". To truly shut down the computer, you have to click the small arrow, and choose Shut Down from the not-so-simple menu that appears. This process needs a very high amount of concentration from the user.

    This is the way you do it with default settings.

    1. Click Start button. (click 1) 
    2. Click the small arrow to the right of Sleep and Lock buttons. (click 2) 
    3. Choose "Shut Down" from the the list. (click 3) (This list has 6 items. If you needed to Restart you have to find where restart is in the list. Shut Down is easier since it's the bottom-most item.) 


    This process requires 3 clicks (same as XP). But it also requires the user to thoroughly concentrate on what he/she is doing, which is too much to ask from an ordinary user.

    You can change the behavior of the Sleep button to Shut Down via power settings. Read this for instructions on how to change it. Then the whole process changes.

    1. Click start button. (click 1) 
    2. Click "Shut Down" button. (click 2) 


    Now it's only 2 clicks. So simple. The catch is that the red Shut Down button is very easily reachable. User don't get any confirmation dialog box after clicking this. So when you click it, wooosh! it's bye bye windows. So it's prone to unintended shut downs.

    In Vista they have increased the number of ways to shut down and none of them are perfect. XP way is better in my opinion.


    Ubuntu 9.04

    Ubuntu 9.04 reportedly have a nice and clean interface. This is true for their Shut Down mechanism too. Although they have borrowed the idea fromApple MacOS X, they does a good job integrating it with their user interface.

    1. Click the power button at the upper-right corner. (click 1) 
    2. Choose Shut Down from the menu. (click 2) (Menu has 6 items. Shut Down is at the bottom and Restart is the one before that) 

    That's it. If you are lazy you can leave your computer and it will shut down. But if you made an error in your decision you can always cancel it since it displays this time-out dialog box.


    If you choose, you can continue the previous process further.

    1. Move the mouse to the Shut Down dialog box. 
    2. Click the shut down button. (click 3) 
    See how thoughtful they have been. The computer will shut down without any user interaction within 60 seconds. If you are in a hurry, you make an extra mouse click on the Shut Down button on the time-out dialog.

    It's "2 clicks" or "3 clicks with a mouse move" depending on the way you choose. But always the result is the same and you have the confirmation dialog so you can undo your decision. This is the nicest shut down process I've seen so far (including MacOS X).

    Finally, see how much we can talk about a simple operation like this. (as if we don't have anything else to do!) These subtle changes effect the user's perception of an operating system. And most of the time, these are the "only" things that a user uses to judge an operating syste
    m.

    Performance Monitoring in Windows Vista

    Most of us like to hate Vista! But with enough system resources and good device drivers, Vista can deliver a really smooth user experience. In addition to having a fancy UI, Vista includes some very powerful tools that system administrators can use to monitor system activity. These tools will help you to dig into system programs and startup lists and fine tune your system performance.

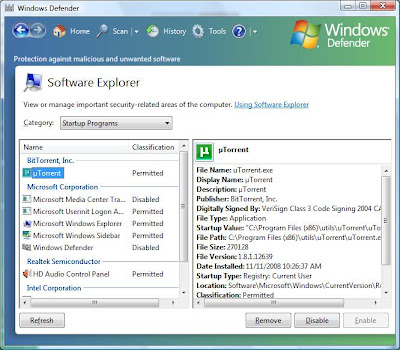
    Windows Defender: Software Explorer

    Windows Defender is a crappy tool which comes with windows to detect malicious programs. Due to its uselessness I have turned it off. But Defender has a tool called Software Explorer which is way better than using "msconfig" and "Task manager" to monitor running processes.

    Go to Control Panel -> Programs -> Windows Defender -> Tools ->Software Explorer

    Startup Programs

    This gives a more clear and detailed view than "msconfig" tool. Since it has the ability to group Manufacturer wise, you can clearly focus on those no-name entries which could most probably be viruses.

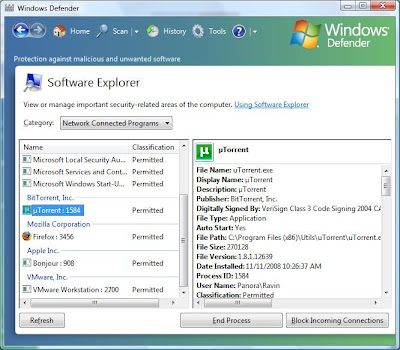
    Network Connected programs

    This shows a complete list of programs has network connectivity. To view detailed information about network communication, you can use theReliability and Performance Monitor.


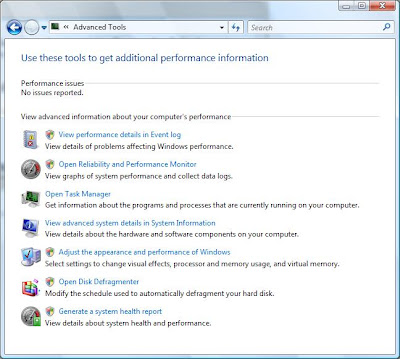
    Performance Information and Tools

    Go to Control Panel -> System and Maintenance -> Performance Information and Tools -> Advanced Tools (on the left pane)

    These include some tools which give detailed performance information reports.

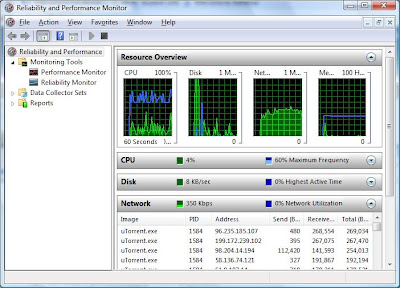
    Reliability and Performance Monitor

    Click "Open Reliability and Performance Monitor" in Advanced performance tools.


    Network monitor showing connections made by uTorrent

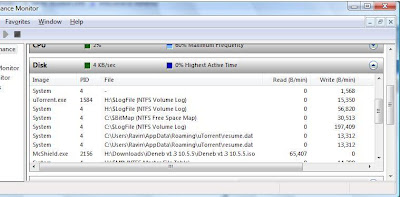
    This is one-stop place to monitor detailed system wide activity. You can monitor Network activity, Memory activity, Disk usage activity and so on. One interesting feature is that you can see details about all the open files and their disk access at any given time.


    Files opened by every process and their read/write activity


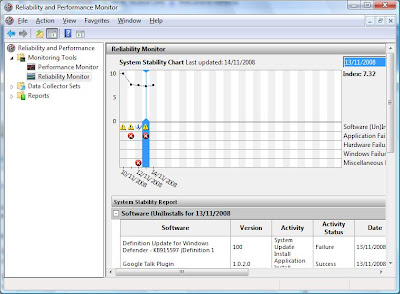
    System Stability Chart

    Windows collects system statistics over time and keeps a history of events in the event log. Vista includes a chart feature which draws a chart over time which varies due to system changes.

    Go to "Reliability Monitor" in the left pane.


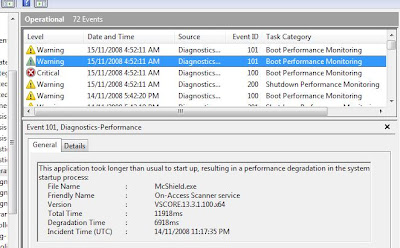
    Bootup performance monitoring in Event log

    Event log includes detailed statics for application and services startup times (including Windows boot time) so you can identify which applications delays windows startup. Windows automatically notifies you if a certain application has taken an unusual amount of time to start.

    Click "View performance details in the Event log" in Advanced performance tools.

    Ok that's the lot. Using these tools you can administer your system to identify any unwanted activity. And with better hardware resources and drivers, I think Vista is a better OS than XP. User experience wise and system administration wise.

    Monday, December 12, 2011

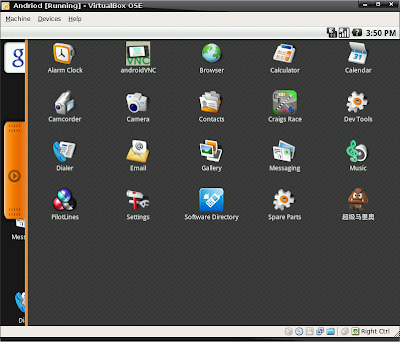
    Android on VirtualBox


    Android, which is one of the most revolutionized mobile OS introduced by Google has come long way since its first introduction. recently Google released Nexus One phone which was said to be good by Linus too. so, everyone would like to experience Google Android although you have no Android supported phone. here's a way with your favorite VirtualBox.

    Step 1 :
    Download the 2 latest CD images.


    Step 2 :
    if you are on windows use PowerISO or something to combine these two CD images 
    OR
    if you are on Linux change directory to the directory where you put your image files and simply type the following:

    cat liveandroidv0.3.iso.001 liveandroidv0.3.iso.002 > liveandroidv0.3.iso


    (make sure that you have typed the correct version number as mentioned in the image file)


    Step 3 :
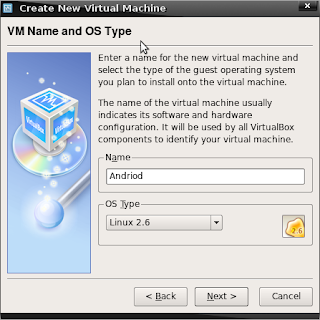
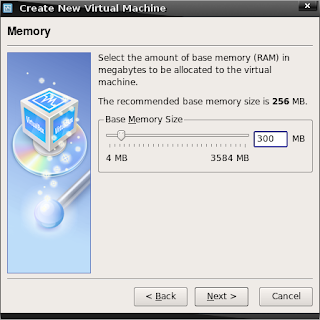
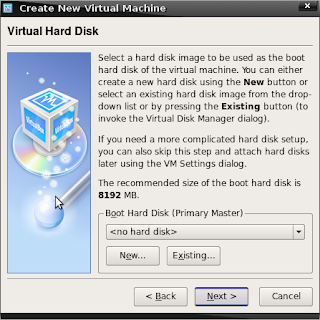
    Start VirtualBox and create a new virtual machine : select Operating System as Linux 2.6 and give 300+ MB for Base memory and you don't need to create a virtual hard disk.


    Step 4 :
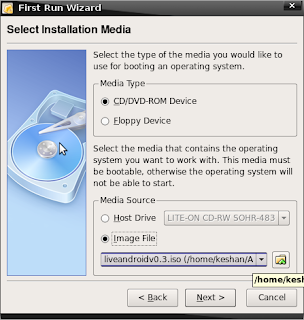
    Start the newly created Virtual machine : and in the wizard choose CD/DVD-ROM Device as Media type and Image file as the source. simply select the location of your CD image to that place.


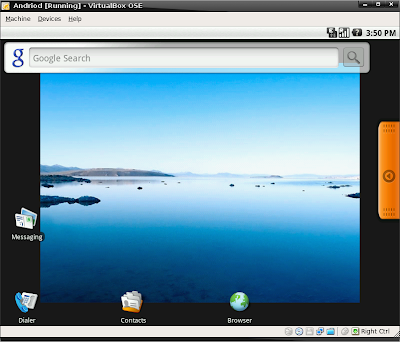
    That is it.... now you will boot into Android OS have fun........


    Controls :
    Arrows - Navigation
    Enter - confirm
    Escape - back
    windows key - home

    Tuesday, December 6, 2011

    What Is VPN & Tunneling? How To Create And Connect To VPN Network?


    When it comes to deploying a highly secured and reliable data transmission system to meet the inter-organization and intra-organization communication needs, most organizations choose to adapt one among 3 types of networking techniques namely Private Network, Hybrid Network and Virtual Private Network. In this post, we will look at each network type, and discuss Virtual Private Network, VPN tunneling, techniques & types of VPN and how to create and setup a VPN network.

    Before we get to VPN, let’s take a closer look at private and hybrid networks.
    Private Network

    Private Network is actually an isolated LAN that uses private IP address space to share data between connected nodes. In private network, applications and data portals (used to manage the communication), are designed to make the whole data exchange process secure from outsiders. Private Network is suitable for organizations where all nodes are present in one place. If private network is to be deployed for multiple sites at different locations, organization may need to purchase a dedicated line for communication followed by private network management system to address the connectivity, data exchange and data transfer speed issues.

    Hybrid Network

    Hybrid Network architecture is particularly deployed to communicate with organization’s site offices and access global WAN for exchanging data and communicating with public. As the name hints, it combines both private and public network techniques to communicate with public as well as secure intra-organization communication from external sources. The Hybrid Network routes all the intra-organization communication and data exchange via private network, while rest of communication, and data send and receive requests are routed through public network links. Just like Private Network, the deployment of hybrid network for multiple sites require leasing a dedicated line for private communication and designing a data exchange management system.

    Why Organizations Prefer VPN?

    The Private Network ensures the security of data which is to be sent & received as well as fast data transfer speed. This simple network architecture requires using one dedicated line to send and receive classified information, but after deploying a Private Network, a public network for inter-organization communication is required. This begets the need of Hybrid Network, which is a combination of both Private and Public network. Hybrid Network uses two dedicated lines for public and private communication. For instance, If an organization has 4 sites, it needs to purchase a highly secured data transmission line to link all sites and design a central data repository to conveniently manage the communication, while the public link is used to access public WAN (internet) for inter-organization data transmission. Since Hybrid Networks need two separate channels for public and private data exchange, many organizations opt-in for Virtual Private Network.
    VPN (Virtual Private Network)

    As mentioned earlier, private and hybrid networks are expensive and require purchasing separate lines for using private IP address space in order to communicate with connected nodes. VPN technology greatly cuts the cost of deploying public and private network, as it enables organizations to use global WAN for both public and private communication. The reason why it’s called virtual is that it doesn’t require physical private network to secure the data transmission. The network is physically public but virtually private. The VPN technology uses staunch encryption to protect data transmission channels from external data theft and like attacks; it uses IPsec, L2TP, PPP, PPTP etc. tunneling techniques to ensure not only data privacy but authentication and integrity as well.

    How VPN Works?

    The VPN network is quite akin to simple server/client architecture, where the server is responsible for storing and sharing encrypted data, providing gateway to initiate intra-organization communication and authorizing clients connected with the network, while VPN clients, just like clients in isolated LAN, send requests to server for retrieving shared information, establish connection with other clients on VPN and process secured information using provided application.
    VPN Tunneling

    What makes VPN end-to-end communications different from simple LAN environment is Tunneling. You can think of it as a tunnel in the internet cloud through which the send and receive data requests travel.

    The Tunnel is actually just a concept that helps us better understand the VPN network dynamics. When you initiate communication or send data over VPN network, the Tunneling protocol(s) used by the VPN network (like PPTP, L2TP, IPSec etc.) wraps up the data packets into another data packet and encrypts the package that is to be sent through the tunnel. At receiver’s end, the tunneling device/protocol deciphers the package and then strips the wrapped data packet to read and access the original message and reveal the source of packet and other classified information.
    Compulsory And Voluntary Tunneling

    The classification of Tunneling is based on the source that initiates the connection. Based on the source, there are primarily two types of Tunneling – Compulsory Tunneling and Voluntary Tunneling. The Compulsory Tunneling is initiated by Network Access Server without requiring user’s input. Moreover, VPN clients don’t have access to information on VPN server, since they are neither responsible nor in control of connection initiation. The compulsory tunneling acts as an intermediary between VPN server and clients, and responsible for authenticating the client and setting it up with VPN server.

    The Voluntary Tunneling is initiated, controlled and managed by user. Unlike Compulsory Tunneling which is managed from carrier network, it requires users to establish connection with local ISP followed by running the VPN client application. You may have used numerous VPN client software that create secured tunnels for a specific VPN server. When VPN client software attempts to initiate a connection, it targets a specific or user-defined VPN server. Voluntary Tunneling requires nothing more than installing an additional tunneling protocol on the user’s system, so that it can be used as one end-point of the tunnel.
    VPN Types & Technologies

    PPTP (Point-to-Point Tunneling Protocol) VPN is one of the most simple VPN technologies, which uses the ISP provided internet connection for creating a secured tunnel between client and server as well as client and client systems. PPTP is a software based VPN system; you may know that Windows OS has built-in PPTP, and all it needs to connect with VPN network is a VPN client software. Although PPTP doesn’t provide encryption and other security features essential to make data exchange processes confidential (Point to Point Protocol does that for PPTP), Windows natively implements authentication and encryption with PPTP to secure the data packets. The advantage is that it doesn’t require purchasing extra hardware for implementation, and client can employ provided software to connect with VPN. Nevertheless, the drawback is that it relies on Point-to-Point protocol for adding security to data packets, so before data packets start traveling through the tunnel, they can be deciphered by external sources.

    SSH Tunneling (Secure Shell Tunneling), as the name implies, uses secure shell protocol to create a tunnel for transferring data from one end to another. The biggest advantage of SSH based tunneling is that it bypasses the internet firewalls. Organizations (which want to compel their workers to use dedicated proxy servers for accessing public websites and data portals) use SSH protocols to route all traffic from dedicated servers. It’s quite different from SSL based VPN technique, where HTTPS protocol is enforced on applications, communication management system, web browsers etc, to secure the transmission from prying eyes. It creates a secure session for connecting servers from web browser and doesn’t need additional devices to configure VPN network, as only HTTPS protocol is required to initiate communication between two ends.

    Developed by IETF, IPSec’s responsibility mainly includes securing the (IP) Internet Protocol communication between end points of VPN tunnel. The data packets that pass through IPSec get encrypted with AES, DES or 3DES. Moreover, it provides both compression and authentication at network level. IPsec VPN technique uses tunnel instead of transport mode. Before sending data, it encapsulates IP packet into a new IPSec packet, ensuring the confidentiality of data packet. It adds an additional IP header, along with ESP (Encapsulated Security Payload) header to add security policy and provide encryption to original data packet. Apart from ESP, it uses AH (Authentication Header) as a sub-protocol to apply additional security layer to original data packet; this prevents third party interferences and IP spoofing.

    Microsoft, in conjunction with Cisco, developed an alternative to PPTP, known as L2TP (Layer to Tunneling Protocol) to provide data integrity. It must be noted the L2TP, just like PPTP, doesn’t provide encryption and relies on PPP (Point-to-Point Protocol) to encrypt the data packets. L2TP tunneling adds L2TP data header to original payload and transfer it to end point in UDP datagram. Apart from Point-to-Point protocol, the confidentiality, authentication and encryption can be achieved by using IPSec at network layer.
    How To Create & Setup VPN?

    There are arguably endless ways in which an organization can create a VPN network for their clients, customers and sponsor companies to fearlessly share private information and provide gateway to their internal network(s). Leaving that large scale VPN network architecture aside, if you want to create a VPN network on small scale for connecting your PCs with a friend’s home network, you can use previously featured Gbridge. It’s a free VPN solution that lets you setup your very own virtual private network, so you can remotely connect with others’ private networks.
    Connect With Remote VPN Network (Office VPN)

    Like previous Windows versions, Windows 7 also provides a simple way to connect with VPN server. If you’re planning to connect with your Office, PPTP/L2TP VPN network, you can use Windows VPN client for establishing connection. Here’s how to do it.

    Before you start off, make sure that you have configured the additional devices as instructed by your network administrator. Now open Network & Sharing Center, and click Set up a new connection or network. It will open the connection wizard. Now select Connect to a workplace option and then hit Next.


    In the next step, choose the connection you want to use to connect with your office VPN. It lets you connect with VPN network using your current connection or the destination’s phone number.


    The next step requires entering the information provided by the administrator. Here, you need to enter the IP address or domain along with destination name. Windows 7 also lets you enable VPN connection for other users and use smart card for authorization.


    Clicking Next will open the last step of the wizard. It requires username and password assigned by your office network administrator.


    When done, click connect to start establishing the connection with your VPN network. Once you’re connected with the VPN network, you can check IP detail from Network and Sharing Center or useipconfig command in CMD to verify that you’re connected with both VPN network and internet.

    Virtual Private Network has truly revolutionized the way of securing data transmission between multiple remote locations. It provides the best solution for ever-growing organizations and businesses that need to deploy both a secured network to share private information, and a public network to communicate with their customers, clients and competitors. In addition to being a cost effective solution, VPN technology eliminates the need of creating multiple data management centers to manage communication. For this very reason, VPN is the method of choice all over the globe for small companies and huge corporations alike.

    How To Convert Videos Into HTML5 Formats With Free Make Video Converter?


    Remember previously-covered Free Make Video Converter that included a host of file and device-based video conversion presets to quickly convert videos into required format? The application has just been updated to 3.0, bringing new video conversion presets for Nokia, Samsung, Andriod mobiles, BlackBerry, DVD conversion options, and significant speed improvements. Apart from newly added presets and under the hood enhancements, it can now convert videos into HTML5 formats, allowing you to create videos in Ogg, Theora, WebM, H.264 formats for your HTML5-based websites. Once the conversion is completed, it generates HTML5 video embed code, so that you can easily insert the video into required container of the webpage.

    All the video conversion presets are accessible from the bottom of the window. To convert video into HTML5, drag the video over the main interface and use the scroll button to pick HTML5 preset. It will ask you to specify the format and output video quality. Once done, specify the output folder, check the output file size, and then click Convert to begin the process.


    Just like with other presets, you can edit the video using built-in video editor before starting the conversion. Andriod video conversion option is updated with more presets, and you may view the newly-added presets by clicking to Android from the bottom row, and then exploring the drop-down menu. As of now, it only supports video conversion for 2 Nokia handsets, including N900 and N800, and Samsung Captivate SGH-1897. Hopefully, the developers will add more device presets in next iteration. It works on Windows XP, Windows Vista and Windows 7.

    Monday, December 5, 2011

    How to Optimize Your LinkedIn Profile for the Job Hunt ?

    About 120 million people now use LinkedIn, and 1 million more join every week. But how many users have a professional profile that’s actually attracting interest from hiring companies? Research my company has conducted shows that 87% of companies use LinkedIn for recruiting, so it’s a good bet that your next employer will look for talent there.

    But how easy are you to find? With all those millions of profiles available, recruiters use specific search terms and network connections to narrow the number of prospects. However, it’s still worth taking the time to tune up your profile so that it pops. Furthermore, using the new “Apply with LinkedIn” plugin, you can also use link your profile to job applications on many company career sites.

    Here are some tips to maximize the likelihood a recruiter with the perfect job contacts you first.

    1. Profile Headlines: Simple and Direct
    The headline is one line of text that appears underneath your name and in search results. In your headline, avoid overused buzzwords or over-the-top phrases (“game changer” or “change agent” are two that come to mind).

    Your headline doesn’t have to include your job title, but it should be clear and concise. Use it to describe the qualities you can offer, and position yourself for relevant job opportunities without inflating your experience. There are even times when it’s smart to downgrade a title. Say that you are a VP at a small company, but would happily consider a director title at a larger company — it may be strategic to leave out the “VP” title in your headline.

    2. Summary and Experience: Keep Your Story Tight


    People will scan your profile just as they do a news story. When I worked as a reporter, we used the inverted pyramid method to structure a story, making sure all the important facts were stacked near the beginning. You too should answer the who, what, when, why and how in your profile summary section. Point to results and quantify your impact to render your record more concrete. If you’ve written a compelling summary, your audience will read on.

    Underneath the summary is a section for specialties. This area frequently contains keywords used to make profiles findable. Optimize your profile for search engines (SEO), but not too much. The Google algorithm is too smart for keyword stuffing — and so are recruiters. If you include five lines of special skills in this section, chances are you won’t be great at any of them.
    Interest will wane further down the page, so spend your time making the top sections of your profile (summary and recent experience) the most substantial. Although in most cases, not every job you’ve held needs a detailed description.

    3. Company Name: What Does It Do?
    Recruiters and hiring managers search by industry terms as well as skills. If your employers haven’t all been household names, describe those companies in a couple of words. That way, recruiters will know whether you’re right for a job in fashion or social gaming, for example. If a former employer has been purchased since you left, and no longer exists, use the name of the acquiring company instead.
    Briefly describe ways in which that company was successful: for instance, a market share leader in a $6 billion industry, the leading patent holder or the highest-rated for customer service. If you worked in a very large company, focus on your particular division or project to help readers understand your experience better.

    4. Recommendations: Don’t Go Overboard
    It’s good to have a few meaningful recommendations, but employers take these with a grain of salt. Promote the most current or best recommendations and hide extras to prevent profile clutter.
    Public positive recommendations are easy to obtain, not to mention often too generic to be very insightful. Hiring managers can easily follow up with the people who supplied those recommendations and see if their offline comments match what’s online.
    If you’re early in your career, get one or two recommendations from professors, classmates or current colleagues. If experience as a summer lifeguard isn’t relevant to your current job search, ask contacts to speak to your work ethic rather than your backstroke.

    5. Connections and Groups: Say Yes and Say Something


    It’s an unspoken rule that people accept most connection requests on LinkedIn. Why? You may find out about an opportunity through those connections. And search results are sorted by the closest to furthest degrees of connection — so you’ll be closer to the top of the pile when your connections perform searches.

    To raise your visibility among your connections, share news about the industry or relevant companies. Then join a few professional groups that interest you. Recruiters often mine groups for prospects, and answering questions or participating in discussions shows your expertise and engagement.

    Bonus Tip: Activity Settings
    If you’re worried what your current employer might think about all this activity, change your “activity broadcasts” setting before making profile updates so your current contacts don’t see them in your feed. Too often I have heard people comment when they see someone has updated their LinkedIn profile, that “they must be looking for a job.”
    But positioning yourself for potential new opportunities shouldn’t surprise any employer. When my company asked employers how long they expect new hires to stay, one-third answered two years or less. Make sure your LinkedIn profile is ready before you are.

    Sunday, December 4, 2011

    How To Disable/Hide Google Search Bar In Android 4.0 ICS Stock Launcher?

    Among the many features and interface elements that Android 4.0 Ice Cream Sandwich took from the tablet-exclusive Android OS variant, Honeycomb, is the static search bar that it displays at the top of its stock launcher. Being static (accessible from each of the five homescreens of the stock launcher), it eliminates the need for you to make room for a search widget on the homescreen. That said, users who don’t use the search application that often might consider it dead weight doing nothing more than making their homescreen look all cluttered. XDA-Developers member oscillik has found a workaround that allows you to hide the search bar. Read on past the break to know how it’s done.


    The method involves disabling the native Google Search application, so while it may hide the search bar from the homescreen, it will also prevent you from using Google Search itself. That is, hitting the Search key on your device while on the homescreen or within the app drawer won’t launch the search application.

    Also, it doesn’t give you extra space on the homescreen. The space that the search bar takes remains unusable. Still, it does make your homescreen look a little less cluttered, and you won’t be losing much if you seldom use the search application. So without further adieu, here is what you need to do to remove the search bar from your homescreen:
    Hit the Menu key while on the homescreen, and navigate to Manage Apps > All > Google Search.
    From within the App info screen that follows, select Disable.

    That’s all there is to it. You can get the search bar back at any time by returning to the Google Search App info screen and hitting Enable. You’ll find the Google Search application at the bottom of the list with all the other disabled apps (if any).

    The method is quite simple, but if you do happen to get stuck somewhere, the following video might be able to clear things up for you.

    Saturday, December 3, 2011

    What are the features of Google+ Android App Updated version?

    The official Google+ client for Android has received a timely update (to v1.0.7) with a plethora of useful features that would surely help it compete better with some of the other hot-running social apps among users (Facebook in particular). For starters, it adds support for the much anticipated group video chat feature better known as Hangouts. Also added to the updated client of Google+ for Android are some other sought-after features which we shall delve into after the break.


    If you have an Android device with a front-facing camera and Android 2.3 or above, then the news of the addition of Hangouts to the Google+ client would surely delight you. For other users, it’s just a matter of time before this feature is available for their devices as well. We put the Hangouts feature to test on our Nexus S with quite satisfactory results. To our (rather pleasant) surprise, an active Hangout session keeps running in the background. To alert you of your active Hangout, the app displays a notification icon in the status bar.

    Glancing at some of the other features included with the updated Google+ client for Android, we find that users can now set their profile pictures from within the app. Other noteworthy additions made to the updated client include sharing photos in Huddle (now known as Messenger), long pressing on posts in stream to +1, share and mute them and improved SMS support (for users in India only). In addition, the app brings enhanced public search and App2SD support along with extensive settings for your Google+ notifications.


    To set a new profile photo, just tap on the Profile button, tap on the profile photo thumbnail, then pick one from the gallery or simply grab a fresh one instantly from your camera.

    As mentioned earlier, Huddle is now called Messenger and allows you to share photos with your contacts. You will notice a camera icon besides the text message field on the conversation screen. Tap on this icon to pick an image from the gallery or capture a new photo. Tapping on a shared image displays it in full screen.


    To enable/disable notifications for selective activities in your Google+ network, go to Menu > Settings > Notification Settings.

    To install Google+ app on your device for the first time or to upgrade the existing installation, visit the Android Market link or simply scan the QR code provided below.

    Google+ App For Android

    Ever since the advent of social media (back in the age when Friendster and MySpace ruled) the social networking industry has enjoyed rapid growth. Most of the people reading this post must know that a Tweet doesn’t have much to do with the chirping of a bird and the word “Wall” is sure to make you think of Facebook. That’s the kind of influence social networking holds over our daily lives these days. Seeing the success of social networking, how can the giants of Internet refrain from entering the fray? Yes, you guessed it, Google is launching a new project called “Google+” that’s all about social interaction.


    Let us delve into the features of this Android app one by one. The full app is actually a combination of collaborating utilities working together to give a complete interactive environment.

    Stream: “Stream” is the place where you can share your thoughts, news and other things with the people you choose to interact with. You simply post anything here and it is shared with your contacts.

    Huddle: “Huddle” lets you send messages to multiple users simultaneously. This is a pretty old facility but one that’s long been marred by bugs, flaws and inconveniences. Google+ is hopeful to give the perfect group messaging experience.

    Circles: Privacy is the biggest downside when it comes to social networking. When online, it’s a little complicated to share the right information with the right people. “Circles” comes up with just the right solution to this problem. You can have distinct online social life among your family and colleagues or any other group. What you share with your friends doesn’t necessarily needs to be told to your family too!

    Other features: There are a bundle of other really cool features that leave Google+ looking like a good prospect for the future. “Spark” helps you strike up a conversation on any topic of your choice. “Photos” saves and shares your photos and albums. There are also location-based services available for Android users that let you navigate, choose a place you want to visit and tag the locations which are new to you.

    That’s pretty much it. The project is in closed beta phase and the app for your Android device is available on the Android market. Fingers tingling to get your hands on this latest hot-cake of an app? But wait, here’s the catch, the testing version is invite only and you need an invitation from Google to download it. Here’s the link where you can request an invite. So just write to Google and you just might get an exclusive invitation to use what could be the social networking giant of tomorrow.


    For any further information on the app, you can follow the link to the official Google blog.

    How To Install Windows 8 On A Windows 7 Tablet ? - Simple Guide

    If you have a tablet capable of running the Windows 7 operating system, then you might be interested in trying out a more tablet-oriented Windows OS, i.e., Windows 8. Although the currently available Windows 8 build is still in its pre-beta stage, however, you might find the new Metro UI to be more suitable for your tablet. In this post, we will provide you with a guide for installing Windows 8 on a Windows 7 tablet.


    Disclaimer: Despite the fact that many Windows 7 PCs and tablets are capable of running Windows 8 Developer’s preview, it must be noted that installing Windows 8 on your tablet can result in issues. Please follow this guide at your own risk. 

    Requirements:
    • Windows 8 ISO
    • Bootable Windows 8 USB. 
    • At least 20GB of free hard disk space (recommended)

    1. Windows 8 installation from USB

    Instructions:
    • Connect and boot your Windows 7 tablet from the bootable USB. To do this, you may have to change your BIOS settings.
    • Once the tablet boots from USB drive, follow the regular installation procedure to install Windows 8 on your tablet.
    • After the installation is complete, install the respective drivers (which can be downloaded from your manufacturers website).

    2. Windows 8 Installation From ISO

    Using this method, you can install Windows 8 on a tablet by mounting the Windows 8 ISO to a disc mounting application, and initiating the installation from the .EXE file.

    Instructions:
    • Login to a regular Windows 7 session on your tablet, and make sure that you have a system backup.
    • Mount the Windows 8 ISO image with a disc mounting tool. You can pick a free disc mounting application from our compilation of the 20 best disc mounting applications.
    • Now, open the virtual disc drive and run the EXE file to proceed with the Windows 8 installation. During installation, select the Windows 7 drive to overwrite Windows 7 with Windows 8. Your Windows 7 data will be moved to the Windows old folder after the installation of Windows 8.


    Although Windows 8 can be uninstalled , we recommend you to keep a backup of your Windows 7 installation to revert the changes.

    How to Calculate Hash, Compare Files And Join & Split Files?

    File Tools is a an opensource utility which is primarily built for splitting and joining files. It also includes checksum and comparison functions to check file chunks and joined file against original Hash value. You can set it to generate a hash file separately while performing joining or file splitting.

    However, the application is not new in the software arena, the processing speed and simple usage made us cover the application. All the 4 main features are listed on the left flank, you can start out with any option you want to. Before splitting or joining files, you can enable an option for saving checksum and also compare the files. While processing, it also saves checksum file in the same folder. Under Split window, you have the options for specifying Size Presets, Size Unit and enable/disable an option for calculating checksum. It also lets you specify chunk size to fit your needs. After the settings are in place, specify the Input file, output path and name of the file. Click Split button to begin the process. Join feature only need a .001 to be specified to begin the file joining process.


    It displays all the information of processes being carried out and if selected calculates the checksum.


    While testing, it made two chunks of one hefty video file having 900MB size in couple of minutes. If you’re rarely need to use file joiners and splitters, you can give this application a try as it offers absolutely no unwanted settings and options. It supports all Windows based OS, we tested it on Windows 7 x86 system.

    How To Update Your PC Applications Automatically?- Simple way

    It can be difficult to keep track of updates for all your installed computer applications. R-Updater simplifies this task and provides a convenient solution for keeping all your software programs up-to-date.

    The portable application offers a user-friendly interface. Upon launching the program, it will instantly check your system to create a list of all applications currently installed. After populating the list, it will scan the applications for their updated versions. You will be prompted for updates that are found.

    The application makes it super simple to navigate from one list to the other. All options and buttons are clearly highlighted. Search filters enable you to instantly look for a particular program. Additionally, you can also add applications manually to the system. The application also features a Give Away Of the Daywhere one application is offered as a freebie everyday.

    The application highlights program updates under three columns – New Catalog Version, New Users Version and New Beta Version. A description for this classification is not given on the product or developer site.


    For advanced options, go to Settings from the bottom. You can configure the columns and trays that are to be displayed. You can also configure your Internet connection from the Internet tab. Scheduler tab enables you to specify a period after which the application looks for new updates.

    It supports Windows 7 OS; testing was carried out on Windows 7, x86 system.

    Wednesday, November 30, 2011

    How To Enable Add/Remove Programs When Disabled By A Virus?

    Are you facing trouble opening Add/Remove Programs from your Control Panel? Does it give you the error saying that it has been disabled by administrator? Some days back we covered a post on How to enable show hidden files and folders when disabled by a virus, the problem of Disabled Add/Remove program is also a registry tweak caused by some virus and is quite frustrating for those who wants to uninstall a software but this dialogue box won’t just open up. This problem has a pretty easy solution.

    Before following the below mentioned steps, it is always necessary to backup registry, if you don’t know how to create backup, follow this link of our other post.


    If your system is attached to a domain, your network administrator may have disabled the Add or Remove Programs applet.

    For standalone system, follow these steps:

    Go to Start > Run and type regedit


    Expand HKEY_CURRENT_USER from the list


    Now expand the Software branch from the list.


    Scroll down to find Microsoft from the list, expand this option and then Windows from the next list.

     
    You will now encounter Current Version, expand it and then expand Policies too.


    Here you will see an Uninstall option, select this key and on the right side you will find a key named NoAddRemovePrograms.


    Delete this key to enable the Add/Remove Programs dialogue in the control Panel. And you are done !


    Warning: Make sure that you have made a backup of your registry before making any changes to it.

    Got any questions, suggestions, or feedback? Feel free to leave a comment.