Showing posts with label Operating Systems. Show all posts

Sunday, May 13, 2012

What are the Different ways to Shutdown PC & Shutdown XP Faster??

Different ways to shutdown your pc

There are so many different ways to turn off your Windows XP computer, let's look at some of them:


1. The standard approach - click the Start Button with your mouse, then select the Turn Off menu and finally click the Turn Off icon on the Turn Off computer dialog. blink.gif

2. Press Ctrl+Esc key or the Win key and press u two times - the fastest approach.

3. Get the Shutdown utility from Download.com - it add the shut down shortcuts for you. Else create them yourself using approach 4.

4. Create a shutdown shortcut on your desktop. Right click on the desktop, choose New Shortcut and type shutdown -s -t 00 in the area where you are asked to specify the location of the program file. Now you can just double click this icon to turn off the computer. The best location would be your quick launch bar.

5. Press the Win key + R key to open the run window. Type shutdown -s -t 00. [s means shutdown while t means the duration after which you want to initiate the shutdown process].

If some open processes or application won't let you turn off, append a -f switch to force a shut down by closing all active processes.


6. Win+M to minimize all windows and then Alt+F4 to bring the Turn Off computer dialog.

7. Open Windows Task manager (by right clicking the Windows Task bar or Alt+Ctrl+Del) and choose Shut down from the menu. Useful when the Windows are not responding.

8. open task manager--->click on shutdown--->hold the ctrl key and click on Turn off::::::: pc will be turned off in 3 secs.. fastest method other than hard shutdown


Shutdown XP Faster..!!
Like previous versions of windows, it takes long time to restart or shutdown windows XP when the "Exit Windows" sound is enabled. To solve this problem you must disable this useless sound.

1. Click Start button.
2. Go to settings > Control Panel > Sound, Speech and Audio devices > Sounds and Audio Devices > Sounds.
3. Then under program events and windows menu click on "Exit Windows" sub-menu and highlight it. Now from sounds you can select, choose "none" and then click Apply and OK.
4. Now you should see some improvements when shutting down your system.

Sunday, April 29, 2012

How to Downgrade Android OS? - Simple Guide

Have you ever had an experience of it before when your android OS is not functioning well as it used to be before due to upgrade and other factors? If you’ve had one before – it is likely that you may be looking for a permanent solution to it now. And one of those permanent solutions is to downgrade your OS to the formal one before the issue arose so that you can be able to re-upgrade when it is right for you to do so.

I have in this post simple guides that will show you How to Downgrade Android OS to lower version e.g – downgrade your device from android 2.2 to 2.1, or downgrade an HTC device from 2.0 to 1.6 respectively.


Guides on How to Downgrade Android OS to lower versions without hassle


1. Download the earlier versions of your device’ android firmware. For example, say you want to download android 2.1 OS, then you should conduct a research on Google for keyword like “Download Android 2.1 Firmware”


2. Use the regular steps according to your device manufacturer guidelines (you might consider checking your manufacturer’s manual before doing that). You’ll find the software extracted and in there, you’ll see a file that ends with/extension “nbo” – that is the Android ROM image file. And it is advisable that you get the exact Android ROM Image Filedue to the reason that, they differ from one manufacturer to the other.

3. Download RUT (ROM Update Tool)

Use the link prescribe beside here to download the ROM update tool for this tutorial. Download RUT here.

4. On your device, install ROM Update Tool Application and after it has being installed on your phone – reboot your Android Phone.

5. Once it is rebooted, browse the Android Image File and select next

6. Then Switch OFF your phone and then remove battery to ensure that the Downgrade starts

7. Switch on again

8. Click the Call+Delete button on your device as it is starting up

9. Connect a USB cable to your desktop PC and the select next on the RUT application

10. And from this moment, the Android ROM image will be installed on your phone

11. Now start to enjoy your newly downgraded android phone.

I believe you find How to Downgrade Android OS from 2.2 to 2.1 useful? Please share your tips and problems in the section below.

Saturday, April 28, 2012

Using Task ForceQuit Pro to Quickly End Tasks - Easy way


After some digging around in the registry, I have traced the problem to the fact it writes a registry entry when you tick the box, but the next time it checks if the box has been ticked before, a different non existent registry key is checked. Below are the registry entries that will stop the activation window appearing and also stop the success window from popping up again. Copy the text below into a notepad text file, and save as ‘yourname.reg’. Then double click the file to import into the registry. Works on current version 1.0.2.0.
Windows Registry Editor Version 5.00

If Task ForceQuit Pro didn’t have these nagging screen issues and the restart / shutdown buttons could be made a bit safer, it has the potential to be a very good little utility. With the registry entries above applied, it still makes a handy tool even though you have to take care with the bottom row of buttons.Compatible with Windows 7, Vista and XP
Download Task ForceQuit Pro

Activate In Built Windows 8 Flip 3D Feature - Simple Guide


1. Press Windows Key + R to open run prompt and then type gpedit.msc and press enter.

2. Now navigate to Computer Configuration >> Administrative Templates >> Windows Components >> Desktop Window Manager – Locate the settings in the right page which says Do not allow Flip3D Invocation – double click this entry to change the settings and then select disabled so that Flip 3D gets enabled.


You should know the following info about this windows 8 setting. This policy setting allows you to configure the accessibility of the Flip 3D feature. Flip 3D allows the user to view items on the Windows desktop as they are being flipped through in three dimensions. 


If you enable this policy setting, Flip 3D is inaccessible.

If you disable or do not configure this policy setting, Flip 3D is accessible, if desktop composition is turned on. When Windows Flip 3D is activated with the Windows+Tab keys, a visual version of the desktop is presented and items can be flipped through to select. 
Please Note: Changing this policy setting requires a logoff for it to be applied only then you will be able to see Flip 3D in effect.

Saturday, April 21, 2012

The steps to Get GPS Navigation on My Smartphone ?

 You can use your smartphone to get GPS navigation complete with satellite tracking to help you on important trips. Mobile GPS is offered by a variety of vendors giving you the option to choose the service with amenities that best suit you. In order to take advantage of GPS services on your smartphone, you must have a data plan with your service provider. Advanced GPS programs are available for a fee, but many free applications also exist.


Browse the main menu on your smartphone for the icon labeled "Applications." Click this icon.


Type "GPS" into the search bar. A list of GPS applications will appear. Some may require a subscription to the service in addition to a fee to download. However, you can also find a "Maps" application that offers directions as a feature rather than the main function of the program. These applications are typically free and allow you to identify your position on the map using satellite technology.


Click "Download" then "OK" when prompted. Once the application download is complete, the GPS program will be added to the desktop of your smart phone. Set up your GPS by entering your current location and a list of favorites under the "Settings" menu of your new application.

Tuesday, December 13, 2011

The Shut Down Comparison among Windows XP,Windows Vista and Ubuntu 9.04

Studying the ways of shutting down the computer has been kind of a research area among operating system GUI designers. Although we as users do not see it, designing a simple interface like shutting down the computer takes lots of user studies and research. Today with number of operating systems that we use, we can see different approaches they have taken on how to present the user with the least annoying Shut Down interface.

I'll compare the shut down mechanisms of the 3 major operating systems we use; Windows XP, Windows Vista and Ubuntu 9.04. Specifically, I'll consider the number of mouse clicks and mouse movement they require from the user. Although there are shortcut keys associated with them, I won't consider them since ordinary users won't know about them anyway.


Windows XP

In XP, users have to go through 2 dialog boxes to accomplish the task. First, the start menu and the second, the final shut down box.

  1. Click Start button. (click 1) 
  2. Click "Turn Off Computer". (click 2) 
  3. Move the mouse to the center of the screen. 
  4. Click "Turn Off" button. (click 3)


    It is clear that this involves 3 mouse clicks and a mouse movement across the screen. Although, as IT people the mouse is in our "genes", this is a fair amount of work load for a typical user. (You should've seen the time it takes for our grandma to do this)


    Windows Vista
    This is totally confusing for new users. There are number of ways you can shut down. With the default settings, you see a yellow "shut-down-like" button. People mistake this as the shut down button where it actually means "Sleep". To truly shut down the computer, you have to click the small arrow, and choose Shut Down from the not-so-simple menu that appears. This process needs a very high amount of concentration from the user.

    This is the way you do it with default settings.

    1. Click Start button. (click 1) 
    2. Click the small arrow to the right of Sleep and Lock buttons. (click 2) 
    3. Choose "Shut Down" from the the list. (click 3) (This list has 6 items. If you needed to Restart you have to find where restart is in the list. Shut Down is easier since it's the bottom-most item.) 


    This process requires 3 clicks (same as XP). But it also requires the user to thoroughly concentrate on what he/she is doing, which is too much to ask from an ordinary user.

    You can change the behavior of the Sleep button to Shut Down via power settings. Read this for instructions on how to change it. Then the whole process changes.

    1. Click start button. (click 1) 
    2. Click "Shut Down" button. (click 2) 


    Now it's only 2 clicks. So simple. The catch is that the red Shut Down button is very easily reachable. User don't get any confirmation dialog box after clicking this. So when you click it, wooosh! it's bye bye windows. So it's prone to unintended shut downs.

    In Vista they have increased the number of ways to shut down and none of them are perfect. XP way is better in my opinion.


    Ubuntu 9.04

    Ubuntu 9.04 reportedly have a nice and clean interface. This is true for their Shut Down mechanism too. Although they have borrowed the idea fromApple MacOS X, they does a good job integrating it with their user interface.

    1. Click the power button at the upper-right corner. (click 1) 
    2. Choose Shut Down from the menu. (click 2) (Menu has 6 items. Shut Down is at the bottom and Restart is the one before that) 

    That's it. If you are lazy you can leave your computer and it will shut down. But if you made an error in your decision you can always cancel it since it displays this time-out dialog box.


    If you choose, you can continue the previous process further.

    1. Move the mouse to the Shut Down dialog box. 
    2. Click the shut down button. (click 3) 
    See how thoughtful they have been. The computer will shut down without any user interaction within 60 seconds. If you are in a hurry, you make an extra mouse click on the Shut Down button on the time-out dialog.

    It's "2 clicks" or "3 clicks with a mouse move" depending on the way you choose. But always the result is the same and you have the confirmation dialog so you can undo your decision. This is the nicest shut down process I've seen so far (including MacOS X).

    Finally, see how much we can talk about a simple operation like this. (as if we don't have anything else to do!) These subtle changes effect the user's perception of an operating system. And most of the time, these are the "only" things that a user uses to judge an operating syste
    m.

    Performance Monitoring in Windows Vista

    Most of us like to hate Vista! But with enough system resources and good device drivers, Vista can deliver a really smooth user experience. In addition to having a fancy UI, Vista includes some very powerful tools that system administrators can use to monitor system activity. These tools will help you to dig into system programs and startup lists and fine tune your system performance.

    Windows Defender: Software Explorer

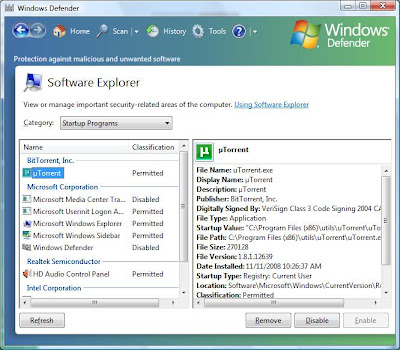
    Windows Defender is a crappy tool which comes with windows to detect malicious programs. Due to its uselessness I have turned it off. But Defender has a tool called Software Explorer which is way better than using "msconfig" and "Task manager" to monitor running processes.

    Go to Control Panel -> Programs -> Windows Defender -> Tools ->Software Explorer

    Startup Programs

    This gives a more clear and detailed view than "msconfig" tool. Since it has the ability to group Manufacturer wise, you can clearly focus on those no-name entries which could most probably be viruses.

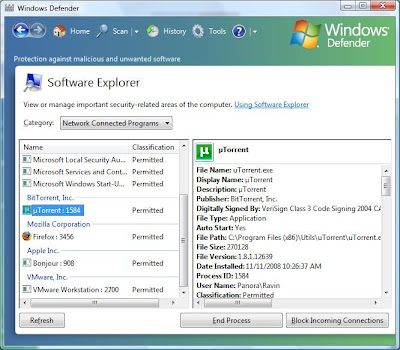
    Network Connected programs

    This shows a complete list of programs has network connectivity. To view detailed information about network communication, you can use theReliability and Performance Monitor.


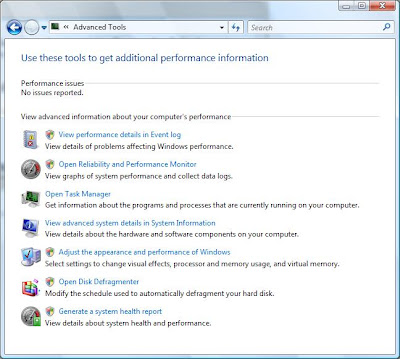
    Performance Information and Tools

    Go to Control Panel -> System and Maintenance -> Performance Information and Tools -> Advanced Tools (on the left pane)

    These include some tools which give detailed performance information reports.

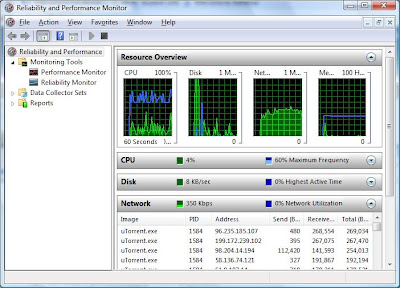
    Reliability and Performance Monitor

    Click "Open Reliability and Performance Monitor" in Advanced performance tools.


    Network monitor showing connections made by uTorrent

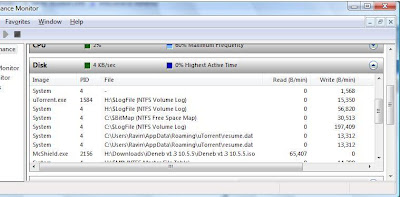
    This is one-stop place to monitor detailed system wide activity. You can monitor Network activity, Memory activity, Disk usage activity and so on. One interesting feature is that you can see details about all the open files and their disk access at any given time.


    Files opened by every process and their read/write activity


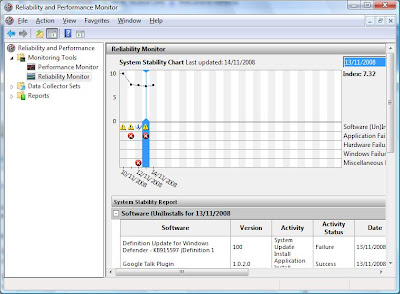
    System Stability Chart

    Windows collects system statistics over time and keeps a history of events in the event log. Vista includes a chart feature which draws a chart over time which varies due to system changes.

    Go to "Reliability Monitor" in the left pane.


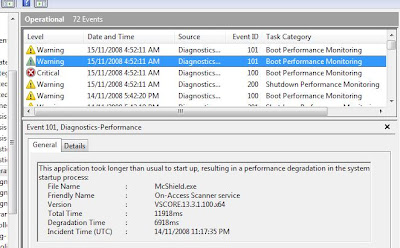
    Bootup performance monitoring in Event log

    Event log includes detailed statics for application and services startup times (including Windows boot time) so you can identify which applications delays windows startup. Windows automatically notifies you if a certain application has taken an unusual amount of time to start.

    Click "View performance details in the Event log" in Advanced performance tools.

    Ok that's the lot. Using these tools you can administer your system to identify any unwanted activity. And with better hardware resources and drivers, I think Vista is a better OS than XP. User experience wise and system administration wise.

    Monday, December 12, 2011

    Android on VirtualBox


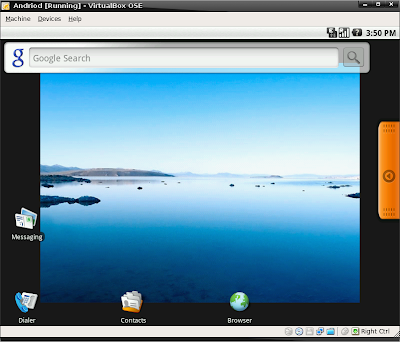
    Android, which is one of the most revolutionized mobile OS introduced by Google has come long way since its first introduction. recently Google released Nexus One phone which was said to be good by Linus too. so, everyone would like to experience Google Android although you have no Android supported phone. here's a way with your favorite VirtualBox.

    Step 1 :
    Download the 2 latest CD images.


    Step 2 :
    if you are on windows use PowerISO or something to combine these two CD images 
    OR
    if you are on Linux change directory to the directory where you put your image files and simply type the following:

    cat liveandroidv0.3.iso.001 liveandroidv0.3.iso.002 > liveandroidv0.3.iso


    (make sure that you have typed the correct version number as mentioned in the image file)


    Step 3 :
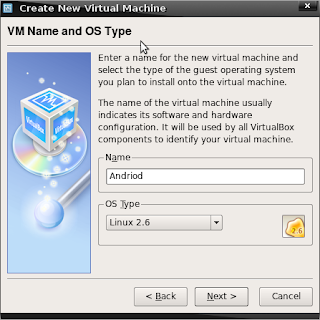
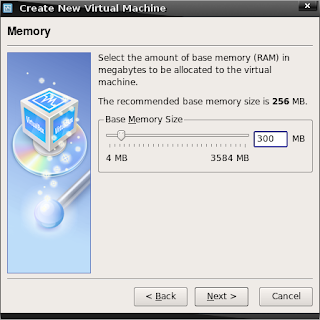
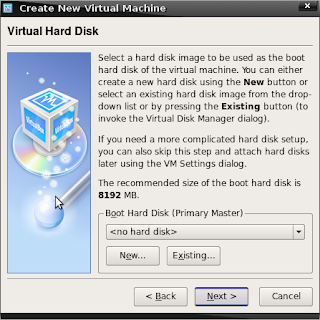
    Start VirtualBox and create a new virtual machine : select Operating System as Linux 2.6 and give 300+ MB for Base memory and you don't need to create a virtual hard disk.


    Step 4 :
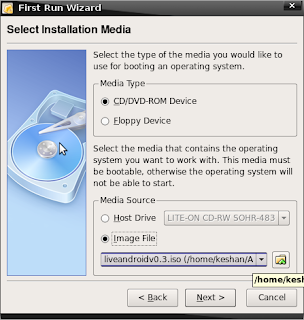
    Start the newly created Virtual machine : and in the wizard choose CD/DVD-ROM Device as Media type and Image file as the source. simply select the location of your CD image to that place.


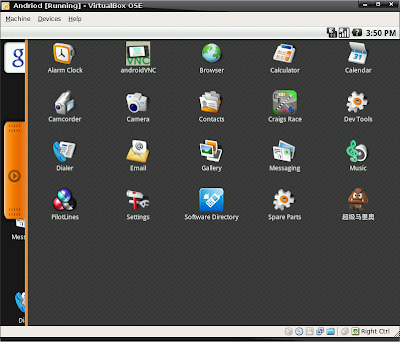
    That is it.... now you will boot into Android OS have fun........


    Controls :
    Arrows - Navigation
    Enter - confirm
    Escape - back
    windows key - home

    Saturday, December 3, 2011

    How To Install Windows 8 On A Windows 7 Tablet ? - Simple Guide

    If you have a tablet capable of running the Windows 7 operating system, then you might be interested in trying out a more tablet-oriented Windows OS, i.e., Windows 8. Although the currently available Windows 8 build is still in its pre-beta stage, however, you might find the new Metro UI to be more suitable for your tablet. In this post, we will provide you with a guide for installing Windows 8 on a Windows 7 tablet.


    Disclaimer: Despite the fact that many Windows 7 PCs and tablets are capable of running Windows 8 Developer’s preview, it must be noted that installing Windows 8 on your tablet can result in issues. Please follow this guide at your own risk. 

    Requirements:
    • Windows 8 ISO
    • Bootable Windows 8 USB. 
    • At least 20GB of free hard disk space (recommended)

    1. Windows 8 installation from USB

    Instructions:
    • Connect and boot your Windows 7 tablet from the bootable USB. To do this, you may have to change your BIOS settings.
    • Once the tablet boots from USB drive, follow the regular installation procedure to install Windows 8 on your tablet.
    • After the installation is complete, install the respective drivers (which can be downloaded from your manufacturers website).

    2. Windows 8 Installation From ISO

    Using this method, you can install Windows 8 on a tablet by mounting the Windows 8 ISO to a disc mounting application, and initiating the installation from the .EXE file.

    Instructions:
    • Login to a regular Windows 7 session on your tablet, and make sure that you have a system backup.
    • Mount the Windows 8 ISO image with a disc mounting tool. You can pick a free disc mounting application from our compilation of the 20 best disc mounting applications.
    • Now, open the virtual disc drive and run the EXE file to proceed with the Windows 8 installation. During installation, select the Windows 7 drive to overwrite Windows 7 with Windows 8. Your Windows 7 data will be moved to the Windows old folder after the installation of Windows 8.


    Although Windows 8 can be uninstalled , we recommend you to keep a backup of your Windows 7 installation to revert the changes.

    Wednesday, November 16, 2011

    How To Solve Laptop From Overheating [Windows 7]?

    A few months back, I bought a new Core i3 laptop, hoping to run more resource intensive applications and games with better performance. While most of the applications seem to run without any issues, I have been dealing with a few thermal heating issues while playing games or running encoding tasks. For some odd reason, even reducing the affinity of the application or the game, does not eliminate the heating problem. I even bought a cooling pad, and tried switching to lower graphic options, but that, too, has resulted in minimum heat reduction. After going through many methods of reducing system heat up, it appears that there is only one true method that may be more effective than others (courtesy of our former editor, Ghaus Iftikhar), i.e., to reduce the maximum processor state from the laptop’s power settings. In this post, we will tell you how to prevent your system from heating up by adjusting the power options for your processor state.

    This tip might come in handy not just for gamers and people who wish to run resource intensive application in the wake of overheating laptops, but also if, for some reason, you are unable to return a laptop with a heating issues (perhaps due to warranty constraints), or are dealing with an old laptop, which won’t take the brunt any more.

    Before explaining the method of reducing the maximum processor state, let us take a look at the logic behind reducing the maximum processor state to prevent overheating of your laptop. Reducing the maximum processor state for your laptop (both when it is on battery or when the power cable is plugged in), reduces the processor’s performance a notch (depending on your settings) and prevents it from being used at optimum potential by an application or game, which will reduce thermal heating. For example, if you are playing a game that is consuming 100% of your processor’s capacity, then it may also result in heating up your system, whereas reducing the battery power state to, say 80%, can resolve this problem, and also result in battery power conservation.

    To change these settings, go to Power Options from the Control Panel or the system tray menu.


    Now go to Change Plan Settings –> Change Advanced Power Settings.


    In the new window that pops-up, expand Processor Power management –> Maximum processor state, and reduce the on battery and plugged in power settings. The settings you keep will depend on your preferences and the capability of your system.
    Based on our experience, we have noticed that that the laptop overheats when the processor is running at 100% processor state. Reducing the processor state by a few notches results in the reduction of temperate by 10-20 C, which results in a minor performance dip. We used Speccy to check for temperate during testing, based on which the processor running on 95% processor state gave the same performance (barely noticeable dip), with a drop of 10-20 C. You can keep an even lower processor state (such as 80-85%) to make sure that your laptop heats up even less.


    The above mentioned tip should easily prevent your laptop from heating up; however, make sure that the processor state is not reduced very low in order to prevent reducing your processor’s performance to an undesirably low level.

    Friday, November 4, 2011

    How to create a Windows Restore Point?

    A restore point can be created automatically or manually, depending on the actions of the user. Windows will create a restore point automatically when the user installs Windows for the first time on a computer and when Windows updates are installed. This is done in the event there are problems sometime after Windows or updates were installed and the user needs to rollback Windows to that previous installation/restore point. Below are the steps for how to create a restore point manually at any time.


    Windows Vista and Windows 7 users
    To create a restore point in Windows Vista and Windows 7, follow the below steps.

    1. On the Windows desktop, click START, find Computer (or My Computer) in the Start Menu, right-click with your mouse and select Properties.


    2. A new window will open. On the left side, click on the System protection option. This will open the System Properties window, with the System Protection tab selected. (If the System Protection tab is not selected, click on that tab to select it.)

    3. Near the bottom on the System Protection tab, click the Create button.


    4. Another small window will open. Enter a description for the restore point in the text field and click the Create button.


    The restore point will be created and available to rollback to if ever needed.

    If you ever need to rollback Windows Vista or Windows 7 to an earlier time, on the System Protection tab, click the System Restore button and follow the prompts to select a restore point and initiate the rollback.

    Windows XP users

    To create a restore point in Windows XP, follow the below steps.

    1. Click Start, All Programs, Accessories, System Tools, and then System Restore.

    2. The System Restore window will open. Select the Create a restore point option and click the Next button.


    3. Enter a description for the restore point in the Restore point description text field and click the Create button.

    The restore point will be created and available to rollback to if ever needed.


    If you ever need to rollback Windows XP to an earlier time, on the first screen of the System Restore window, select the Restore my computer to an earlier time option and follow the prompts to select a restore point and initiate the rollback.

    Wednesday, October 26, 2011

    Windows 8 Developer Preview Free downloads

    The Windows 8 Developer Preview is a pre-beta version of Windows 8 for developers. These downloads include pre release software that may change without notice. The software is provided as is, and you bear the risk of using it. It may not be stable, operate correctly or work the way the final version of the software will. It should not be used in a production environment. The features and functionality in the pre release software may not appear in the final version. Some product features and functionality may require advanced or additional hardware, or installation of other software.


    Note: You can't uninstall the Windows 8 Developer Preview. To go back to your previous operating system, you must reinstall it from restore or installation media.

    Windows 8 Developer Preview with developer tools English, 64-bit (x64)

    DOWNLOAD (4.8 GB)

    Sha 1 hash - 6FE9352FB59F6D0789AF35D1001BD4E4E81E42AF

    All of the following come on a disk image file (.iso). See below for installation instructions.

    • 64-bit Windows 8 Developer Preview
    • Windows SDK for Metro style apps
    • Microsoft Visual Studio 11 Express for Windows 8 Developer Preview
    • Microsoft Expression Blend 5 Developer Preview
    • 28 Metro style apps including the BUILD Conference app

    Windows 8 Developer Preview English, 64-bit (x64)

    DOWNLOAD (3.6 GB)

    Sha 1 hash – 79DBF235FD49F5C1C8F8C04E24BDE6E1D04DA1E9

    Includes a disk image file (.iso) to install the Windows 8 Developer Preview and Metro style apps on a 64-bit PC.

    Note: This download does not include developer tools. You must download the Windows 8 Developer Preview with developer tools 64-bit (x64) to build Metro style apps.


    Windows 8 Developer Preview English, 32-bit (x86)

    DOWNLOAD (2.8 GB)

    Sha 1 hash - 4E0698BBABE01ED27582C9FC16AD21C4422913CC

    Includes a disk image file (.iso) to install the Windows 8 Developer Preview and Metro style apps on a 32-bit PC.

    Note: This download does not include developer tools. You must download the Windows 8 Developer Preview with developer tools 64-bit (x64) to build Metro style apps.


    Live SDK

    The Live SDK provides a set of controls and APIs that enable applications to integrate Single Sign On (SSO) with Windows Live ID and access information from SkyDrive, Hotmail and Windows Live Messenger. To learn more, sign up for our technical preview.


    System Requirements

    The Windows 8 Developer Preview works great on the same hardware that powers Windows Vista and Windows 7:
    • 1 gigahertz (GHz) or faster 32-bit (x86) or 64-bit (x64) processor
    • 1 gigabyte (GB) RAM (32-bit) or 2 GB RAM (64-bit)
    • 16 GB available hard disk space (32-bit) or 20 GB (64-bit)
    • DirectX 9 graphics device with WDDM 1.0 or higher driver
    • Taking advantage of touch input requires a screen that supports multi-touch
    • To run Metro style Apps, you need a screen resolution of 1024 X 768 or greater


    Notes about installing the Windows 8 Developer Preview

    A clean install is supported on all builds, but you can upgrade if you are installing a download without the developer tools. You will receive the full set of migration options when setup is launched in Windows. To dual-boot, you must first boot from media and choose an alternative partition.

    How to install the Windows 8 Developer Preview from an ISO image

    The Windows 8 Developer Preview is delivered as an .iso image that must be converted into installation media stored on a DVD or a USB flash drive. On Windows 7, the easiest way to convert this file is to use Windows Disc Image Burner. On Windows XP and Windows Vista, a third-party program is required to convert an .iso file into installable media—and DVD burning software often includes this capability.

    Note: The .iso file that contains the developer tools requires a large capacity DVD called a DVD-9, as well as a DVD burner that can handle dual-layer (DL) DVDs. Most modern burners should be able to handle this format.

    Are you an MSDN Subscriber?
    Go to the MSDN subscriber page to see additional developer preview downloads available.

    Sunday, October 23, 2011

    How to resolve Black Screen in Windows?


    Starting your computer and seeing the disastrous black screen  means that you definitely need to see these troubleshooting black screen computer tips. I have seen many black screens on computers as I used to repair them. I am grateful that I do not have to do this any more, as I used to have literally piles of computers complaining of the same problem, a black screen problem. Now that I am not fixing computers, I have time to write tutorials and troubleshooting black screen tips for other people to learn by. It is impossible for me to mention every possible cause or solution of a black screen computer, however even if this article helps 50% of the people that read it, I will be happy.
    Troubleshooting Black Screen, this could mean a few things:
    • You were just about to load Windows and saw the logo screen and then you got a black screen in Windows.
    • You saw the usual loading screens but just didn’t quite make it into Windows. You did not see a Windows logo as it appears that you can only see a black screen in Windows.
    • You logged into Windows and then saw a black screen.
    • You were using the computer and then a black screen in Windows appeared.
    • You have logged into Windows to see a black screen with a flashing cursor.
    If you see a computer black screen and do not see anything else at all, including the usual loading screens, then your black screen has appeared before Windows has even had a chance to load. As you can see, there are many ways to have a computer black screen and therefore it is very hard to pinpoint your particular problem. Sometimes having this problem can be easily solved, but at other times it is a nightmare and hopefully these troubleshooting black screen tips will help you.
    Start in Safe Mode when Troubleshooting Black Screen Errors
    1. If you can start your computer in safe mode you should be able to choose to do a system restore, providing you have not disabled the system restore feature. Below I have a screen shot of the incensed boot options menu that you see when you press the F8 key when starting the computer. In the screen shot below I have chosen safe mode. When I pressed enter the computer will boot to safe mode.
    black screen in Windows seven safe mode

    Last known good configuration for troubleshooting black screen problems

    2. Restart your computer and press F8 to get to the advanced options menu. Choose to start with the last known good configuration. If you are lucky enough to see a screen full of options, after an error with a black screen in Windows, never choose to start the computer normally. You should always choose a safer option right now. The two best options to try first our last known good configuration and safe mode. In the screen shot below I have selected “last known good configuration” to see if Windows start with the same files it did before the error happened.
    troubleshooting black screen last know good configuration

    8 More Troubleshooting Black Screen Computer Tips

    The following troubleshooting tips for a black screen in Windows are not in any particular order. I probably would recommend that if you can start your computer, always do it in safe mode after a serious error. Also when you have a black screen in Windows, do not rush and try to fix the problem straight away, as you may cause more problems than you realize.

    Check all your cables

    1. Check to see that or you’re plugs are securely plugged in and there is nothing connected that should not be there. This includes having a small USB flash drive plugged in while you are trying to start the computer. did a cable come loose while you were using your computer? What about the power supply to the computer? These are pretty common causes but can still cause a panic until you find the culprit.
    Check for faulty devices
    2. Check for bent pins or faulty devices. Unplug printers and external hard drives. Also check the ends of connections to see if there are any bent pins. For example a bent pin on the end of the keyboard cable can cause a black screen. This might not apply to a black screen in Windows unless the pin board device has become faulty while you are using Windows. This troubleshooting black screen computer tip is a difficult one to diagnose manually. Ir is like searching for a needle in a hay stack!

    Check hardware

    3. Check your internal hardware. Check to see if your hard drive and CD drives are plugged in correctly and securely. If you have recently transported your computer from one place to another this could dislodge the CPU all loose certain cables. Also check your computer memory as this is one of the number one reasons for a black screen. If you see a black screen in Windows while you have been using the computer, you may have had a hardware problem. This can be caused by a video card, as mentioned below, or even something as simple as dust on your CPU, causing your computer to overheat. You Can still get a black screen in Windows because your CPU may have just been connecting to the motherboard. Basically hanging on by a thread.

    Enabled low resolution video or enable VGA mode

    4. If you are playing a game on your computer and it shut down and when you restart you only have a black screen, you need to restart the computer. When restarting press F8 to go to the advanced options menu, and choose ―enable low-resolution video‖ or ―enable VGA mode‖. This problem often happens when you are playing a game that your video or graphics card cannot handle. Your computer might overheat from the pressure or it could possibly damage the video card.If you are a gamer you would be familiar with troubleshooting black screen problems as the games just keep getting bigger and bigger!

    Connecting a TV or another monitor

    5. If you have recently changed monitors or connected your computer to a TV try restarting and pressing F8 to get the advanced options menu, then choose ―enable low-resolution video‖ or ―enable VGA mode‖. You can also try pressing the Fn key on your keyboard and F5 or F6 at the same time. Back in the old days….Hmm I am not that old. We did not even think about trying to connect your computer to your TV and did not need troubleshooting black screen tips.

    On-board video vs install video card

    6. If you are just set up your computer when plugged all the cables in, check to see if the monitor is plugged into the on-board video plug when you actually have a PCI or AGP video card installed. Trust me I have done this myself. Simply move the plug to the correct position.

    Use a diagnostic POST card

    7. You can also try troubleshooting black screen problems and fix boot errors with a diagnostic POST card. This is a PCI card that you can slot into your computer’s motherboard to help diagnose boot errors and sometimes troubleshooting black screen problems.
    HOTER PC POST Diagnostic Test Card Motherboard Analyzer for PCI/LPT 2 Digits

    Use the Windows operating system disc

    8. If you have an original Windows operating system disc that came with your computer, then definitely insert it into the CD or DVD drive, and use this discs resources to repair your computer. Even if you are using Windows XP, it also has a recovery console that will help you prepare a black screen. However with Windows Vista and Windows 7 it is even easier to repair a black screen in Windows if you have the original operating system CD. These versions of Windows now have an option to restore your system in the recovery console options.
    system recovery Windows 7
    If you do not have an operating system cd you can buy a repair cd for under $10.
    Ultimate Boot CD / Disc Ultimate Repair Recovery Fix DOS Windows 7 XP Vista 98 95 New 2011 Disk
    I hope my troubleshooting tips for having a black screen in Windows can help you. Of course there is no guarantee in this situation as there are literally hundreds of causes and solutions for this problem.