Saturday, May 26, 2012

What is VoIP? How does it work?

3.1 What is VoIP?

VoIP stands for 'V'oice 'o'ver 'I'nternet 'P'rotocol. As the term says VoIP tries to let go voice (mainly human) through IP packets and, in definitive through Internet. VoIP can use accelerating hardware to achieve this purpose and can also be used in a PC environment.

3.2 How does it work?

Many years ago we discovered that sending a signal to a remote destination could have be done also in a digital fashion: before sending it we have to digitalize it with an ADC (analog to digital converter), transmit it, and at the end transform it again in analog format with DAC (digital to analog converter) to use it.
VoIP works like that, digitalizing voice in data packets, sending them and reconverting them in voice at destination.
Digital format can be better controlled: we can compress it, route it, convert it to a new better format, and so on; also we saw that digital signal is more noise tolerant than the analog one (see GSM vs TACS).
TCP/IP networks are made of IP packets containing a header (to control communication) and a payload to transport data: VoIP use it to go across the network and come to destination.
Voice (source) - - ADC - - - - Internet - - - DAC - - Voice (dest)

3.3 What is the advantages using VoIP rather PSTN?

When you are using PSTN line, you typically pay for time used to a PSTN line manager company: more time you stay at phone and more you'll pay. In addition you couldn't talk with other that one person at a time.
In opposite with VoIP mechanism you can talk all the time with every person you want (the needed is that other person is also connected to Internet at the same time), as far as you want (money independent) and, in addition, you can talk with many people at the same time.
If you're still not persuaded you can consider that, at the same time, you can exchange data with people are you talking with, sending images, graphs and videos.

3.4 Then, why everybody doesn't use it yet?

Unfortunately we have to report some problem with the integration between VoIP architecture and Internet. As you can easy imagine, voice data communication must be a real time stream (you couldn't speak, wait for many seconds, then hear other side answering): this is in contrast with the Internet heterogeneous architecture that can be made of many routers (machines that route packets), about 20-30 or more and can have a very high round trip time (RTT), so we need to modify something to get it properly working.

What is JUnit? What are the benefits?

JUnit is an open source framework that has been designed for the purpose of writing and running tests in the Java programming language. JUnit was originally written by Erich Gamma and Kent Beck. There are many ways to write test cases. A test case is a code fragment that checks that another code unit (method) works as expected. So if we want an accurate and efficient testing process then using a good testing framework is recommended. JUnit has established a good reputation in this scenario. 


JUnit is a regression-testing framework that developers can use to write unit tests as they develop systems. Unit testing belongs to test a single unit of code, which can be a single class for Java. This framework creates a relationship between development and testing. You start coding according to the specification and need and use the JUnit test runners to verify how much it deviates from the intended goal. Typically, in a unit testing, we start testing after completing a module but JUnit helps us to code and test both during the development. So it sets more focus on testing the  fundamental building blocks of a system i.e. one block at a time rather than module level functional testing. This really helps to develop test suites that can be run any time when you make any changes in your code. This all process will make you sure that the modifications in the code will not break your system without your knowledge.

Using a framework, like JUnit, to develop your test cases has a number of advantages, most important being that others will be able to understand test cases and easily write new ones and that most development tools enable for automated and / or one click test case execution.

JUnit provides also a graphical user interface (GUI) which makes it possible to write and test source code quickly and easily. JUnit shows test progress in a bar that is green if testing is going fine and it turns red when a test fails. There is a lot of pleasure in seeing the green bars grow in the GUI output. A list of unsuccessful tests appears at the bottom of the display window. We can run multiple testsconcurrently. The simplicity of JUnit makes it possible for the software developer to easily correct bugs as they are found.

Monday, May 21, 2012

Making Win Xp 60% Faster

Whenever you start your computer, you are faced with a few moments of thumb twiddling while Windows XP boots and prompts you to log on. Although you should expect to wait for a few moments, sometimes Windows XP seems to boot rather slowly. In fact, you may notice that over a period of time the PC that used to roar to life seems a bit sluggish instead. Fortunately, you can perform several techniques that help Windows XP get the bootup speed you want. This chapter explores how to put these techniques to work.

Some of the things may already have been discussed in some threads earlier

Stopping Unneeded Startup Services

Along with the core operating system and programs that Windows XP runs when it starts, there is also a host of services involved. Many of these services are necessary for Windows XP to operate correctly. However, many of them are for features in Windows XP that you may not use at all. You can peruse the services and disable any service that you do not want to run. The fewer services that run, the more quickly Windows XP will boot.

Caution: Exercise caution when stopping services. If you do not know what a service does or are unsure of the ramifications of stopping the service, leave it alone. Some services are critical to Windows XP's operations, so make sure you understand what the service is before you disable it.

To reduce the number of services that start on bootup, you can access two different areas of Windows XP. The first is the System Configuration Utility. The Services tab shows you the services that start when the computer boots.

You can stop a service from starting by simply clearing the check box next to the service and clicking OK. However, before you do so, there is another way to disable services that you may prefer because the interface gives you more information about the service in question.

Open Control Panel/Administrative ToolsServices or else select Start/Run, type services.msc, and click OK. Either way, you see the Services console.

I prefer to use the Services console instead of the System Configuration Utility because it describes what the service does. Additionally, you can double-click a service and examine its properties.

Notice the Startup Type column in Figure 4-2. This information lists whether the service is automatic or manual. Manual services are only started in Windows XP when you start a process that requires the service. Some other process may require the service that has a "dependency" relationship with it; in this case, the dependency service will start, as well. Because these services do not start automatically when you boot Windows XP, you do not need to do anything with manual services.

However, all services listed as automatic start when Windows XP boots. These are the services that increase boot time. As I have mentioned, many of them are necessary and important, so you should not stop automatic services from booting unless you are sure of the ramifications. You can get this information by looking at the Description column. Here's a quick look at common services you may want to live without:

Automatic Updates: This service enables Windows XP to check the Web automatically for updates. If you don't want to use
Automatic Updates, you can disable the service. You can always check for updates manually at the Windows Update Web site.

Computer Browser: If your computer is not on a network, you don't need this service. If you are on a network, leave it alone.

DHCP Client: If you are not on a network, you do not need this service. If you are on a small workgroup, you can still increase boot time by configuring manual IP addresses (which I explore later in this chapter).

DNS Client: If you are not on a network, you do not need this service. If you are, leave it alone.

Error Reporting and Event Log: You don't have to use these services but they can be very helpful, so I would leave them configured as automatic.

Fax: If you don't use your computer for fax services, you can disable this one. Help and Support: If you never use the Windows XP

Help and Support Center (found on the Start menu), you can disable this service.

IMAPI CD-Burning COM: This service enables you to burn CDs on your computer. If you never burn CDs, you can disable the service.

Indexing Service: Your computer keeps an index of files but if you rarely search for files, the service is just a resource hog. You can stop it and turn the service to manual.

Windows Firewall/Internet Connection Sharing: If you do not use these features, you can disable them.

Infrared Monitor: If you do not use infrared devices, you can disable this service.

Messenger: This service sends alert messages on a local area network (it is not the same as Windows Messenger). If you are not on a network, you can disable this service.

Print Spooler: If you do not do any printing from the computer, you can disable this service. If you print, make sure you leave it as automatic.

Remote Registry: This service allows remote users to modify the Registry on your computer. If you are not on a network, you can disable this service.

System Restore Service: This service allows you to use System Restore. If you have turned off System Restore anyway, you do not need to turn off the service. If you do, you turn off System Restore.

Themes: If you do not use themes, you can disable this service.

Windows Image Acquisition: If you do not use scanners or digital cameras, you can disable this service.

Wireless Zero Configuration: If do not use wireless networking devices, you can disable this service.

You may have a number of other automatic services, depending on software and other configurations on your computer. So it's a good idea to look through the services and learn more about them. If you double-click a service, a Properties dialog box appears

Notice that on the General tab, you see a Startup Type drop-down menu. If you want to change an automatic service to manual, select Manual here and click OK. As a general rule, don't disable a service unless you are sure you will never use it.

However, manual configuration allows the service to be started when you find it necessary, thus speeding up your boot time. However, before you change a service to manual, look at the Dependencies tab (see Figure 4-4). This tab shows you which other services depend upon the service you are considering changing.

Keep in mind that services are necessary for the vast functionality you get with Windows XP. Change only those services that you understand and do not use. How you use your Windows XP computer should be the best guide in terms of optional startup services.

Tip:

The Indexing service and the System Restore service take up a lot of disk space and system resources across the board.
You can live without the Indexing service but I suggest that you keep using System Restore. It works great when you are in a bind and this is one case where the loss of speed may not be worth the ramifications of not using System Restore. Speed Tips and Tricks for Windows XP Startup Aside from startup programs, services, and the Prefetch folder, there are a number of other startup procedures and issues you can modify to help Windows XP start faster. The following sections explore those tips and tricks. Manual IP Addressing on Small Office/Home Networks Windows XP is configured to help you take care of networking. It uses the TCP/IP protocol for networking in workgroups, or what you might call small office or home networks that do not use a dedicated server. The problem is that automatic IP addressing can be slow. When your computer boots, it has to query the network to see what IP addresses are already in use and then assign itself one. If you want to speed up the boot time a bit, consider manually assigning IP addresses to all computers on the network. This way, the network computers do not have to worry about locating an automatic IP address. Because one is manually configured, the operating system doesn't have to spend time solving this problem. This isn't a networking book, however, so I won't delve into the implications of using a manual IP address, but if you are using a computer that functions as a host computer to the Internet (using Internet Connection Sharing [ICS]), you can get into connectivity problems if you change the configuration of the IP address. However, you can still work around this problem by starting with the ICS host computer. Select Start/Connect To/Show All Connections. Right-click your network adapter card and click Properties. On the General tab, select TCP/IP in the list of services and click the Properties button. In the TCP/IP properties, you can see if you use an automatic or manual IP address. In the example in Figure 4-5, I have configured a manual IP address of 90.0.0.1 and a default subnet mask. The other computers on my office network each use a different IP address in the same class, such as 90.0.0.2, 90.0.0.3, 90.0.0.4, and so on. This way, each computer has a permanent IP address, which helps increase boot time. Note that if you change the IP addresses of your computers, they must all use the same subnet mask. A default subject mask of 255.255.255.0 will keep you in good shape. Make sure you understand the implications of changing IP addresses on your network. If you have no networking experience at all, you may be wiser to leave the automatic IP addressing as is and try to gain some speed using the additional suggestions in this chapter. Disabling Recent Documents History Windows XP includes a feature that keeps track of all recent documents you have opened or used. The idea is that you can select Start/Recent Documents History and quickly reopen any document you have recently used. I use many documents each day and never use the feature myself. In my opinion, I can keep up with what I want to use without Windows XP doing it for me. The bad thing about Recent Documents History is that Windows XP has to calculate what should be put there each time you boot Windows, which can slow things down. So, if you never use the Recent Documents History, it's a good idea to disable it.

Here's how:
1. Open the Registry Editor (select Start/Run, type regedit, and click OK).
2. Navigate to HKEY_CURRENT_USER\Software\Mcft\Windows\ CurrentVersion\Policies\Explorer.
3. Create a NoRecentDocsHistory D_WORD key. Double-click the value to open it once it is created.
4. Set the Data Value to 1 to enable the restriction.
5. Click OK and close the Registry Editor. You'll need to restart the computer for the change to take effect. Disabling the Boot Logo You can remove the boot logo that appears when you start Windows XP. This little tweak probably shaves only a few seconds off your boot time but seconds count if you are serious about trying to get Windows XP up and running as quickly as possible. The only negative is that if you remove the boot logo, you will also not see any boot messages, such as check disk. (But if you are not having problems with your computer, this isn't such a big deal.)
To remove the boot logo, follow these steps:
1. Select Start/Run, type msconfig, and click OK.
2. In the System Configuration Utility, click the BOOT.INI tab.
3. On the BOOT.INI tab, click the NOGUIBOOT check box option. Click OK. Removing Unwanted Fonts One trick that increases your boot time a bit is to lose any fonts in the Fonts folder in Control Panel that you never use. The more fonts you have, the more processing Windows XP has to do to prep all of those fonts for use. You must be a bit careful here to not remove fonts that you might want, but there is a good chance that you can live without many of them. For instance, you may have foreign language fonts and other symbol fonts (such as Wingdings) that you never use. To delete unneeded fonts, follow these steps:
1. Open the Fonts folder in Control Panel.
2. Select Edit/Select All and then Edit/Copy.
3. Create a new folder on your desktop, open it, and select Edit/Paste.
4. In this new folder, delete any of the fonts you do not want.
5. Return to the Fonts folder in Control Panel. Right-click the selected fonts and click Delete.
6. Go back to your new desktop folder and click Edit/Select All.
7. Return to your Fonts folder and click Edit/Paste. You now have only the desired fonts in the Fonts folder. Tip: You can directly delete fonts from the Fonts folder without creating the secondary folder. However, I recommend the preceding steps to help ensure that you do not make a mistake in the deletion process. Stopping Remote Assistance and Remote Desktop Sharing In Windows XP Professional, you have two remote networking features called Remote Assistance and Remote Desktop Sharing. These remote networking features are very helpful in a variety of situations but if you don't use them, it is good idea to disable them to save boot time. You can always enable them later if you want to use them. Note: If you are interested in using Remote Desktop or Remote Assistance, see my book Windows XP for Power Users: Power Pack published by John Wiley & Sons.
1. Open the Start menu, right-click My Computer, and choose Properties.
2. Click the Remote Tab.
3. Clear both check boxes to disable Remote Assistance and Remote Desktop. Speeding Up the Dual-Boot Timeout If you dual-boot your computer with Windows XP and another operating system, you see an operating system selection menu on startup. If you typically boot into Windows XP and not the other operating system, you can speed up the dual-boot timeout value so that you do not wait so long for the boot process to select your default operating system and continue with the boot process. The default timeout value is 30 seconds but you can change this setting to 10. This gives you enough time to select the alternate operating system if you want but also speeds up the boot process. You can skip this section if you do not use a dual-boot configuration.
Follow these steps:
1. Locate the boot.ini file on your computer. It is a hidden file by default; mine is located in C:\boot.ini.
2. Open the file with Notepad (which is what opens it by default).
3. Change the Timeout value to 10 (see Figure 4-11).
4. Select File/Save and close Notepad. Speeding Up Your PPPoE Connection If you use a Point-to-Point Protocol connection over Ethernet (PPPoE), you may notice a delay in using the PPPoE connection after startup. By default, there is a 120 second delay but you can stop this behavior by manually configuring an IP address for the network adapter card. If you do not use a PPPoE connection, you can skip this section.
1. Select Start/Connect to/Show All Connections.
2. Open the TCP/IP properties for your LAN network interface card.
3. Manually set the IP address on the TCP/IP properties to an appropriate IP address and subnet mask for your network. Reducing the Wait Time When you start to shut down Windows XP, it has to quit, or "kill," any live applications or processes that are currently running. So close all applications first. However, some applications and processes are always running in the background. You can reduce the amount of time that Windows XP waits for those applications and processes to close before Windows XP kills them. Edit three different Registry settings to change this:
1. Open the Registry Editor.
2. Navigate to HKEY_CURRENT_USER\Control Panel\Desktop. Select WaitToKillAppTimeout and set the value to 1000.
3. Select the HungAppTimeout value and set it to 1000 as well. 4
. Navigate to HKEY_USERS\.DEFAULT\Control Panel\Desktop. Set the WaitToKillAppTimeout and set the value to 1000. Select the HungAppTimeout \newline value and set it to 1000 as well.
5. Navigate to HKEY_LOCAL_MACHINE\System\CurrentControlSet\Contro l. Select the WaitToKillServiceTimeout value and set it to 1000.
6. Close the Registry Editor. Automatically Killing Tasks on Shutdown You know the drill. You start to shut down the computer, you wait a few moments, and then you see a dialog box asking if you want to kill an application or service that is running. Instead of prompting you, you can make Windows XP take care of the kill task automatically. Here's how:
1. Open the Registry Editor.
2. Navigate to HKEY_CURRENT_USER\Control Panel\Desktop.
3. Highlight the value AutoEndTasks and change the value to 1.
4. Close the Registry Editor.

Reverse the mouse buttons


1) No context menu
What will you see when you right click on the desktop? You will see a context menu which says arrange icons, refresh,..and so on. Are you angry at your friend for not wishing you for you B'day? Do you wanna play a trick on a newbie in your family who is new to computers? This is a cool trick to play. By this tweak, you will be able to disable the right click on the desktop or any icons/files/folders/applications... But right click will work on taskbar of the start button and registry. So, dont worry!!!
Open your registry and you will see all unknown files like HKEY_CLASSES_ROOT....... and so on. Don't panic. Follow this path. HKEY_CURRENT_USER>SOFTWARE>MICROSOFT>WINDOWS>CURRENT VERSION>POLICIES>EXPLORER. On the right side of the registry, you will see two files(in general) named 'default' and 'NoDriveTypeAutoRun'. Right click on the empty space in the registry and goto New>DWORD VALUE and name it as "NoViewContextMenu". Remember, no spaces and N,V,C,M should be capitals. Right click on this and click modify. The default value will be 0. Change it to 1. Note: DONOT CHANGE THE HEXADECIMAL TO DECIMAL. Click OK. Close your registry and logout. Bingo!!! Once you login again, right click wont work. Your friend will be perplexed and the next thing he/she does is call the system administrator not knowing that not all system administrators will be knowing about registry. Now, to enable it again. follow the same path and set the value to 0. Logout and then login to see the effect.
2) Reverse the mouse buttons
This is a cool trick to play on newbies. Actually, there are two ways to do this. One is changing the settings in the Control panel and the other is through editing registry. You can do it either way. But I prefer the second way, which is challenging.
(i) Through Control Panel - goto Start> Control Panel> Printers and other hardware> Mouse. In Button configuration, enable the switch primary and secondary buttons option and click OK. But remember, you have just swapped the mouse buttons. So, for OK, you have to click the right mouse button. The newbie will be perplexed. Well, this trick is good for left handers.
(ii) Editing the registry - By default the left mouse button is the primary and the right is secondary. Open your registry and follow this path:
HLEY_CURRENT_USER>Control Panel>Mouse and on the right side of the registry, create this String value(REG_SZ): 'SwapMouseButtons' and set its value to 1. Bingo!!! You are done. Log out/Restart the computer.
You can try this: Combine tricks 1 and 2. That means, this will result in swapping of the mouse buttons and disabling the left click(once the buttons are swapped). User is ready to call system administrator cuz he feels that the system is behaving wildly.

Create A Hidden User Account


Create A Hidden User Account
This tweak allows an account that is normally displayed on the Welcome screen to be hidden from view. To log on using the account it's necessary to use the Log On To Windows dialog box similar to the one in Windows 2000. #[Start] [Run] [Regedit]#Registry Key:

HKEY_LOCAL_MACHINE\SOFTWARE\Microsoft\WindowsNT\CurrentVersion\Winlogon\SpecialAccounts\UserList#Modify/Create the Value Data Type(s) and Value Name(s) as detailed below.#Data Type: REG_DWORD [Dword Value] // Value Name: Type Name of Account to be Hidden#Setting for Value Data: [0 = Account is Hidden / 1 = Enabled]#Exit Registry and Reboot...

While the account is hidden on the Welcome screen, note that the account profile will be visible in C:\Documents and Settings or wherever user profiles are stored as well as in Local Users and Groups

Hidden Programs In Windows XP !


Is it strange to hear , but true that some good programs are hidden in Windows XP !!!

Programs :

1. Private Character Editor :

Used for editing fonts,etc.
** start>>Run
** Now, type eudcedit

2. Dr. Watson :

This an inbuilt windows repairing software !
** start>>Run
** Now, type drwtsn32

3. Media Player 5.1 :

Even if you upgrade your Media Player, you can still access your old player in case the new one fails !!!
** start>>Run
** Now, type mplay32

4. iExpress :

Used to create SetupsYou can create your own installers !
** start>>Run
** Now, type iexpress

How to find the IP address of the sender in Hotmail


When you receive an email, you receive more than just the message. The email comes with headers that carry important information that can tell where the email was sent from and possibly who sent it. For that, you would need to find the IP address of the sender. The tutorial below can help you find the IP address of the sender. Note that this will not work if the sender uses anonymous proxy servers.
Finding IP address in Hotmail
1. Log into your Hotmail account with your username and password.
2. Click on the Mail tab on the top.
3. Open the mail.
4. If you do not see the headers above the mail message, your headers are not displayed. To display the headers,
* Click on Options on the top-right corner
* In the Mail Options page, click on Mail Display Settings
* In Message Headers, make sure Advanced option is checked
* Click on Ok button
* Go back to the mails and open that mail.

5. If you find a header with X-Originating-IP: followed by an IP address, that is the sender's IP addressHotmail headers : name ,In this case the IP address of the sender is [68.34.60.59]. Jump to step 9.
6. If you find a header with Received: from followed by a Gmail proxy like thisHotmail headers : nameLook for Received: from followed by IP address within square brackets[].In this case, the IP address of the sender is [69.140.7.58]. Jump to step 9.
7. Or else if you have headers like thisHotmail headers : nameLook for Received: from followed by IP address within square brackets[].In this case, the IP address of the sender is [61.83.145.129] (Spam mail). Jump to step 9.
8. * If you have multiple Received: from headers, eliminate the ones that have proxy.anyknownserver.com.
9. Track the IP address of the sender

How to find the IP address of the sender in Gmail


How to find the IP address of the sender in Gmail
When you receive an email, you receive more than just the message. The email comes with headers that carry important information that can tell where the email was sent from and possibly who sent it. For that, you would need to find the IP address of the sender. The tutorial below can help you find the IP address of the sender. Note that this will not work if the sender uses anonymous proxy servers.

Finding IP address in Gmail:

1.Log into your Gmail account with your username and password.

2. Open the mail.

3. To display the headers,* Click on More options corresponding to that thread. You should get a bunch of links.* Click on Show original.

4. You should get headers like this:Gmail headers : nameLook for Received: from followed by a few hostnames and an IP address between square brackets. In this case, it is65.119.112.245.That is be the IP address of the sender!

5. Track the IP address of the sender.

Recover the lost administrators password in Windows XP


Slightly more work needed if you lose or forget the Windows XP administrator password.

1.First reboot Windows XP in safe mode by re-starting the computer and pressing F8 repeated as the computer starts up.

2.Then (in safe mode) click Start and then click Run. In the open box type "control userpasswords2" without the quotes - I have just used quotes to differentiate what you have to type.

3.You will now have access to all the user accounts, including the administrators account and will be able to reset the lost password.

4.Just click the administrators user account, and then click Reset Password.

5.You will need to add a new password in the New password and the Confirm new password boxes, and confirm by clicking OK.


All done, you have recovered the lost adminitrators password!

Just what is Dropbox?


Virtual Storage with Dropbox
For those of you who don't know, Dropbox is a simple online virtual storage utility that allows you to make your files accessible from almost anywhere. Designed for those who are tired of e-mailing files to themselves and carrying around flash drives, Dropbox looks to revolutionize the way you store and share files.

Here's how it works. After installation and connecting to the server, the Dropbox interface is just like any folder on your computer. You simply drag and drop to move files around and any files or folders that are uploaded to Dropbox will immediately be synchronized within your account. In addition Dropbox also keeps track of every single change made to the contents of your storage and any changes are instantly updated to all computers linked to the account.

What happens if I'm not on any of my computers? Absolutely no need to worry. Just get on the Dropbox web interface and you will be able to access your files from anywhere in the world. The Dropbox web interface also remembers all the changes you make to your files and allows you to restore to any previous versions of the file. You can even un-delete files that you may have accidentally erased.

Where Dropbox really shines is the way it allows you to share whatever you want with other people. Every individual folder can be shared with other people and every member of a shared folder will be able to add, edit, and delete the contents inside but will not be able to access anything outside of that specific folder. This file sharing system is perfect for team projects involving music or video editing, computer and system repairs, or for anything which needs collaboration among its members. There is also a public folder that allows you to share files with non-Dropbox users through the use of a hyperlink.

If you are looking for an easy and reliable way to share files amongst friends, family, and coworkers then take a look at what Dropbox has to offer. Dropbox is free for Windows, Mac, and Linux and you can have share 2 GB of your files for free or upgrade to Dropbox Pro for 50GB of storage.

EVGA's W555 Motherboard


EVGACES was a huge event when it happened a few of weeks ago. There was some pretty big surprises and some huge new technologies unveiled that everybody was talking about. But what people are talking about now are some of the things that flew under the radar at the show, products like the new W555 Motherboard from EVGA.

The W555 is basically like your typical dual-processor LGA1366 motherboard except this baby was designed to be overclocked. Now judging by the images already seen the W555 isn't small. There are no exact dimensions that have been officially released yet but EVGA has confirmed that the W555 is larger than either the E-ATX or SSI standards.

But why is it so big you might ask? Well maybe because this thing is packed full of stuff. The W555 can hold two overclocked processors and a dozen DDR3 DIMM slots. On top of that there is also room for 7 PCI expansion slots. At first glance, people may think that they will be able to toss in two core i7 processors and start overclocking. Core i&s only have a single QPI link so in order to run a pair of processors in SMP you will need two Xeon W5000-series CPUs which each have two QPI links.

This board is already getting people excited with the possibility of being able to overclock a pair of 8-thread CPUs. Adding to that, you should be able to install a pair of Xenon-branded 12-thread Gulftown cored CPUs, set to be released later this year, for a whopping total of 24 threads from a single box. Each of the CPUs socket is provided with its very own bank of 6DIMM sockets.

Overall this thing looks insane. With all the overclocking possibilities and the theoretical possibility of running 7 GPUs in this thing is enough to make all you computer geeks out there slipping in a puddle of your own drool. Add that to the possible 24-thread count from a single box and you have a match made in geek heaven. No word on a release date or price has been revealed but we will keep you updated as more information rolls in. 

Remove Thumb.db file


Thumb.db is is a cache of the current picture in that directory.to remove it go for following
step1 > open "WINDOWS EXPLORER".
2>go to "TOOLS".
3>open "FOLDER OPTIONS".
4>go to "VIEW".
5>see 1st section "FILES & FOLDERS".
6>click on the "DO NOT CACHE THUMBNAILS".
now the thumbnail file will be removed from ur computer once u do this the file will be never created.

Mozilla Finally Succumbs to H.264 Support


H.264Mozilla just announced that it is about to begin supporting the H.264 video codec, a move the company has said goes against its better judgment. Mozilla suggested that it had been forced into this decision, which is patent laden, and also assured users and developers that it would continue to offer its software free of charge as it currently does.
According to a blog post by Mitchell Baker, Chair of the Mozilla Foundation, "Mozilla is on the cusp of changing our policy about our use of video codecs and making use of a format known as 'H.264'. We have tried to avoid this for a number of years, as H.264 is encumbered by patents. The state of video on the web today and in mobile devices in particular is pushing us to change our policy."
Baker also added that Mozilla resisted the move to H.264 support because it wants to build products that people "love". He also added that using standards that are laden with patents is not supportive of this goal. "We've declined to adopt a technology that improves user experience in the hopes this will bring greater user sovereignty. Not many would try this strategy, but we did. It's time to shift our weighting. It's time to focus on shipping products people can love now, and to work on developing a new tactic for bringing unencumbered technology to the world of audio and video codecs."
Mozilla CTO Brendan Eich posted an additional blog post covering Mozilla's decision in greater depth and also suggests that Mozilla could have avoided this transition altogether if it had support from firms like Google and Adobe. In case you missed it, both Adobe and Google started talks about supporting more open standards recently. Unfortunately both Google and Adobe had to drop those ideas due to the commonplace of H.264.
According to Eich, "Some say we should hold out longer for someone (Google? Adobe?) to change something to advance WebM over H.264. Others say we should hold out indefinitely and by ourselves, rather than integrate OS decoders for encumbered video. What I do know for certain is this: H.264 is absolutely required right now to compete on mobile. I do not believe that we can reject H.264 content in Firefox or Android or or in B2G and survive the shift to mobile. Losing a battle is a bitter experience. I won't sugar-coat this pill.... Failure on mobile is too likely to consign Mozilla to decline and irrelevance."
Source: The Inquirer - Mozilla grudgingly adopts H.264Mitchell's Blog - Video, user experience and our missionMozilla Hacks - Video, Mobile, and the Open WebEngadget - Mozilla caves, will support H.264 to avoid 'irrelevance'

All (Ctrl+Alt+Del) Permanently deleted files Recovery solution

Sometimes we delete the files permanently, and realize that deleting them is like a Blunder...

For all those folks,
Here is the solution

Software called "Kissass Undelete" , can bring those files from the hard disk or your flash drive.
Conditions : Only if the data on that drive is not re-occupied(or written). that means the space which was available after the deletion is not been occupied after the deletion.

Click Here to download the .

1)
To start searching for the files,
Select the drive from the Left panel of the Windows and Click the scan button.
the Scan might take upto 10 secs.

2)
When the files search has been completed, it will show you the results with the name, typ, size and the last modified date of the searched file.

3) Now you can select the file to be recover. This is an Open source application and available for All Windows OS(Windows XP/Vista/ 7).

Sunday, May 13, 2012

What are the Different ways to Shutdown PC & Shutdown XP Faster??

Different ways to shutdown your pc

There are so many different ways to turn off your Windows XP computer, let's look at some of them:


1. The standard approach - click the Start Button with your mouse, then select the Turn Off menu and finally click the Turn Off icon on the Turn Off computer dialog. blink.gif

2. Press Ctrl+Esc key or the Win key and press u two times - the fastest approach.

3. Get the Shutdown utility from Download.com - it add the shut down shortcuts for you. Else create them yourself using approach 4.

4. Create a shutdown shortcut on your desktop. Right click on the desktop, choose New Shortcut and type shutdown -s -t 00 in the area where you are asked to specify the location of the program file. Now you can just double click this icon to turn off the computer. The best location would be your quick launch bar.

5. Press the Win key + R key to open the run window. Type shutdown -s -t 00. [s means shutdown while t means the duration after which you want to initiate the shutdown process].

If some open processes or application won't let you turn off, append a -f switch to force a shut down by closing all active processes.


6. Win+M to minimize all windows and then Alt+F4 to bring the Turn Off computer dialog.

7. Open Windows Task manager (by right clicking the Windows Task bar or Alt+Ctrl+Del) and choose Shut down from the menu. Useful when the Windows are not responding.

8. open task manager--->click on shutdown--->hold the ctrl key and click on Turn off::::::: pc will be turned off in 3 secs.. fastest method other than hard shutdown


Shutdown XP Faster..!!
Like previous versions of windows, it takes long time to restart or shutdown windows XP when the "Exit Windows" sound is enabled. To solve this problem you must disable this useless sound.

1. Click Start button.
2. Go to settings > Control Panel > Sound, Speech and Audio devices > Sounds and Audio Devices > Sounds.
3. Then under program events and windows menu click on "Exit Windows" sub-menu and highlight it. Now from sounds you can select, choose "none" and then click Apply and OK.
4. Now you should see some improvements when shutting down your system.

Solution if Email is overload? Try Priority Inbox - Official Gmail Blog


New update by Gmail Email overload? Try Priority Inbox - Official Gmail Blog.

It is normally seen that your mailbox is full of unwanted mails and you are not able to check all the mails then how to identify which mail is important & which are not? So Here is the solution now...

Gmail introduced new feature called Priority inbox.

Through this feature you can easily identify important mails which you should read.
It is basically based on the mails which you normally read & reply.

And If you want to use those mails then you can mark with star and choose option of less important or more important..

Just watch the video , you will understand everything.
Gmail rocks...

How to watch movies in MS Paint?


> Open your favorite movie palyer and play the move

> Hit "PrintScreen", keep playing the movie in the player, dont stop it.

> Open MsPaint.

> Select "Edit>Paste" Or Hit "CTRL+V"

> Now You can watch movies in Paint!

> But there are no Pause, Next, Previous, Stop etc. buttons

> Experiment with other formats too, it doesn't play DivX , Flash movies, etc.

How to search with your voice in Android?


How to search with your voice in Android?

Android is a amazing platform with unlimited features. But to exploit its opportunities the user need to understand its possibilities.

Google’s search app allows you to search the web or your phone just by talking. Tap the microphone next to the search bar and record your search. It’s awesome and incredibly accurate.

How to change anyone password in xp without knowing it?- Tips and Tricks


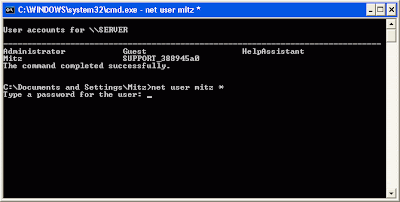
If you log in to admin account and want to change password of admin or user then do the following steps

1. click start then run type cmd in it and hit enter command prompt opens

2. type net user it will show you user present in xp

3. type net user desired username new password and press enter all done 

Make Xp genuine


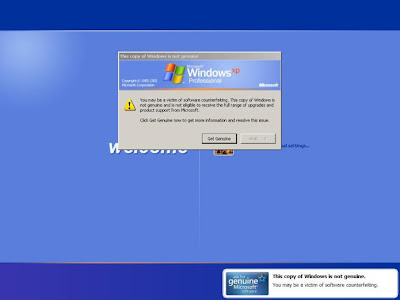
MaKe Xp GeNuIne in 1 SeCond!


JUST COPY THE FOLLOWING CODE IN A NOTEPAD AND SAVE IT AS"GENUINE.REG"AND RUN THAT REG FILE!


Windows Registry Editor Version 5.00


[HKEY_LOCAL_MACHINE\SOFTWARE\Microsoft\Windows NT\CurrentVersion\WPAEvents]
"OOBETimer"=hex:ff,d5,71,d6,8b,6a,8d,6f,d5,33,93,fd
"LastWPAEventLogged"=hex:d5,07,05,00,06,00,07,00,0f,00,38,00,24,00,fd,02


[HKEY_LOCAL_MACHINE\SOFTWARE\Microsoft\Windows NT\CurrentVersion]
"CurrentBuild"="1.511.1 () (Obsolete data - do not use)"
"InstallDate"=dword:427cdd95
"ProductId"="69831-640-1780577-45389"
"DigitalProductId"=hex:a4,00,00,00,03,00,00,00,36,39,38,33,31,2d,36,34,30,2d,\
31,37,38,30,35,37,37,2d,34,35,33,38,39,00,5a,00,00,00,41,32,32,2d,30,30,30,\
30,31,00,00,00,00,00,00,00,00,0d,04,89,b2,15,1b,c4,ee,62,4f,e6,64,6f,01,00,\
00,00,00,00,27,ed,85,43,a2,20,01,00,00,00,00,00,00,00,00,00,00,00,00,00,00,\
00,00,00,00,00,00,00,00,00,00,00,31,34,35,30,34,00,00,00,00,00,00,00,ce,0e,\
00,00,12,42,15,a0,00,08,00,00,87,01,00,00,00,00,00,00,00,00,00,00,00,00,00,\
00,00,00,00,00,00,00,00,00,00,00,00,00,00,00,00,00,94,a2,b3,ac
"LicenseInfo"=hex:9e,bf,09,d0,3a,76,a5,27,bb,f2,da,88,58,ce,58,e9,05,6b,0b,82,\
c3,74,ab,42,0d,fb,ee,c3,ea,57,d0,9d,67,a5,3d,6e,42,0d,60,c0,1a,70,24,46,16,\
0a,0a,ce,0d,b8,27,4a,46,53,f3,17


Its All.

IT IS 100% TEATED AND WILL WORK SURE!
By making your XP genuine,u can now install softwares on ur pc
such as Windows Media Player 11 , Internet Explorer 7 , etc.


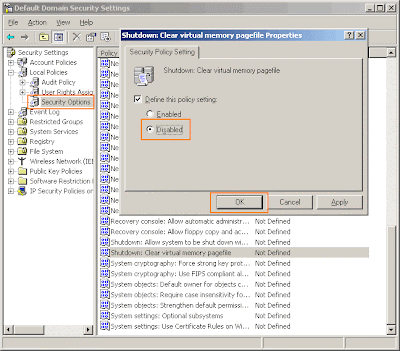
WinXP Clear Page file on shutdown

Go to Control panel Administrative tools, local security policy.
then goto local policies ---> security options.

Then change the option for "Shutdown: Clear Virtual Memory Pagefile"

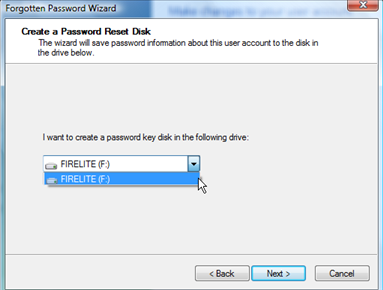
Create a Password Reset Disk


If you’re running Windows XP Professional as a local user in a workgroup environment, you can create a password reset disk to log onto your computer when you forget your password. To create the disk:

1.Click Start, click Control Panel, and then click User Accounts.

2.Click your account name.

3.Under Related Tasks, click Prevent a forgotten password.

4.Follow the directions in the Forgotten Password Wizard to create a password reset disk.(u can use pen drive also)

5.Store the disk in a secure location, because anyone using it can access your local user account.

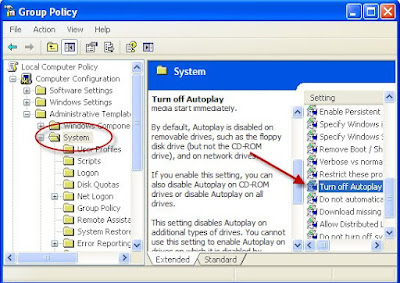
Disable CD Autorun

( WinXP PRO Only)

1) Click Start, Run and enter GPEDIT.MSC

2) Go to Computer Configuration, Administrative Templates, System.

3) Locate the entry for Turn autoplay off and modify it as you desire.

Right position to work on the Computer? - with images

For everyone who works daily on a computer. The mistakes daily mouse and keyboard usage will result in Carpal Tunnel Syndrome! Use the mouse and keyboard correctly. 
View below for the RIGHT TECHNIQUES.. ....

Correct way to work on the Computer


Correct way to work on Keyboard


Correct way to work on Mouse

Hand Exercises for Carpal Tunnel Syndrome


IPhone 4 Vs Samsung Galaxy S2. Which one is the Best?


Galaxy S2iPhone 4
Form Factor125.3 x 66.1 x 8.49mm, 117g115.2 x 58.7 x 9.3mm, 137g
Screen4:27-inch, 800x480px, Super Plus AMOLED3.5-inch, 960x640px, LCD with IPS
Processors1GHz dual-core, 1GB RAMApple A4, 512MB
Camera8MP rear, front 2MP, 1080p video capture5MP rear, front VGA, 720p video capture
Storage16/32GB + microSD16/32GB
Battery1650mAh1420mAh, Up to 10 hours video
ConnectivityWi-Fi, NFC, 4G, BT 3.0, DLNA, Wi-Fi tetheringWi-Fi, BT 2.1, 3G
OSAndroid 2.3 GingerbreadIOS 4.2


SAMSUNG GALAXY S2 VS IPHONE 4: SIZE AND WEIGHT

The Galaxy S2 measures 125.3 x 66.1 x 8.49mm and weighs in at 117g, while the iPhone 4 measures 115.2 x 58.7 x 9.3mm and weighs in at 137g. Samsung claims the Galaxy S2 would be the world’s thinnest smartphone at just 8.49mm and the feather light 117g as well. But, the iPhone 4 is a bit better than the Galaxy S2 in width and height.

Display
The Galaxy S2 has a 4.27-inch Super AMOLED Plus display with 800×480 pixels, while the iPhone 4 sports a 3.5-inch Retina display with 960×640 pixels. We see that it’s true the Super AMOLED Plus is one step better than the older Super AMOLED, but when people take a look at the pixels size only, the iPhone 4 is still the better one. The Galaxy S2′s display would still steal your heart with its large screen, anyway. Moreover, the new display of the Galaxy S2 offers a better contrast, better outdoor visibility and lower power consumption than iPhone 4.

Processor
The Samsung Galaxy S2 uses dual core 1.2 GHz ARM Cortex A9 Processor with Samsung Orion Chipset and 1 GB RAM, and the iPhone 4 comes with Apple A4 and 512MB RAM. This is what the Galaxy S2 wins over the iPhone 4, even though there’s no clear proof to show what’s going on graphically with the double RAM. For sure, the CPU built within the phone is a super fast processor that is able to run multitasking.

Camera
The Galaxy S2 has an 8-megapixel rear camera and 2-megapixel front-facing camera, along with the 1080p video capture. The iPhone 4 is a bit lower at this point, offering a 5-megapixel rear camera and a VGA front-facing camera, with 720p video capture. Do you still need another bullet to hit the iPhone 4? It’s all obvious that there’s an unbalance battle here. And, that’s not enough! The Galaxy S 2 also includes plenty of great technology such as Smile Shot, Beauty Shot, Panorama Shot, Action Shot and Cartoon Short too.

Storage
There’s 16/32GB storage offered by the Galaxy S2, and its sports a microSD too, while the iPhone 4 only comes with 16/32GB storage without microSD. The microSD you can get on the Galaxy S2 can be mentioned as a big plus to hit the iPhone 4. Effectively, you can store twice as much on it, and thus all your 1080p videos and 8-MP camera would fix it best.

Connectivity
The Galaxy S2 offers WiFi, NFC, 4G, Bluetooth 3.0, DLNA, WiFi tethering, and new HDMI technology, while the iPhone 4 only gives users WiFi, Bluetooth 2.1 and 3G network. Again, this is what to beat the iPhone 4. The 4G network, Bluetooth 3.0 and NFC technology are the form of the latest connectivity features should be installed to a new top smartphone.

Battery Life
The Galaxy S2 uses 1650 mAh battery type, and the iPhone 4 has 1420 mAh battery with 10 hours of video watching. The Galaxy S2′s battery is definitely bigger than that the iPhone 4, and it sounds natural because the dual core CPU would use lots of energy, while the large screen do the same.

Software
The Galaxy S2 runs Android 2.3 Gingerbread, while the iPhone 4 uses iOS 4.2. You can customize the Android OS, and you can’t do it with the iOS. You can get full Flash-enabled web browsing on Android, and the iPhone 4 shows the edge when it comes to applications. In short, the iPhone 4 is still the better one while both offer multitasking. The Game Center on iOS even gives special advantage compared to what Google has to date.

Price
The iPhone 4 is still the most expensive phone, more than anyone else, while the Galaxy S2 offers a lesser price tag than the iPhone 4. Of course, it is the biggest advantage people would find on the Galaxy S2. With those incredible features and facilities, the Galaxy S2 would find its own easy to win the market’s heart then.

SAMSUNG GALAXY S2 VS IPHONE 4: CONCLUSION

Is there still anything to say? Are there still more words to comment? The Galaxy S2 is an absolute king of the smartphone of today’s market. It is a really impressive to proud of, let alone the capabilities of the phone even beat the iPhone 4 mercilessly.

What are the things need to do before selling your iPad? - 4 simple things


So, eager to trade up for the new iPad? Well, the good news is that you can still get a decent chunk of change for your old one, provided you’ve kept it in relatively good shape. Here’s a couple ways to get a few extra pennies for last year’s iPad, plus some tips for keeping your iPad data safe and secure.

1. Back it up, using either iTunes or iCloud backup

Don’t even think of giving away your iPad without first making a backup copy of its settings and data.

Backing up your iPad is as simple as syncing it with iTunes—and indeed, each time you sync your iPad, iTunes makes a backup complete with all your settings, application data, your iMessages, and any snapshots or video clips in your Camera Roll.

You can also back up your iPad using Apple’s iCloud service, which automatically (and wirelessly) backs up your iPad settings and data to Apple’s remote iCloud servers. 

Make sure you have a recent iPad backup—either in iTunes or iCloud—before wiping your iPad's memory.

Once you get a new iPad (assuming that’s the plan, of course), you’ll be able to restore the backup of your old iPad from either iTunes or iCloud; just follow the prompts as you’re setting up your new tablet. 

One thing to keep in mind is that an iPad backup file on iTunes or iCloud doesn’t include music, movies, TV shows, music videos, or your actual iPad applications. Instead, you’ll have tore-download them from the iTunes store (your iPad should do this automatically during the backup restoration process).

And what about music and videos that you didn’t purchase from iTunes? Well, you’ll need to transfer them manually from wherever you’d originally synced them, or (for music only) via Apple’s new iTunes Match service.

2. Wipe it completely

Now that you’ve backed up your iPad, you’ll need to wipe its memory completely clean—that is, unless you like the idea of letting your iPad’s new owner poke through all your email, contacts, photos, and other personal information.

Here’s what you do:
  • First, make absolutely sure you’ve backed up your iPad. If you’re using iTunes for your backups, click Preferences from the iTunes menu, click the Devices tab in the window that appears, then make sure you see a recent backup of your iPad in the “Device backups” list. If you’re using iCloud, go to your iPad, tap Settings, iCloud, Storage & Backup, and check the date of your latest backup at the bottom of the screen. 
  • All set? Go back to the Settings menu on your iPad and tap General, Reset, then “Erase All Content and Settings.”
  • Within a few minutes (or more, depending on how much data is on your iPad), you should be looking at a gray screen that reads “iPad,” just as if you were switching it on for the first time. And with that, you’re done.
3. Find the original box, sync cable, and charger

No, you don’t need your original iPad box to sell your old iPad, but it’ll help sweeten the deal once you find a willing customer. More important, though, is the white syncing cable—the one with a USB plug on one end and Apple’s 10-pin connector on the other—and its accompanying charger, a pair of key accessories that sells for $30 through the Apple store.

4. Clean the screen, but not with Windex


Sure, go ahead and clean the iPad's screen—but no water, please!

The nice thing about the iPad’s aluminum shell and durable glass screen (well, relatively durable, anyway) is that they both shine up like a new penny. A gentle wipe with (as Apple recommends) a soft, dry cloth should do the trick.

Whatever you do, though, don’t use a damp cloth, nor should you ever spray your iPad’s screen with glass cleaner. The iPad is deathly allergic to all things liquid, and water damage isn’t covered by Apple’s standard one-year warranty. Just don’t do it.

What are the essential Facebook tips and tricks?


Don’t like getting tagged in someone else’s Facebook photo? Had it up to here with the ticker? Want to change the privacy settings for all your old posts in one fell swoop? Read on for 10 tips that’ll make life on Facebook easier—and more private.

How to make your Facebook news feed default to “most recent” stories first?
Tired of seeing “highlighted” stories at the top of your Facebook news feed? Here’s a browser bookmark that’ll keep your Facebook feed in chronological order.


You can limit who sees the posts from "Open Graph" Facebook apps right before you install the app onto your account.

How to keep Facebook’s new “Open Graph” apps from (over-)sharing your activity?
Want to keep your reading, listening, and streaming habits to yourself? Here’s how to stop Facebook’s new, oversharing Open Graph apps from spilling the beans.

How to restrict access to all your old Facebook profile posts?
You can lock down access to all your wall posts in just a few clicks—but once you do it, there’s no easy way to undo it.

You can always bring the ticker come back, if you really miss it.

How to completely hide the Facebook ticker?
Some people love it, most seem to hate it, but there was no real way to completely hide the Facebook ticker—well, until now, anyway.

How to send a photo from your iPhone directly to Facebook?
Wish you could post a fresh snapshot from your iPhone onto your Facebook wall without having to open the Facebook app? Here’s how to do it.


If you haven't turned "Timeline Review" on yet, you should—pronto.


How to turn on Facebook’s “Timeline Review” feature?
Facebook’s improved privacy controls let you check any photo you’ve been tagged in before it pops up on your Timeline—but you’ll have to tweak your settings first.


How to “unfriend” a Facebook friend without really unfriending them?
Want to keep a marginal Facebook pal at arm’s length without actually hitting the unfriend button? Read on for a couple of ways to do it.


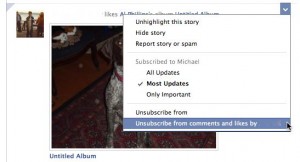
Just unsubscribe from a friend's comments and "likes" to keep random photos out of your news feed.

3 ways to declutter your Facebook news feed
Seeing too many links and photos in your Facebook news feed from perfect strangers? Read on for three ways to whip your bloated news feed into shape.

4 ways to keep Facebook comments private
Don’t like the idea that everyone (or seemingly everyone, anyway) on Facebook can see the comments you’ve left on your friends’ posts? You’re not alone.

How to control who can post stories to your Facebook Timeline—and who can’t?
Don’t want any and all of your Facebook friends marking up your Timeline—or sifting through Timeline stories posted by others, for that matter? No problem.